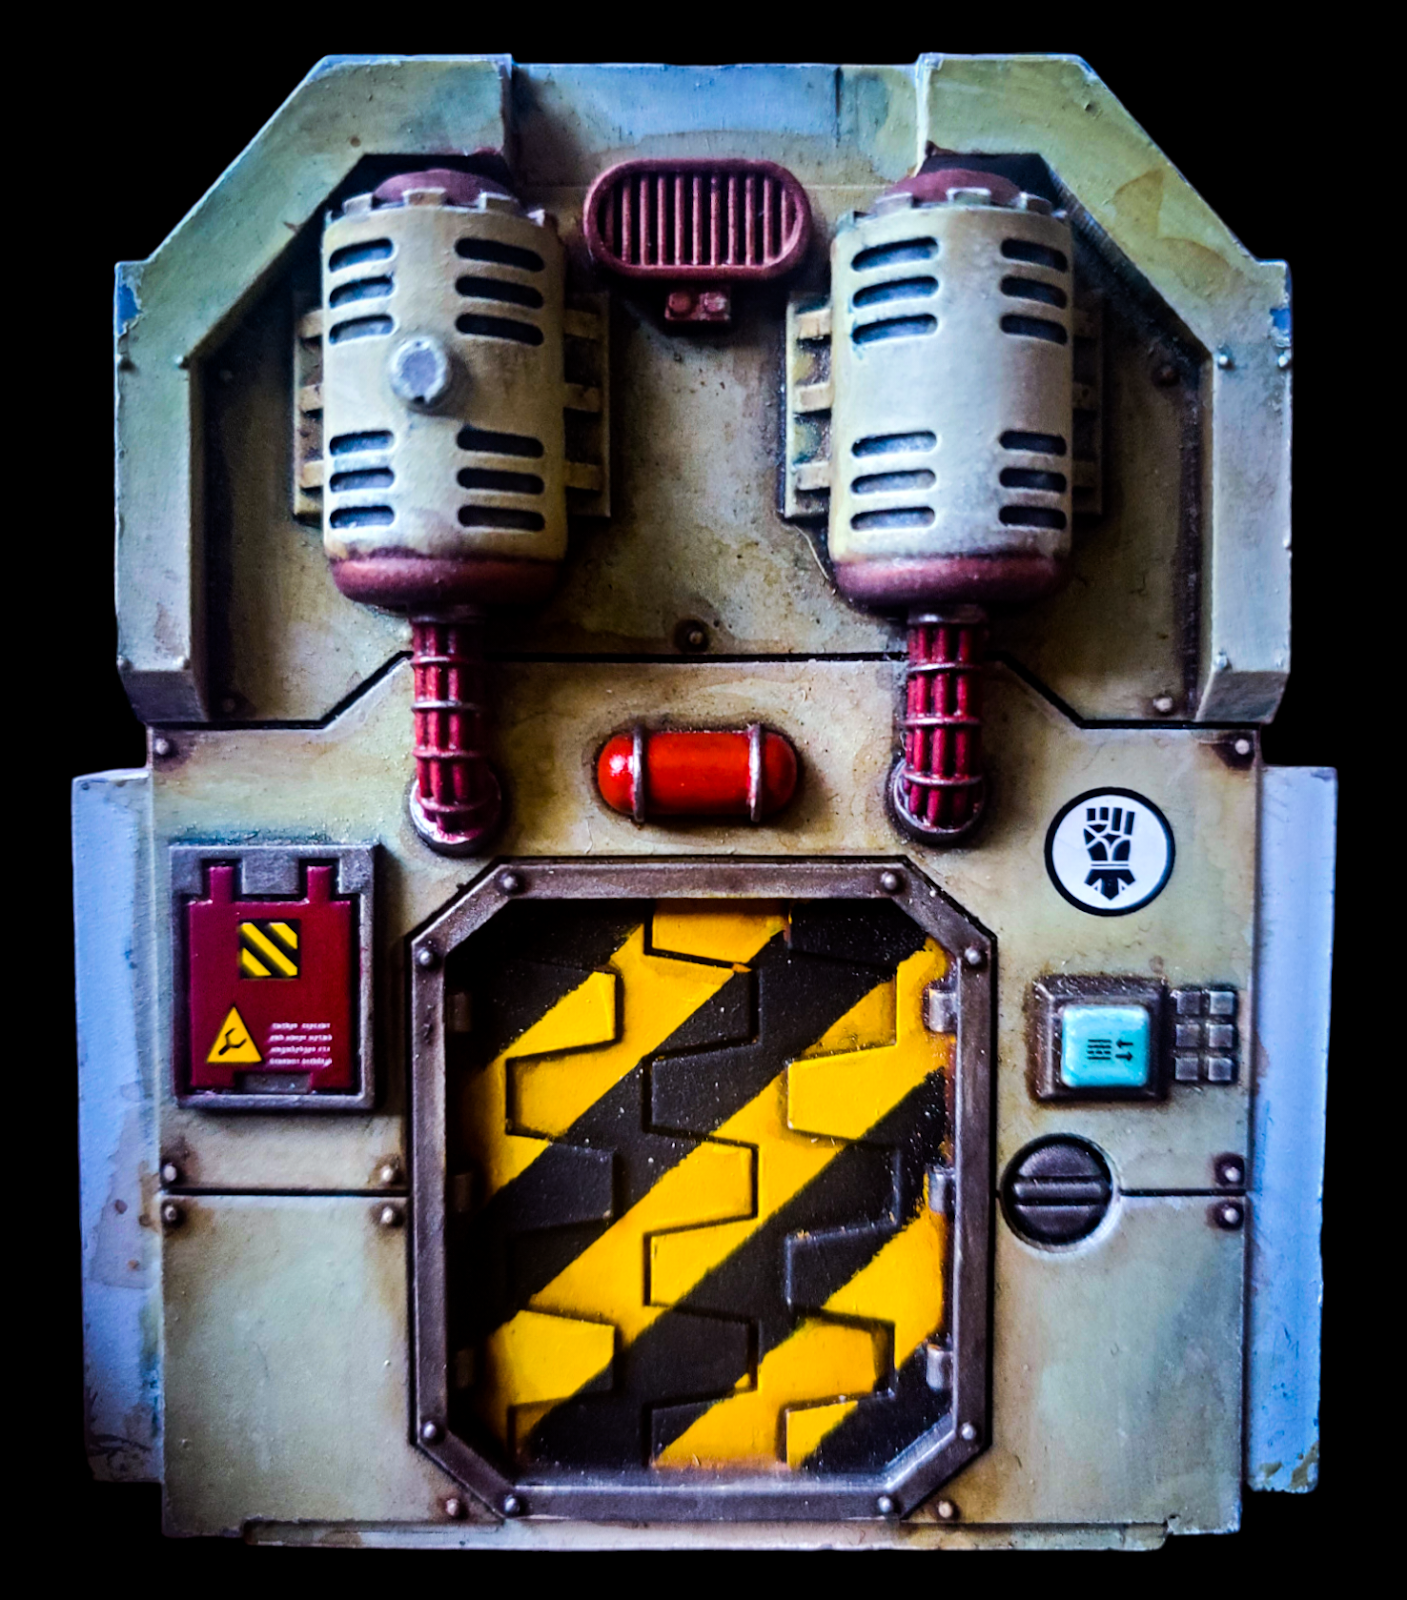
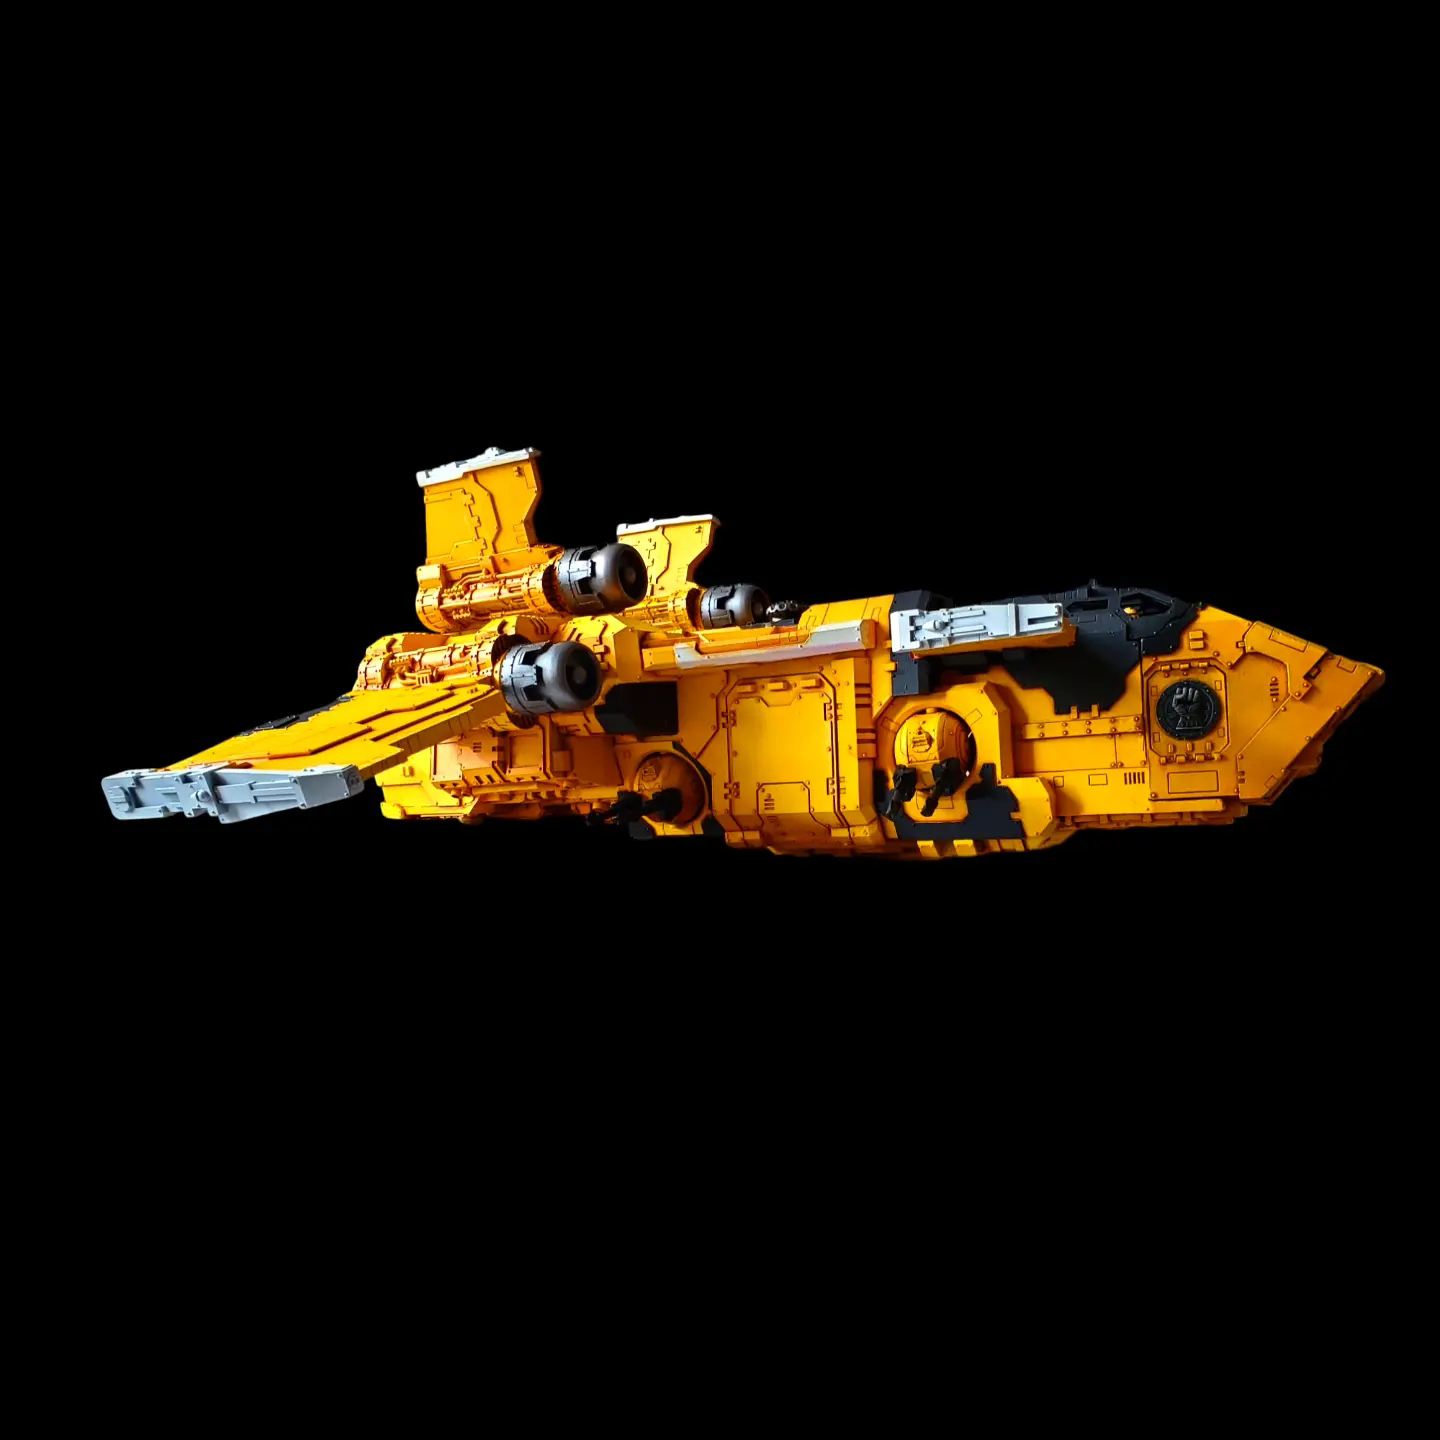
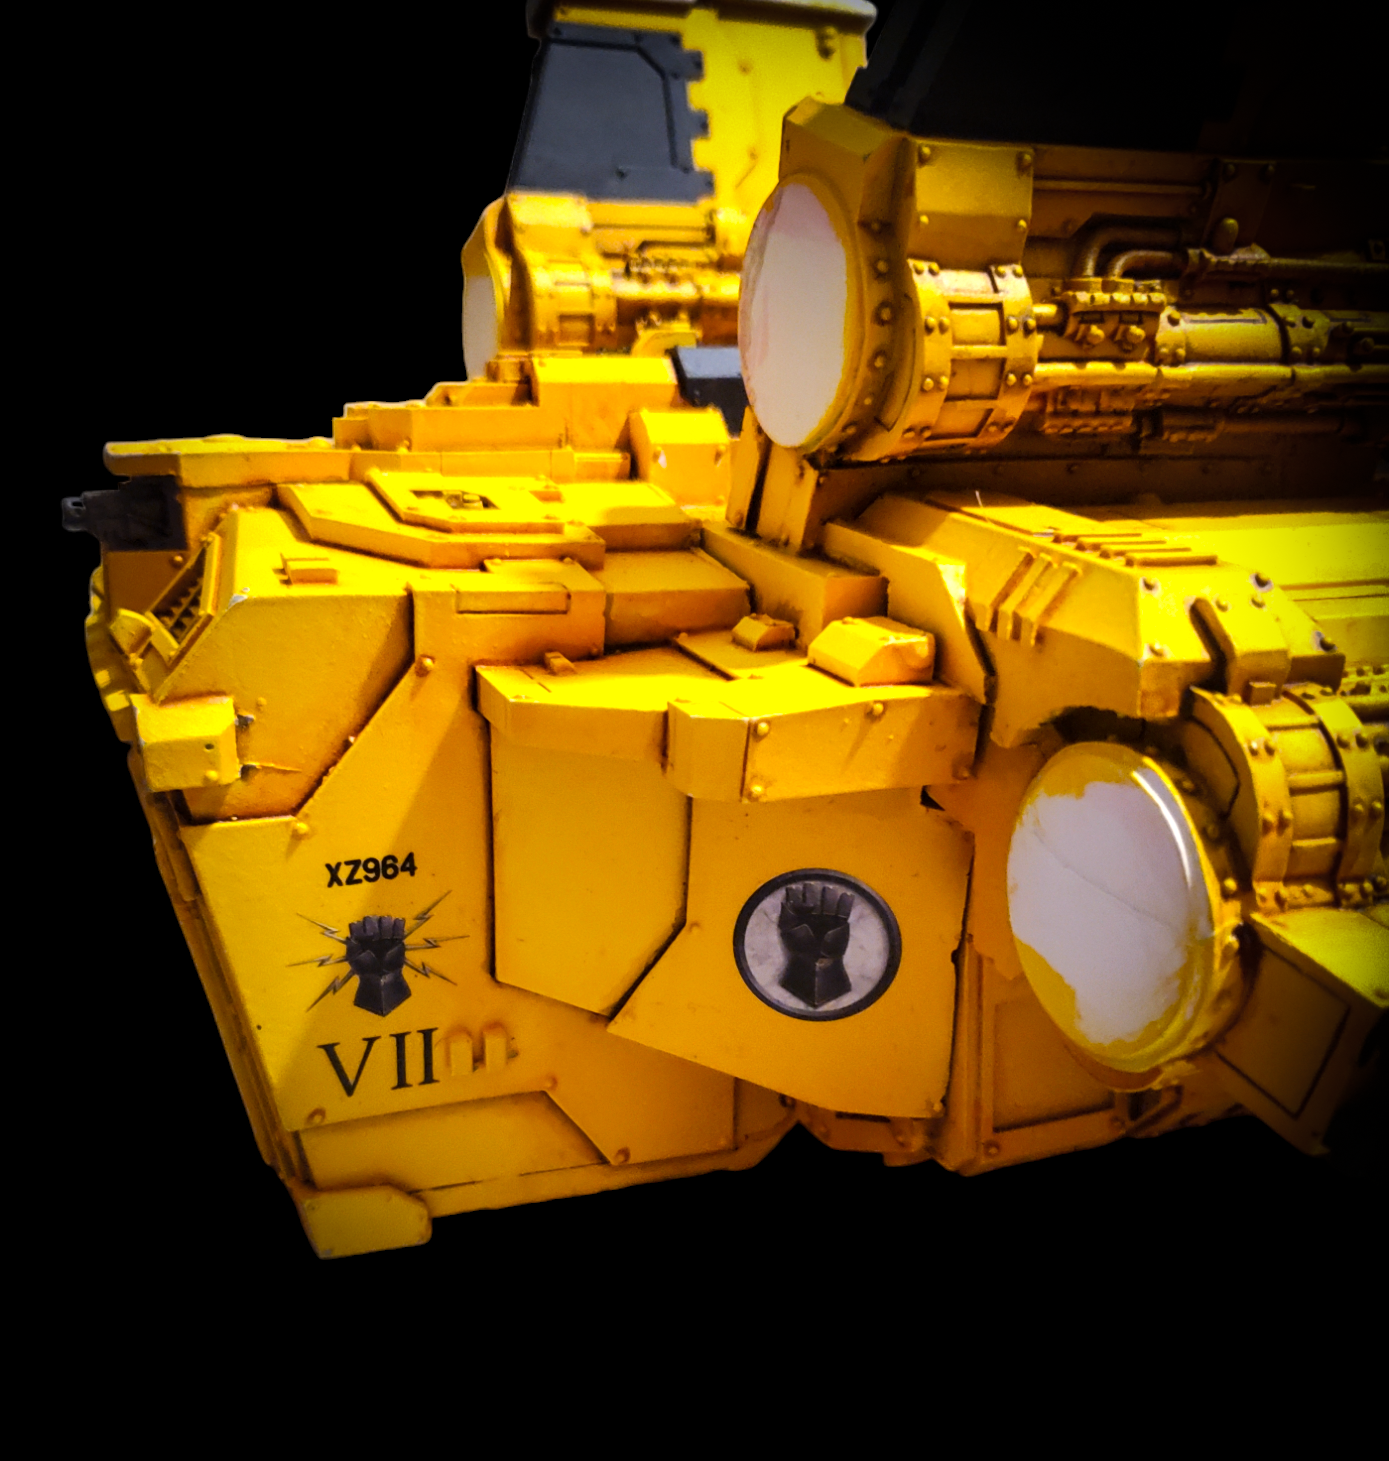
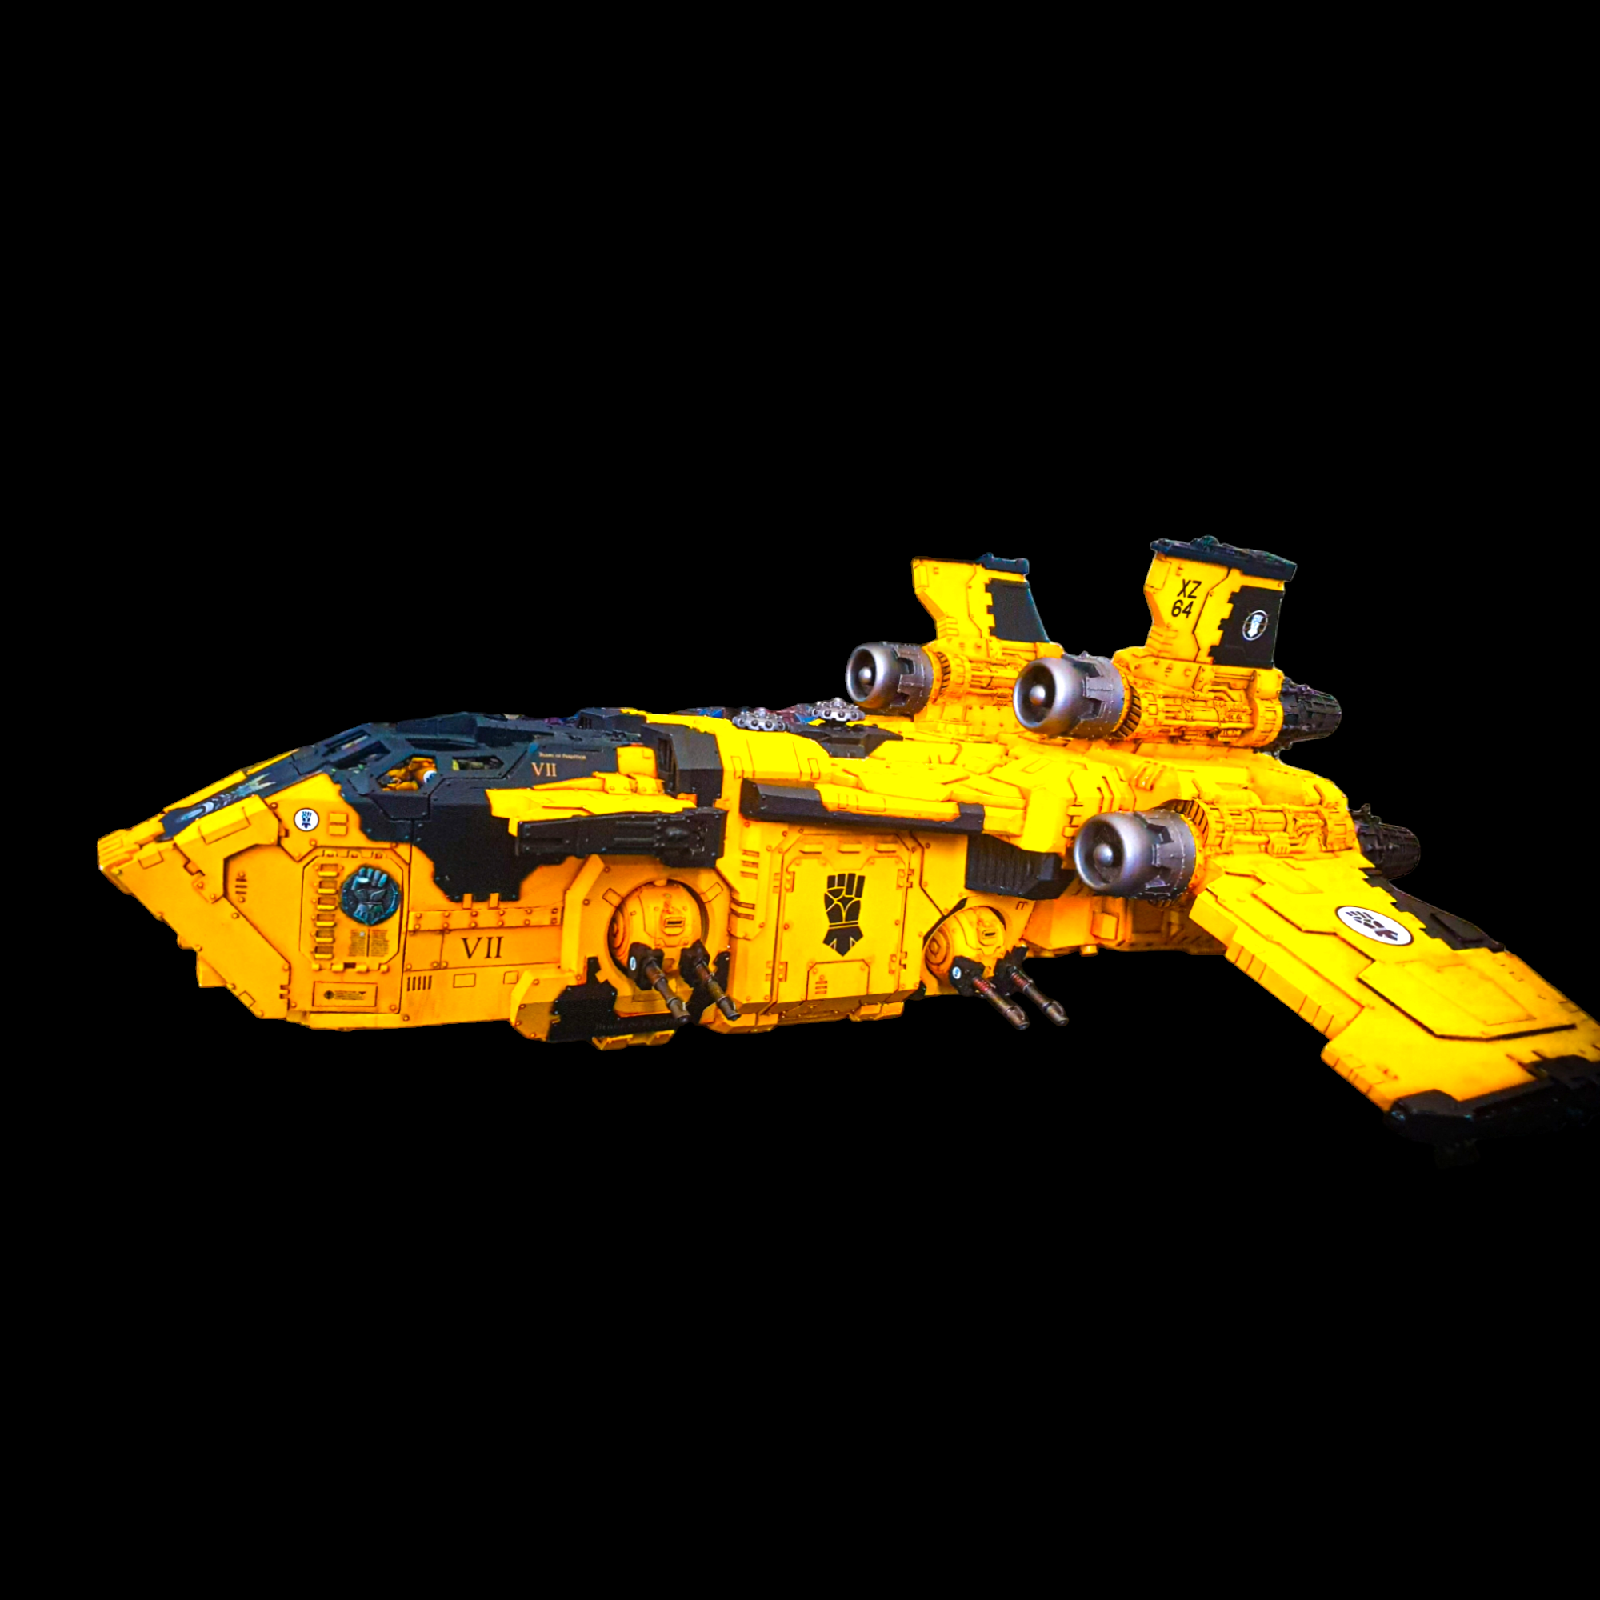
Sokar Pattern Stormbird XZ964 - Imperial Fists
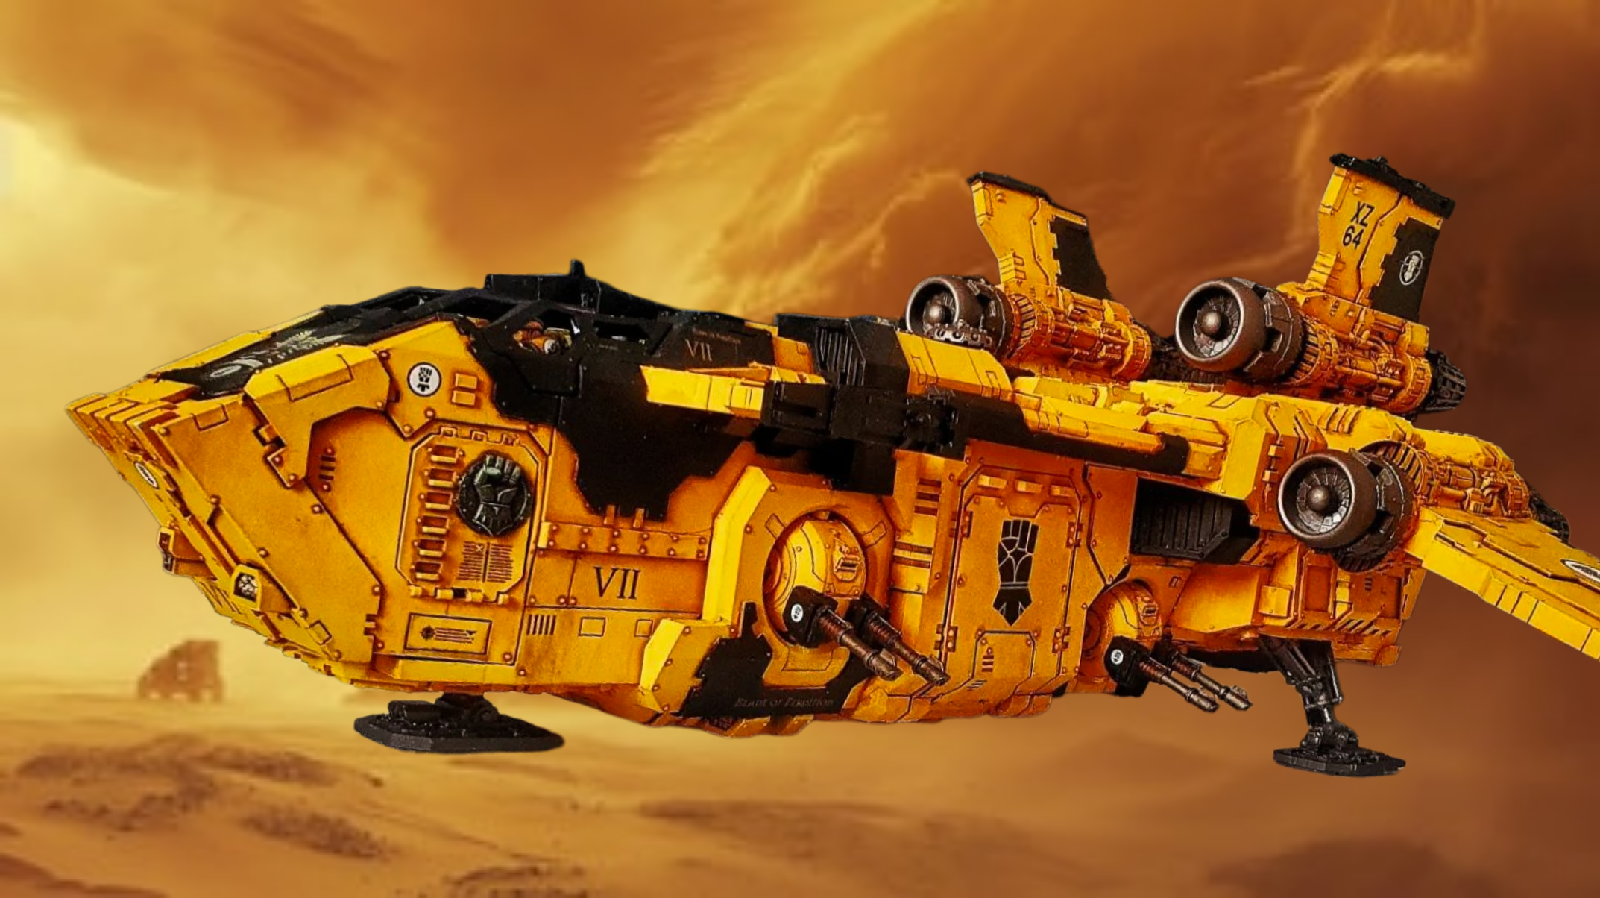


Sokar Pattern Stormbird 002
"Oath of Retribution"
From the Imperial Fists battle barge Blade of Perdition
Tail number XZ964
This has been on my bucketlist since the day I saw it back in 2016. I've always been a sucker for massive Warhammer "Miniatures" I thought I'd start to document this monster of a build here before I do too much and start to forget, so I'll update this blog as I go!

Unpainted Stormbird in the cabinets at Warhammer World
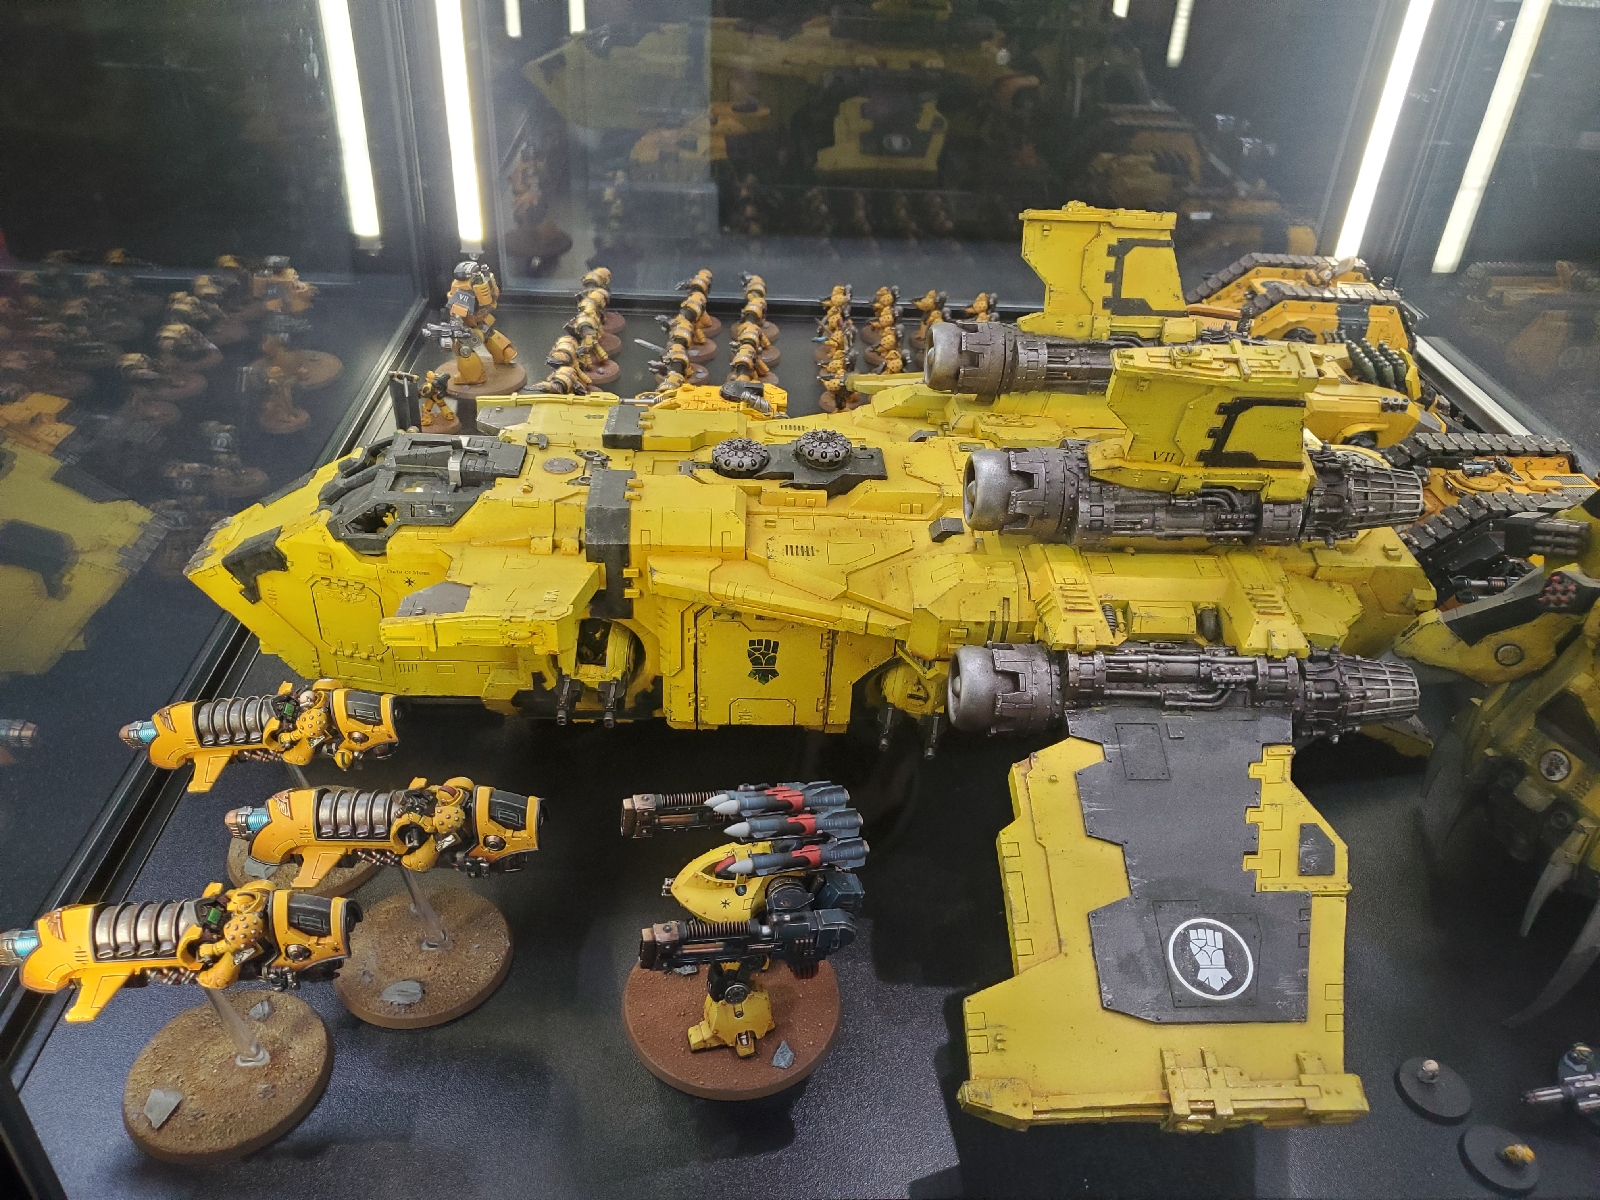
The Stormbird in the Exhibition hall. Although mine will also be Imperial Fists, I won't be copying this scheme but doing my own thing with it.


I wanted to give a honest review here of the model kit. I've researched the kit heavily online in the run up to pulling the trigger on it and already I disagree with a chunk of the information I've seen. I want to do a fair none biased review. I am in no way connected to GW in any form and I love that, because it means I can be totally honest when doing build/reviews

One of the first things that I disagree with other people on is the instructions that come with the kit. Released in 2016 it comes with the newer full colour highly detailed and step by step instructions. This is luxury compared to old Forge World!


I've seen reviews that say these instructions aren't good enough, but compared to the older models produced by Forge World, these instructions are a huge upgrade over the photocopied A4 sheets you used to get, basically loosly showing you the parts of the kit and then a photo of the completed model saying, yeah, build it just like we did that one. Yes, I do agree that it doesn't tell you where the glue contact area is etc but you're going to use common sense here aren't you, you're going to be dry fitting everything multiple times before glueing anything.
I think it really does depend on your experience with Forge World resin as to how much fun you will have assembling this monster of a model kit! If you have worked with a few resin models there's absolutely nothing here that will come as a big shock that I have found so far. No haha gotcha moments so far at least!


It all made the kit seem a lot more daunting and I initially approached my own build already in a very negative mindset before anything was even glued together. In my experience, the thiner the resin the more at risk it is to some slight warpage. Usually the big thicker parts don't warp in the same way but are just as susceptible to things like slippage. If you have worked with resin you know full well what to expect and what to look out for! So yeah, honestly some things will need a little heat to get them to meet up properly. A hair dryer so far had been enough to fix any problems and I've been really happy with the dry fitted results so far. I don't think you need to be a masterclass model making expert to use a hairdryer! I wanted to be honest here, and get out of the mindset of 'this is a bad kit' It's really not, at least not yet!!! It needs some careful thought and planning and a lot of dry fitting with heat where needed. As does any big resin model.

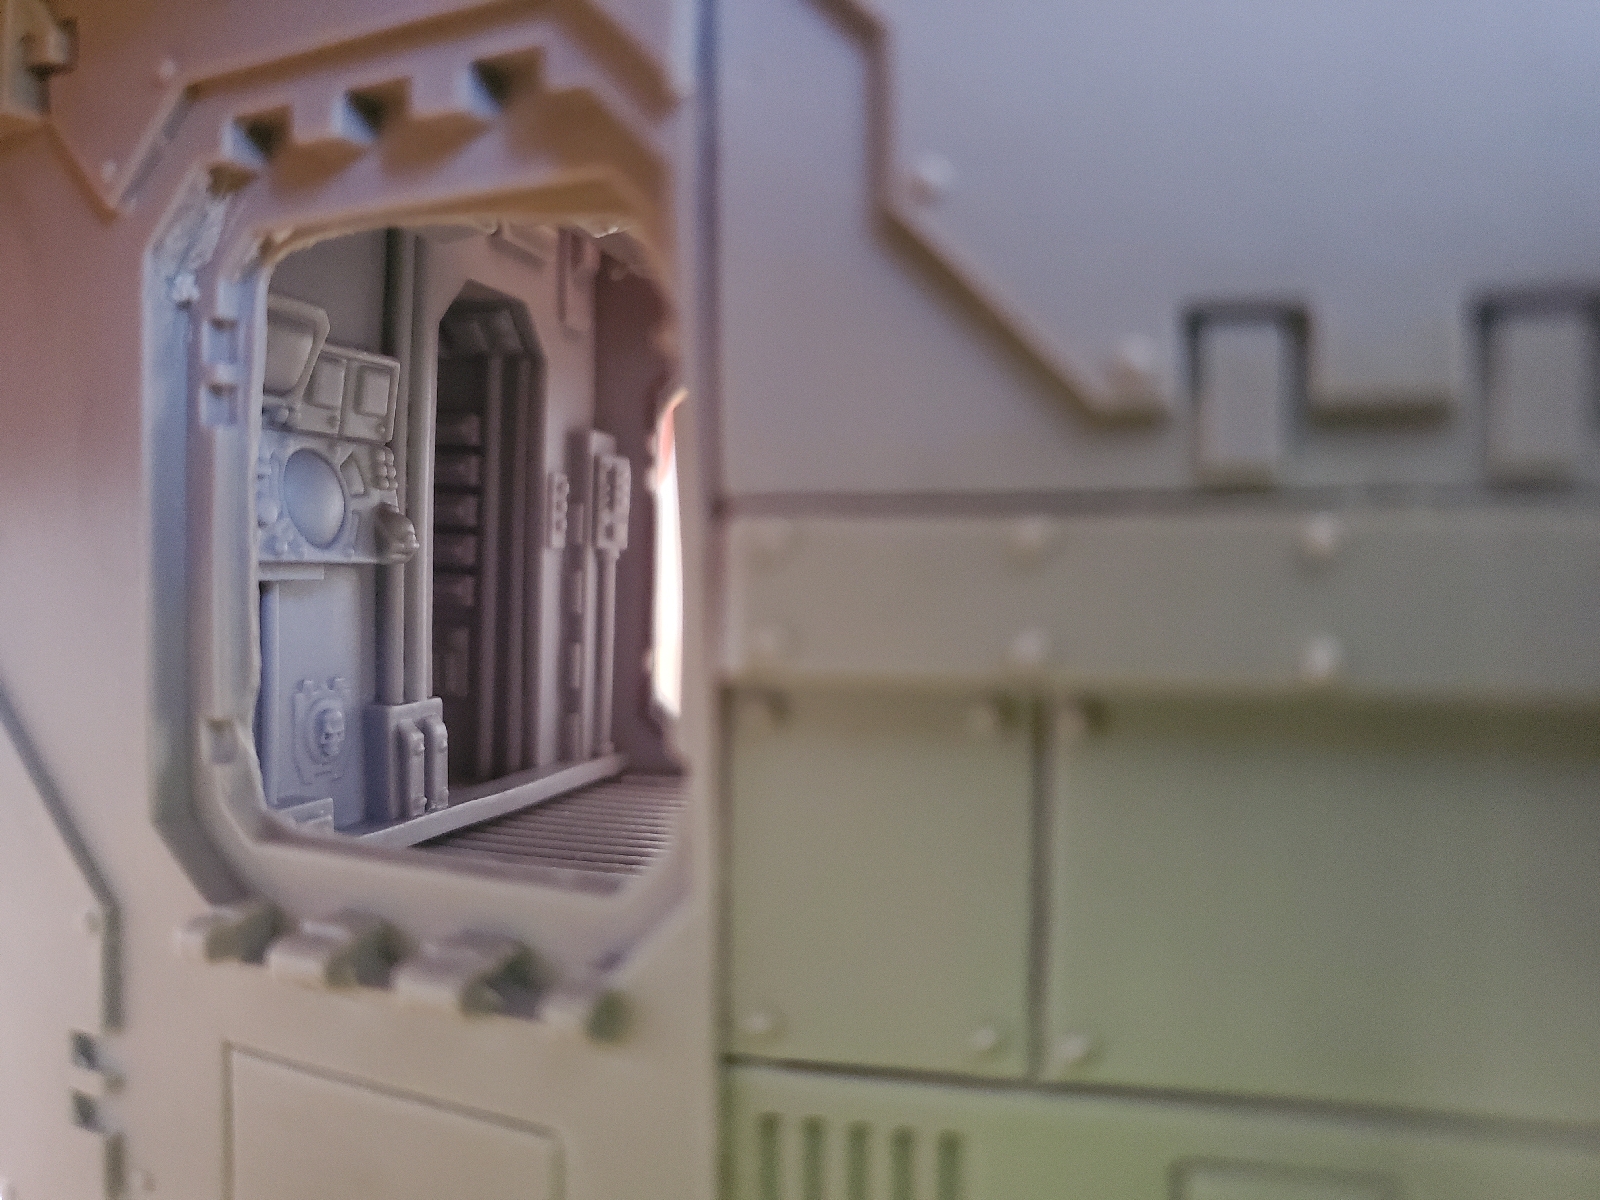
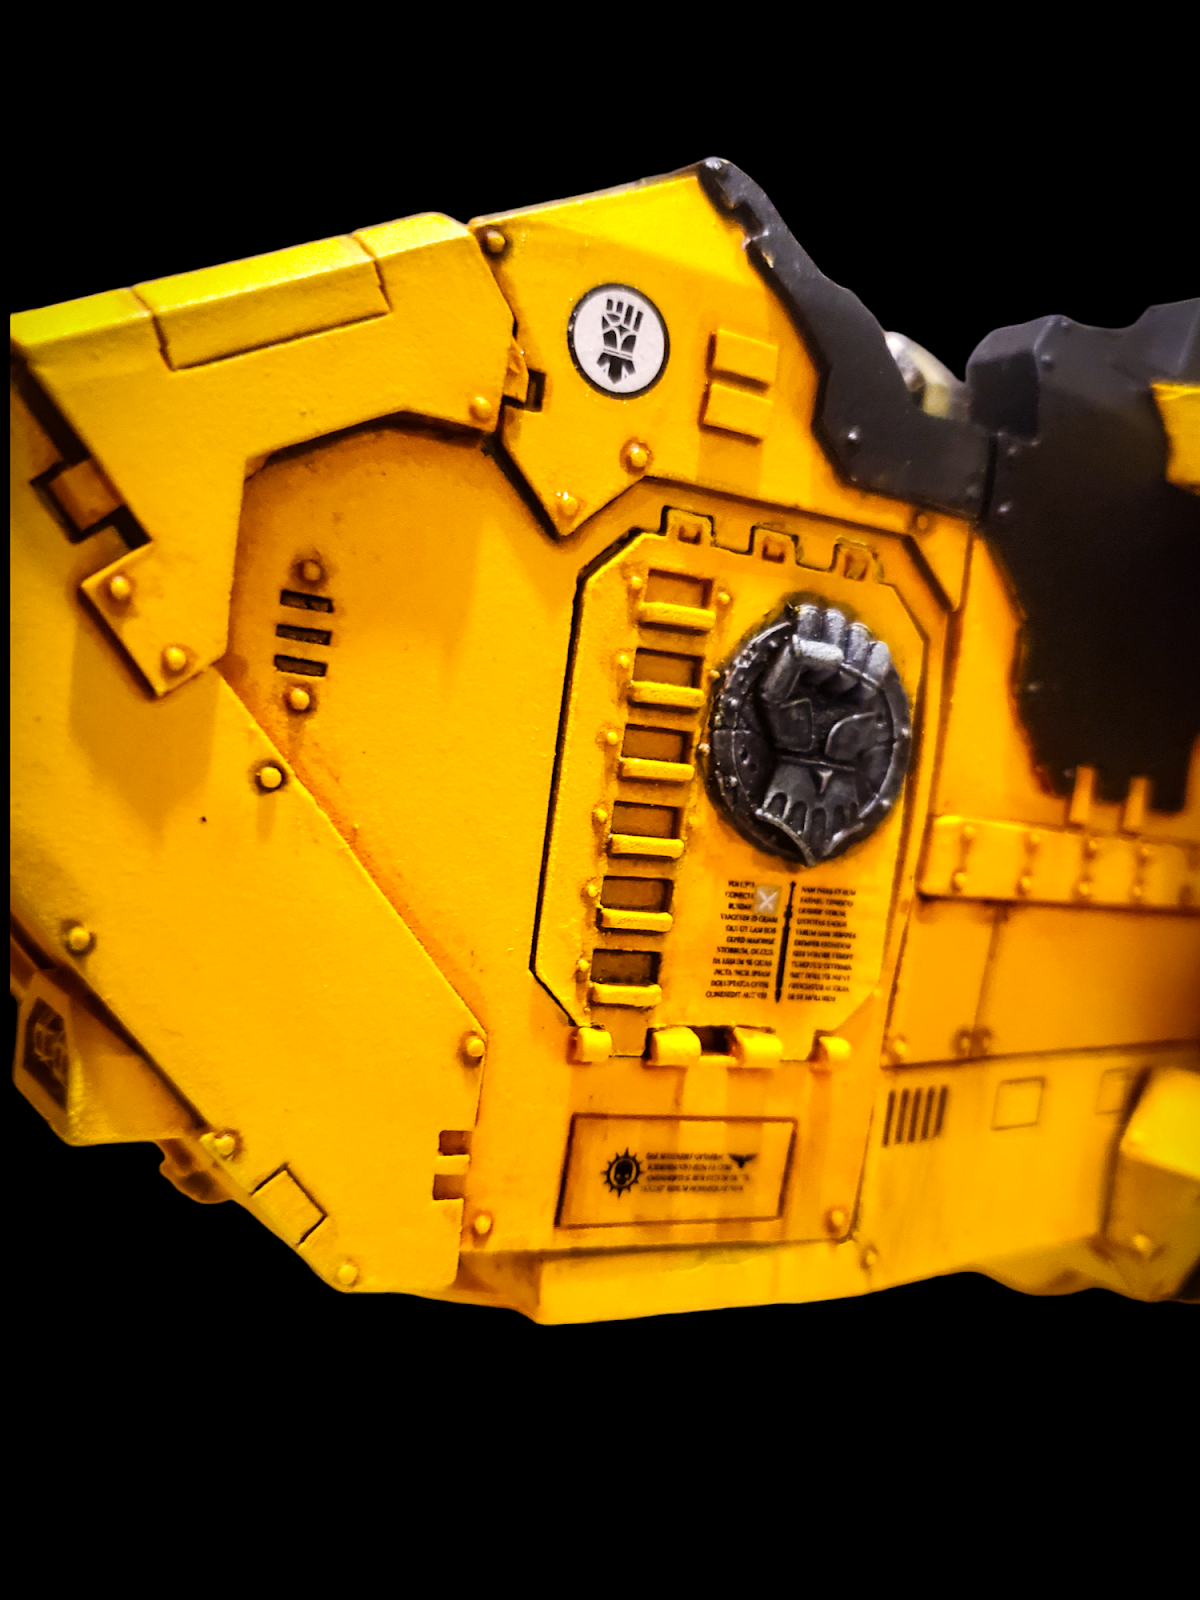
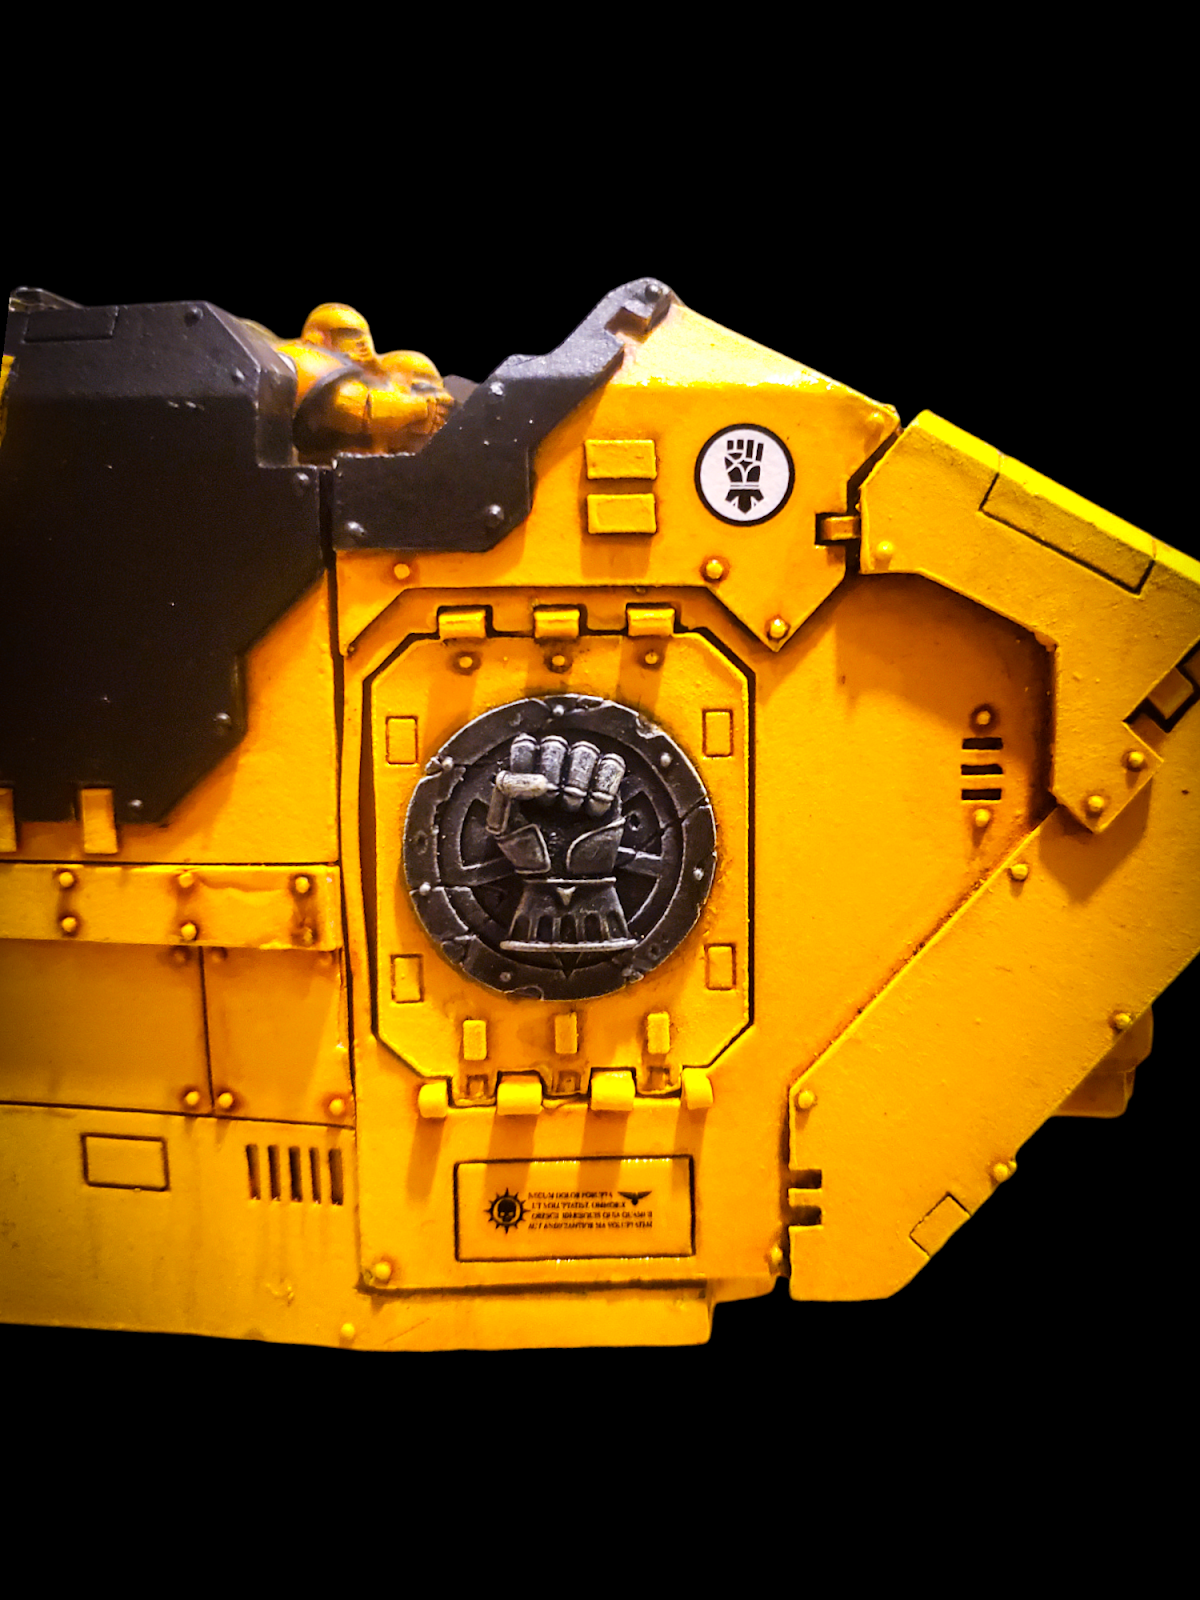
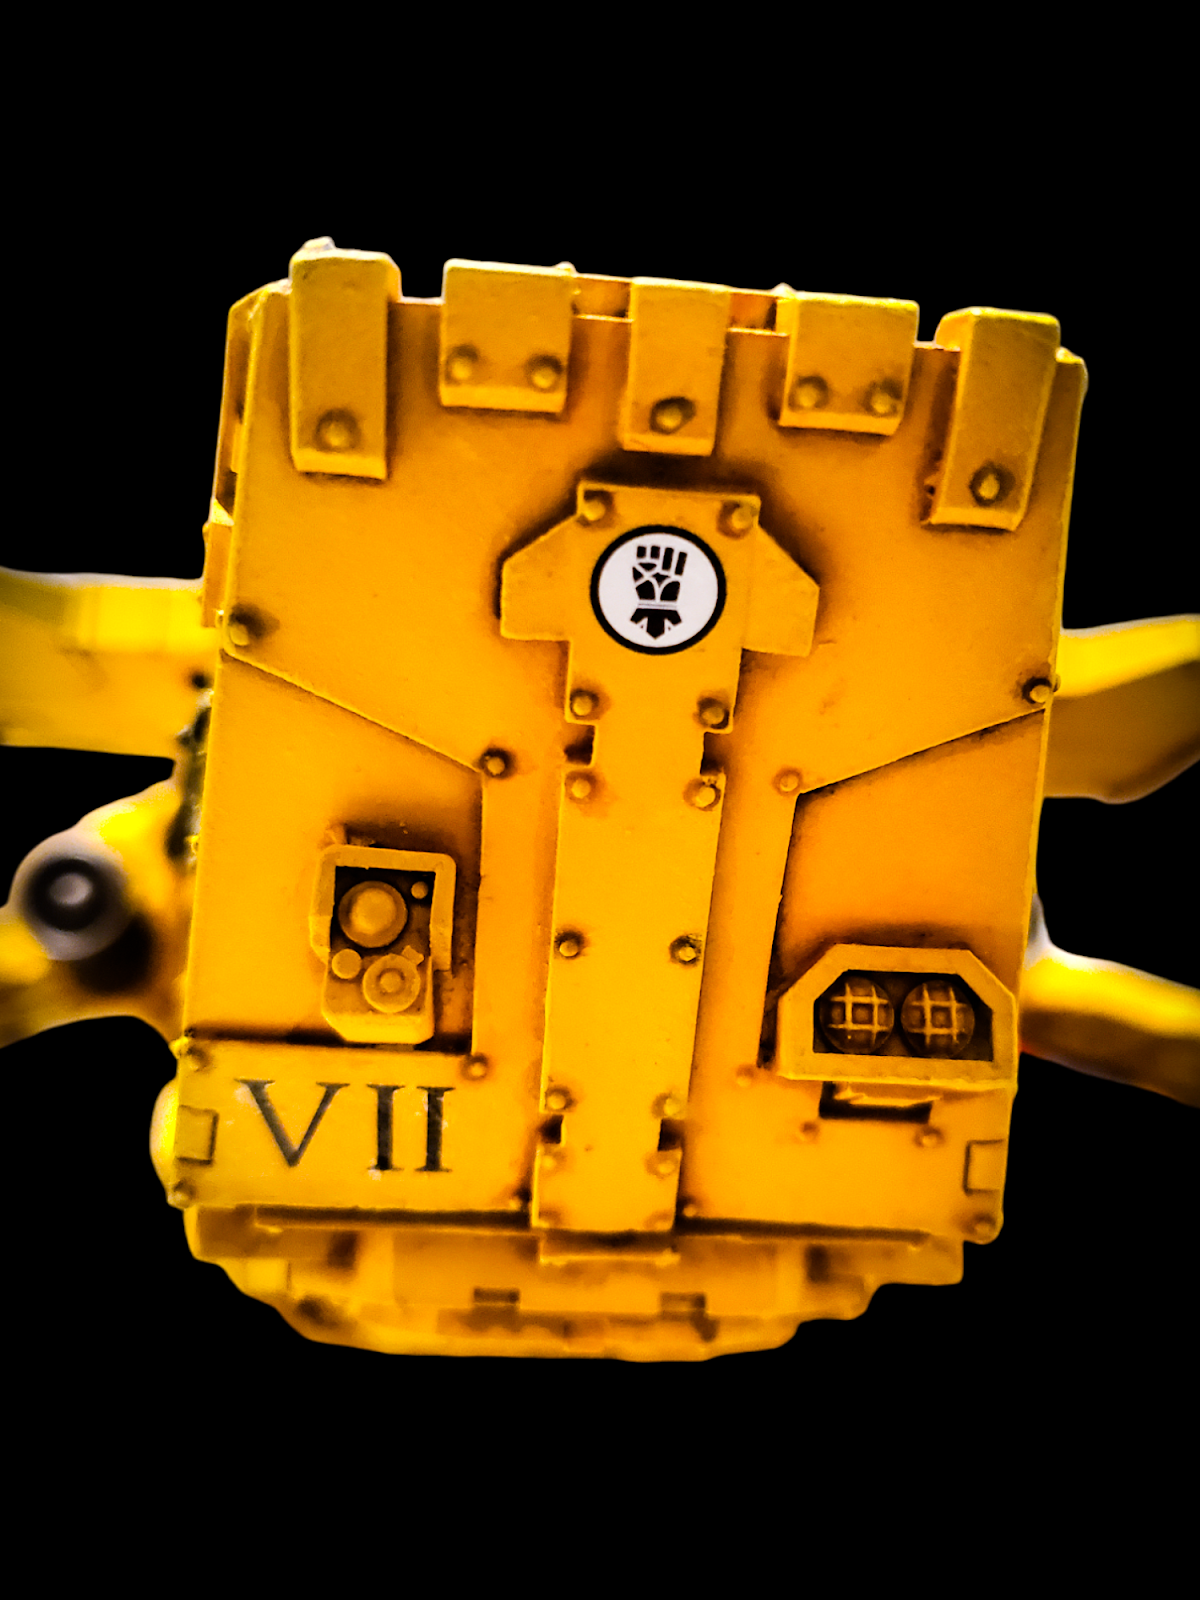
The kit is very detailed, theres detail hidden all over the place, it reminds me of the Titans in many ways when you keep finding little hidden details! I genuinely love that about these big Forge World kits, I feel like I'm getting my moneys worth from these kits that they didnt hold back on design, you find things that they didnt need to include them, but they did anyways. My Warbringer sprang to mind, i remember pretty much decalaring the model finished but kept noticing things id missed and i spend another couple of months on it! The kit that kept on giving! I will paint every nut and bolt on this thing!


Sokar Pattern Landspeeder? I glued the arms on to the pilots clad in Mk4 Space Marine power armour, lined them up and glued their hands to the yokes now. This means they will line up as intended and i'd be able to paint the pilots separately and give myself plenty of room to paint the cockpit without the yokes or pilots getting in my way!


The eagle eyed will notice the original doors are just blu tacked on. I was on the look out for Legion Specific doors for this. They are the Land Raider type, rather than the Rhino type that Forge World sadly put out of production. A decision I don't fully understand. With more affordable, more plastic Land Raider varients out now more than ever previously before with the standard Mk3 Phobos varients currently being usable in the current Warhammer 40k setting (including the Crusader and Redeemer varients) and the 30k Proteus and Spartan currently all available in plastic for the first time. The Stormbird and Thunderhawk still in production too that use those doors, its one doors fits all, kind of feels like so much lost sales and supplying customers what the want. The Land Raiders are everywhere at the moment! They are forcing us into the 2nd hand or 3rd party domain of 3D printing or dreaded recasters! I would happily buy Forge World doors for every tank I own in all the Chapters and Legions i collect if only they'd just let me!

(I've used these 4x2mm n52 magnets in the nose and doors)
It was also this stage I started to magnetise the nose section and cockpit so the lot could be removed. I'd hate to never see those details again by perminantly glueing it shut! It's more of a display piece than a gaming piece. FIVE 4x3mm N52 Neodymium magnets in the nose allows the piece to be removed and is strong enough to not fall off by itself. I had the magnets left over from the Warbringer build anyways so it's not an extra expense at this stage.
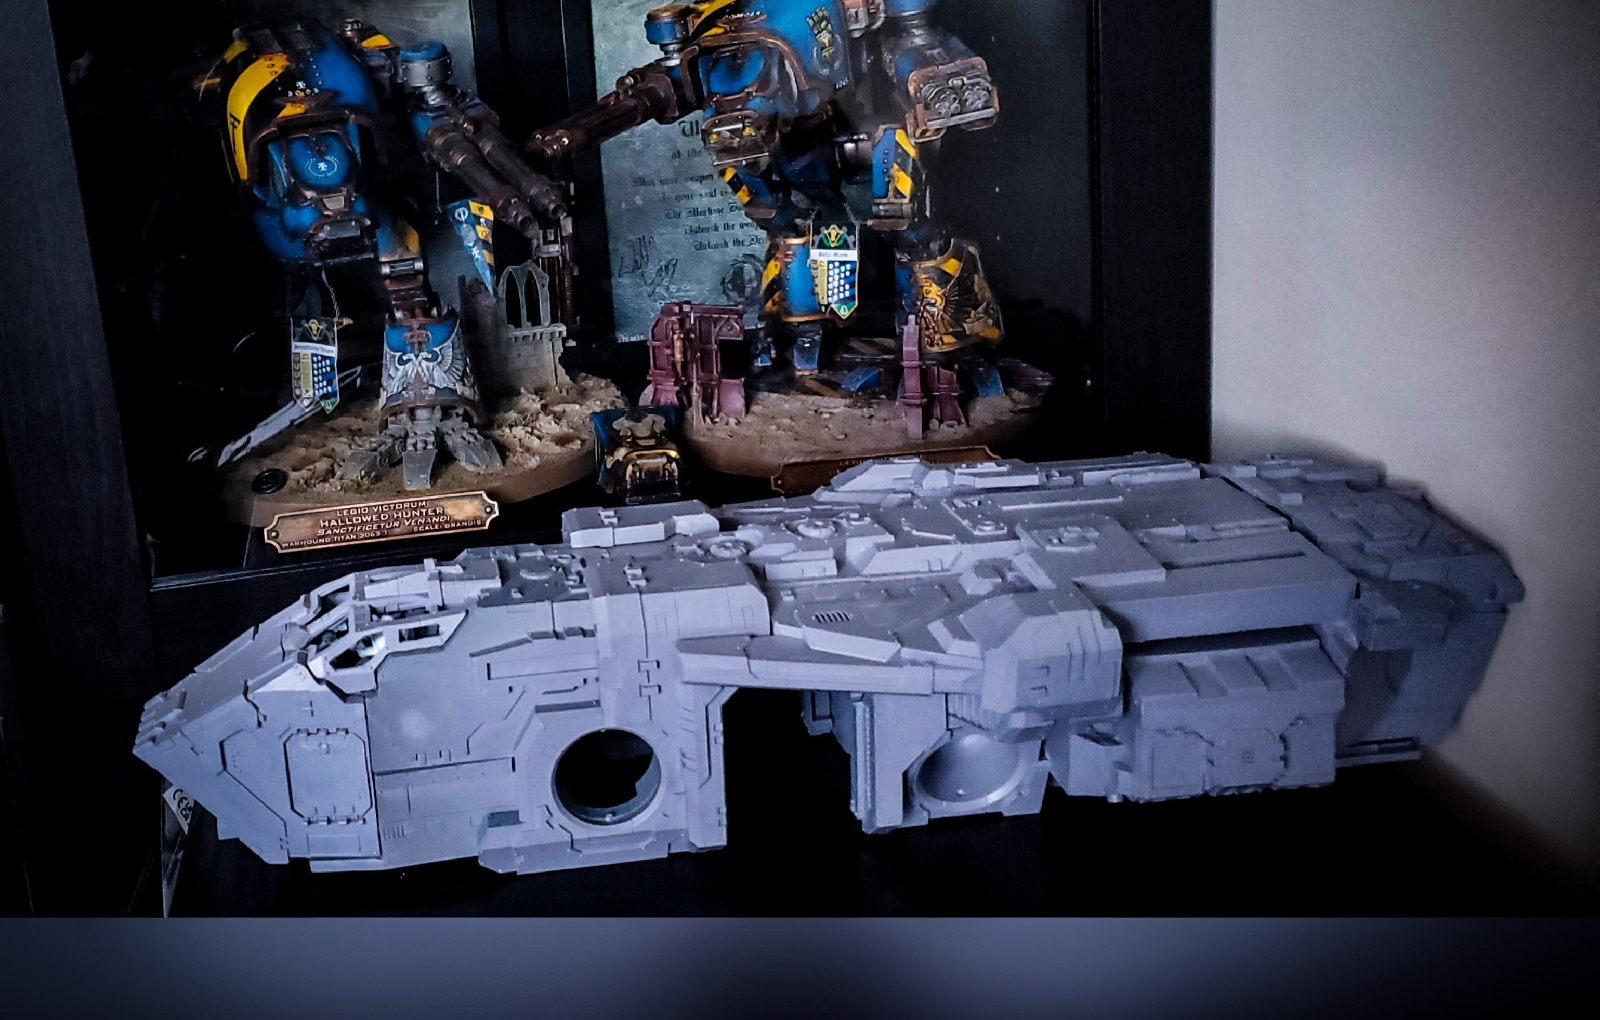
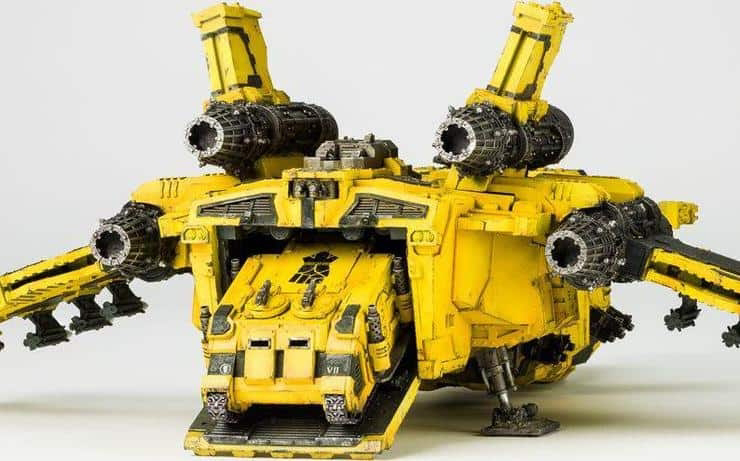
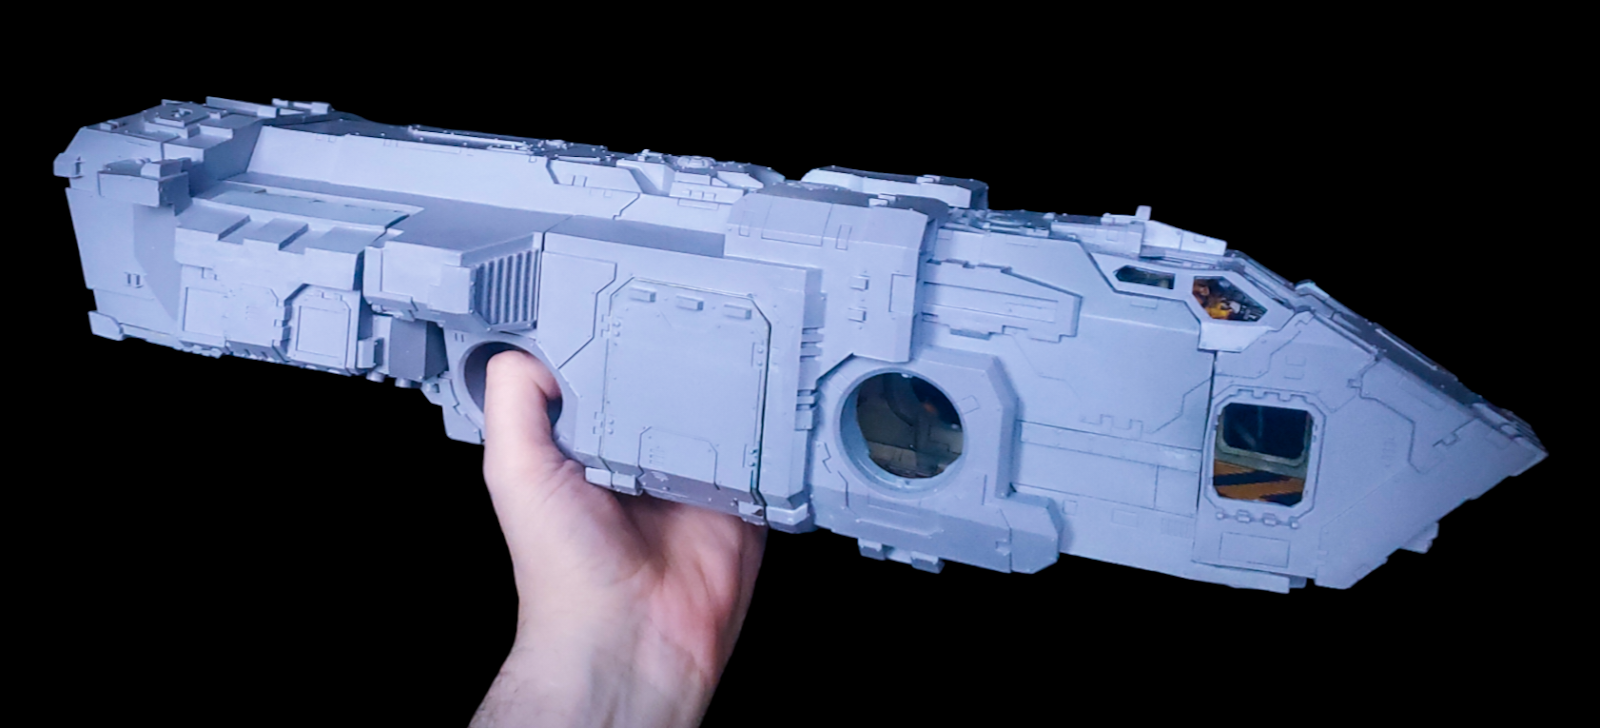
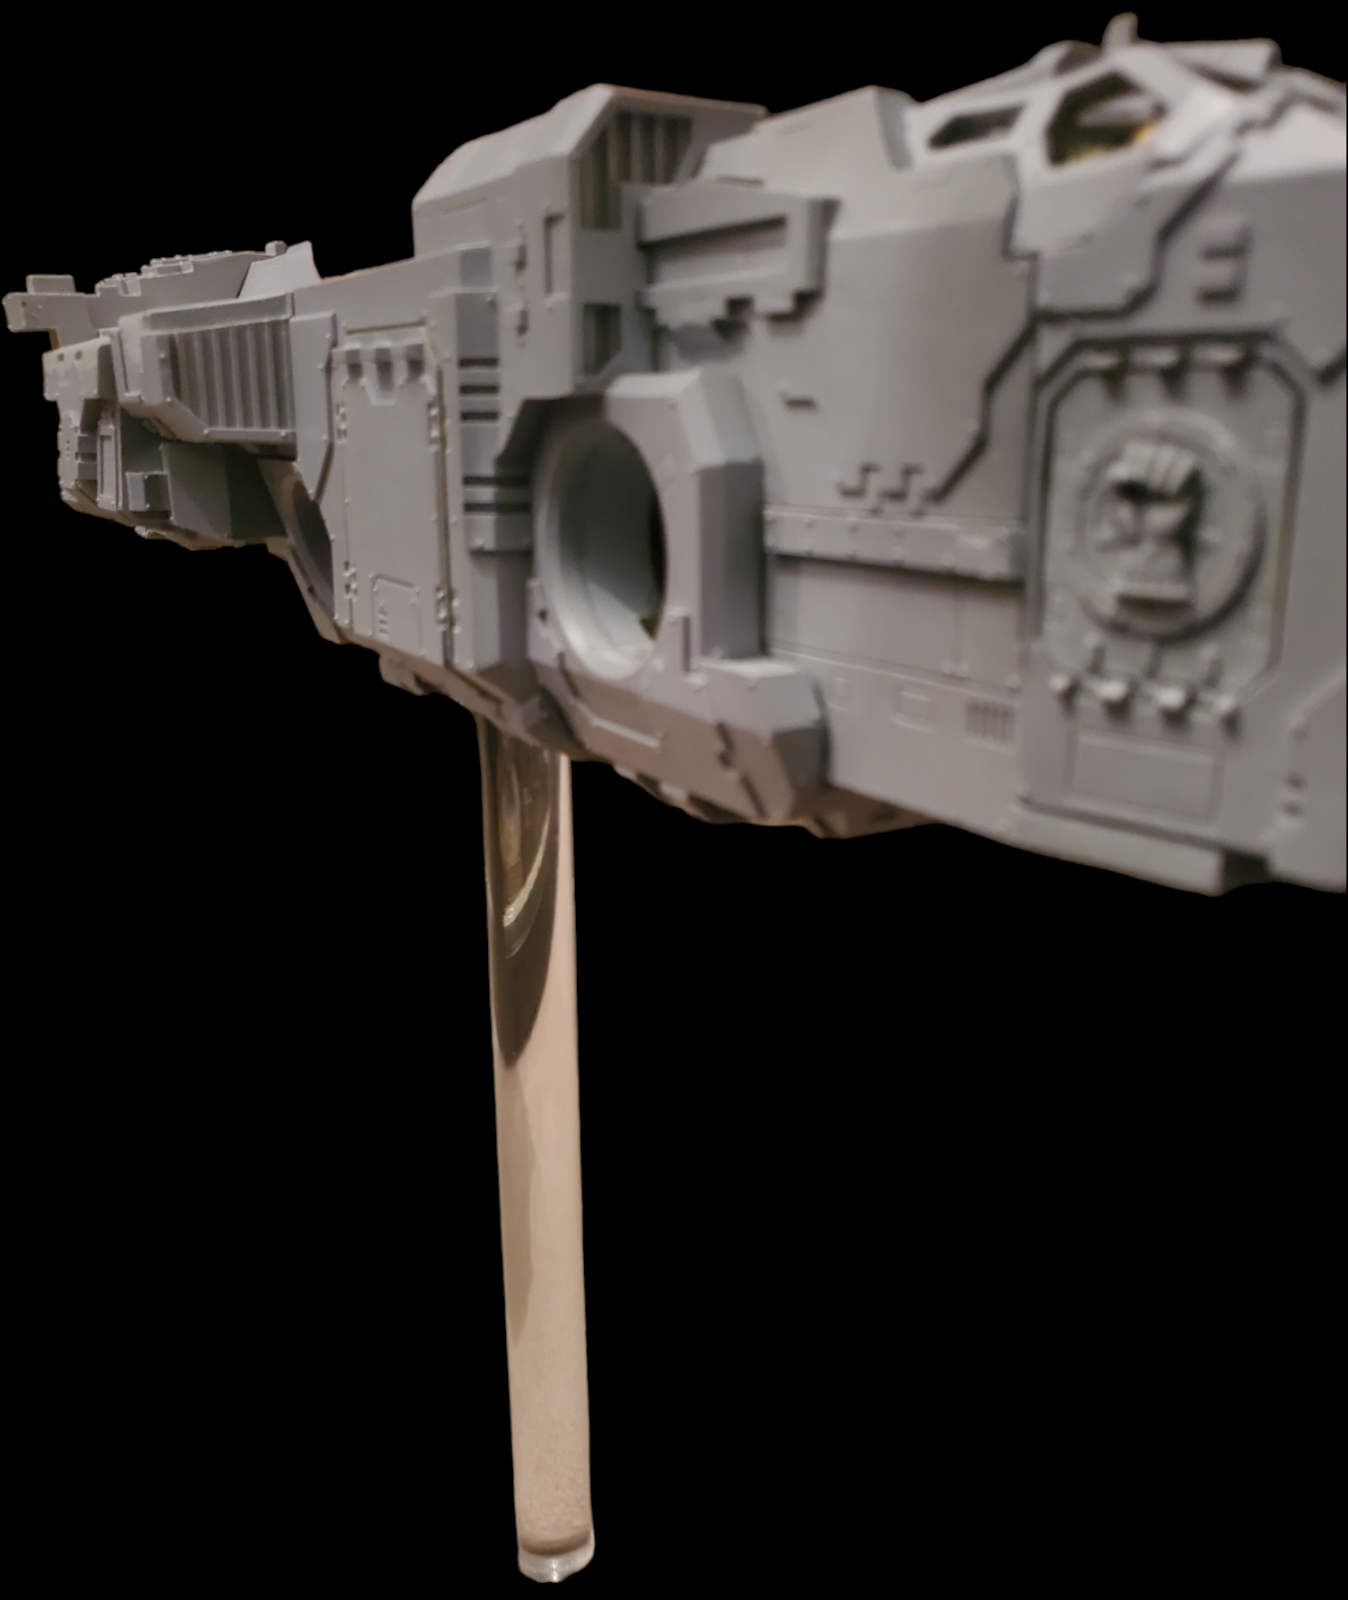
It was at this moment (Still nothing structurally glued) that I realised how massive this thing really is! The weight too!! We are definitely in the ballpark of Warlord Titan in size and weight!

Bingo, fell lucky, secured some legit FW doors found for a reasonable price too, they are the much older ones rather than the newer varinet, I have seen crazy prices attached to these on the likes of Evilbay! Thanks to an Instagram friend for the heads up on these, and thanks to the friendly legit non greedy scammer seller on Facebook Marketplace for being so cool to deal with!
Definetly gives that it that more special feel to a model I'm more than likely will ever get to do just one of. (Said that about a Titans tho I know)

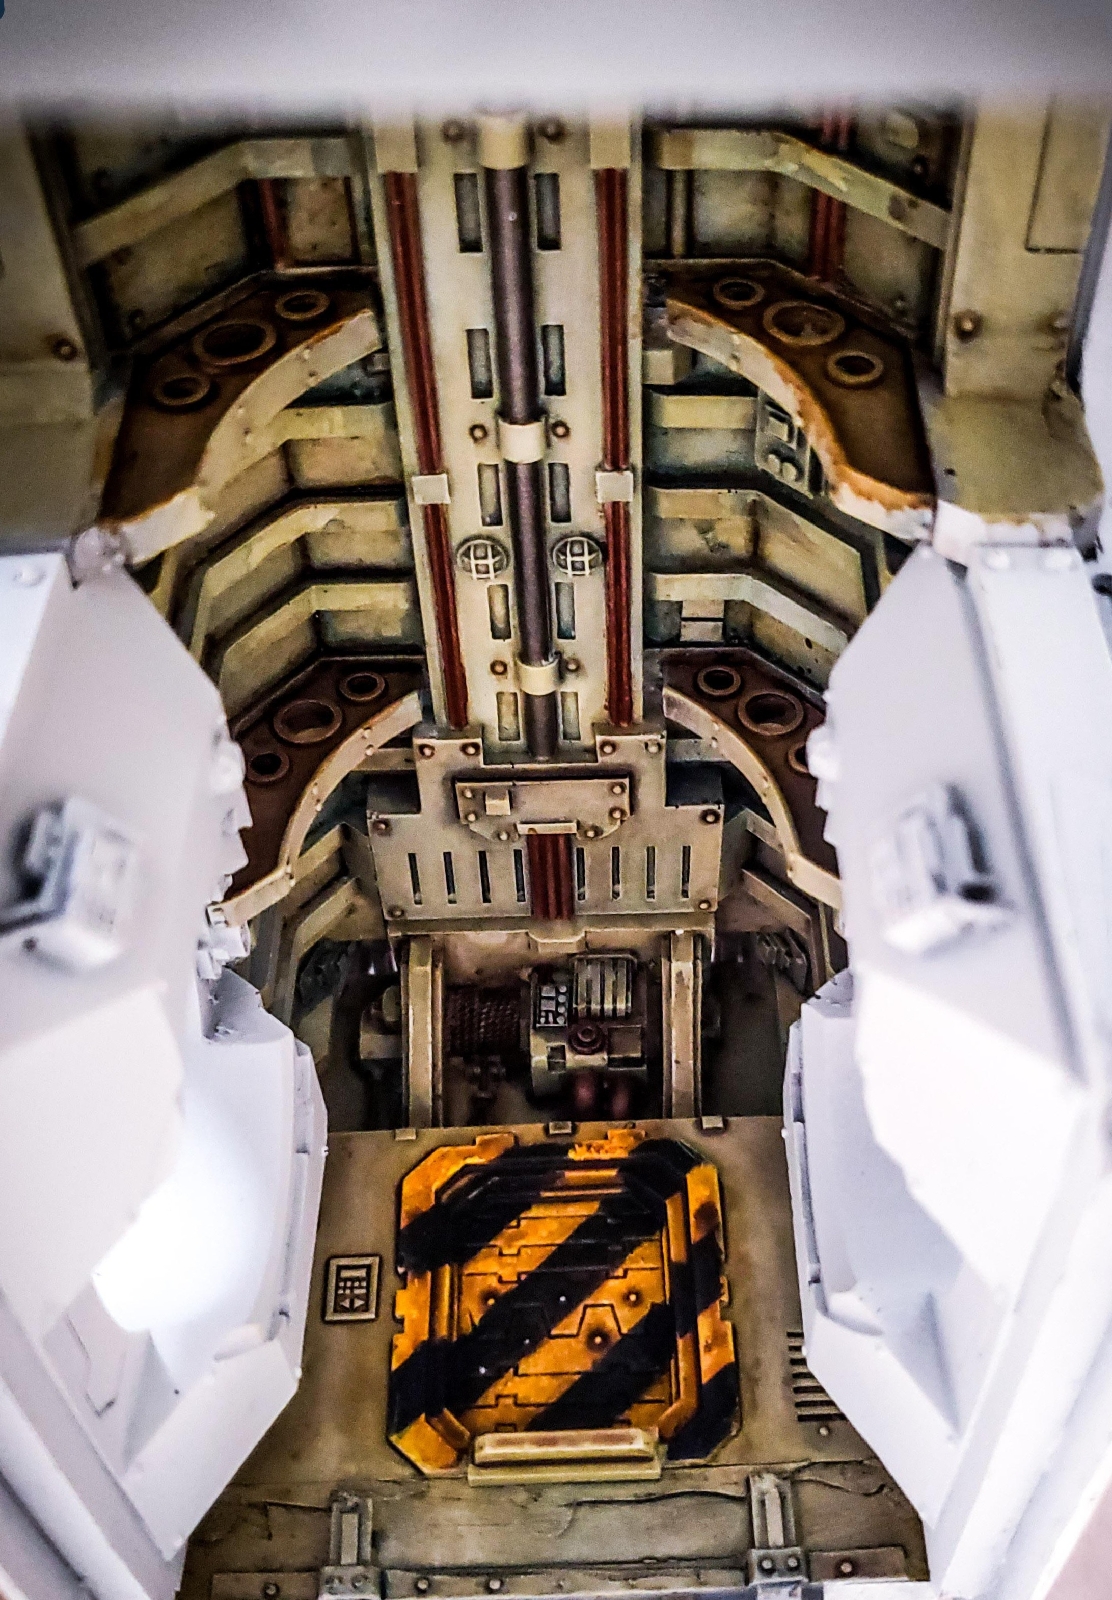
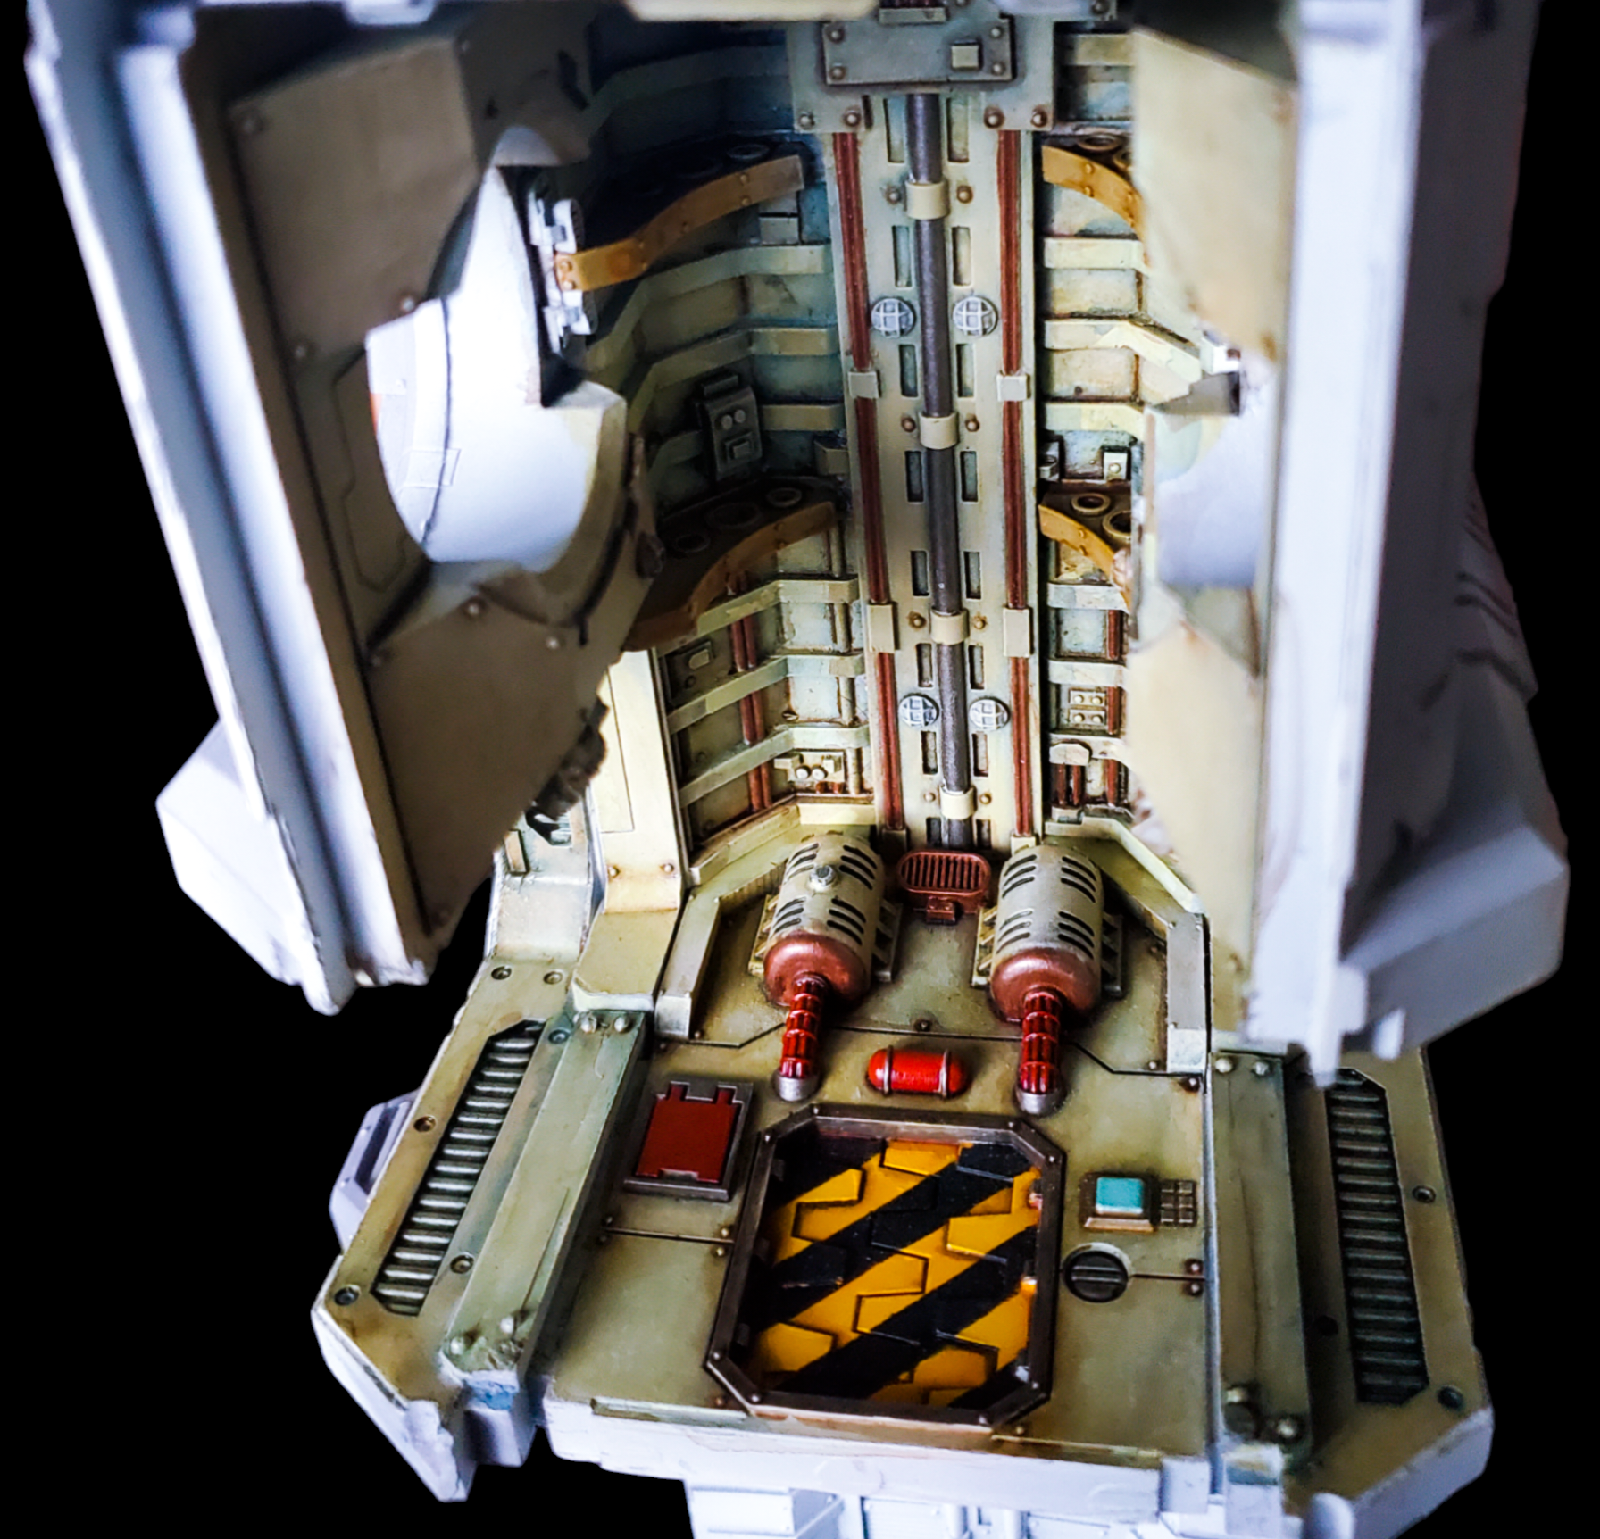
Being a bit of a Military Aviation geek in a former life, I looked at some of my favourite bomber and cargo aircraft for some inspiration for the interior of this beast!


It already had an old bomber feel to it!
 Star Wars taught us to even look back to WW2 for inspiration and everything should look lived in, used and abused. It's really how I wanted it to look.
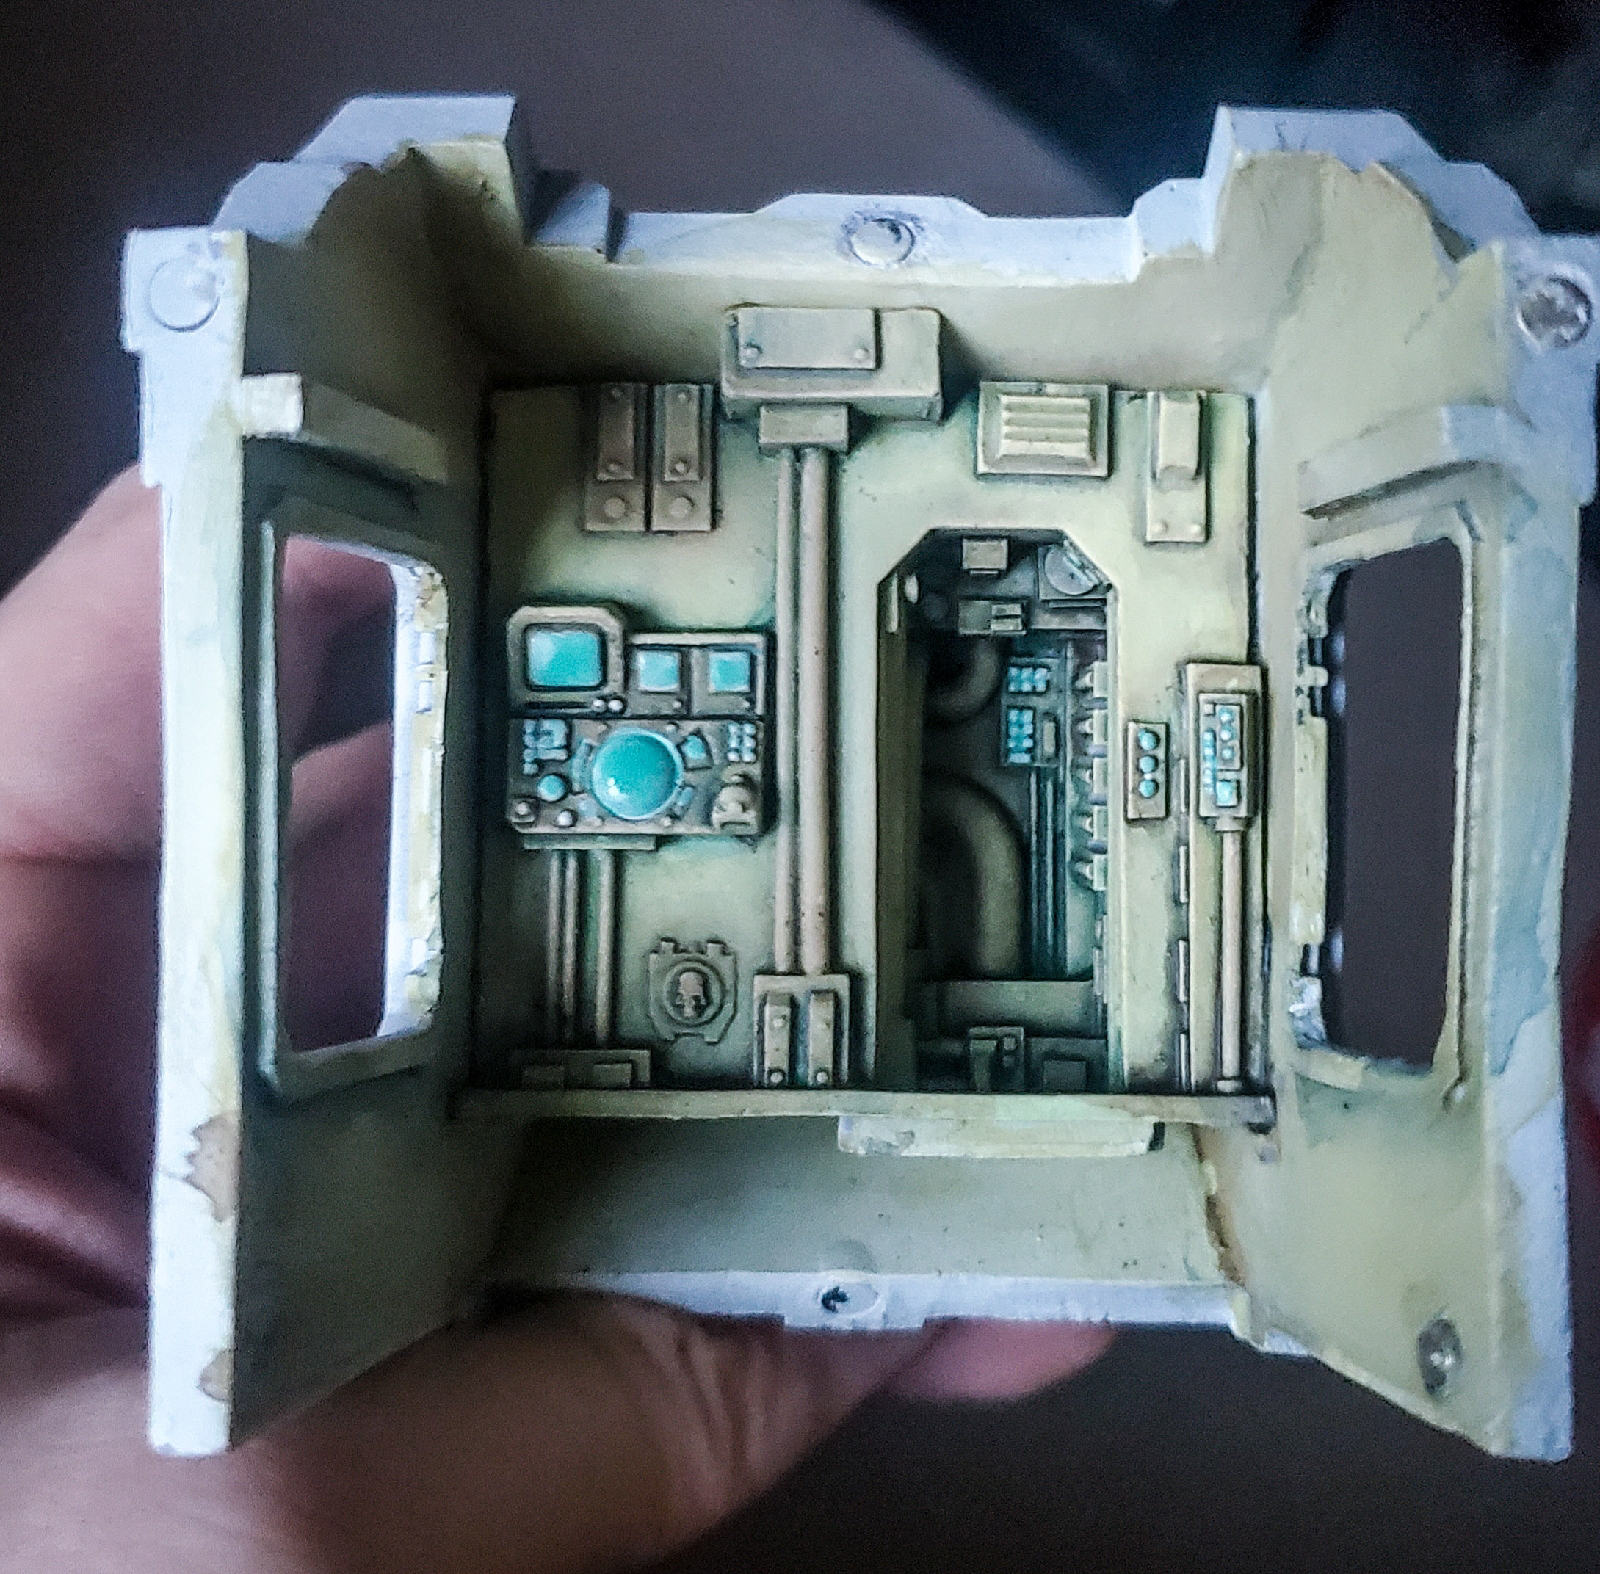
 Managed to capture what I had in my head. I knew what I wanted, and I knew what I didn't want. I try to avoid instrument panels looking like someone poured skittles and M&Ms all over them, if that's your jam, each to their own, thats what I love about this hobby! Do it your way and there's not a wrong way!
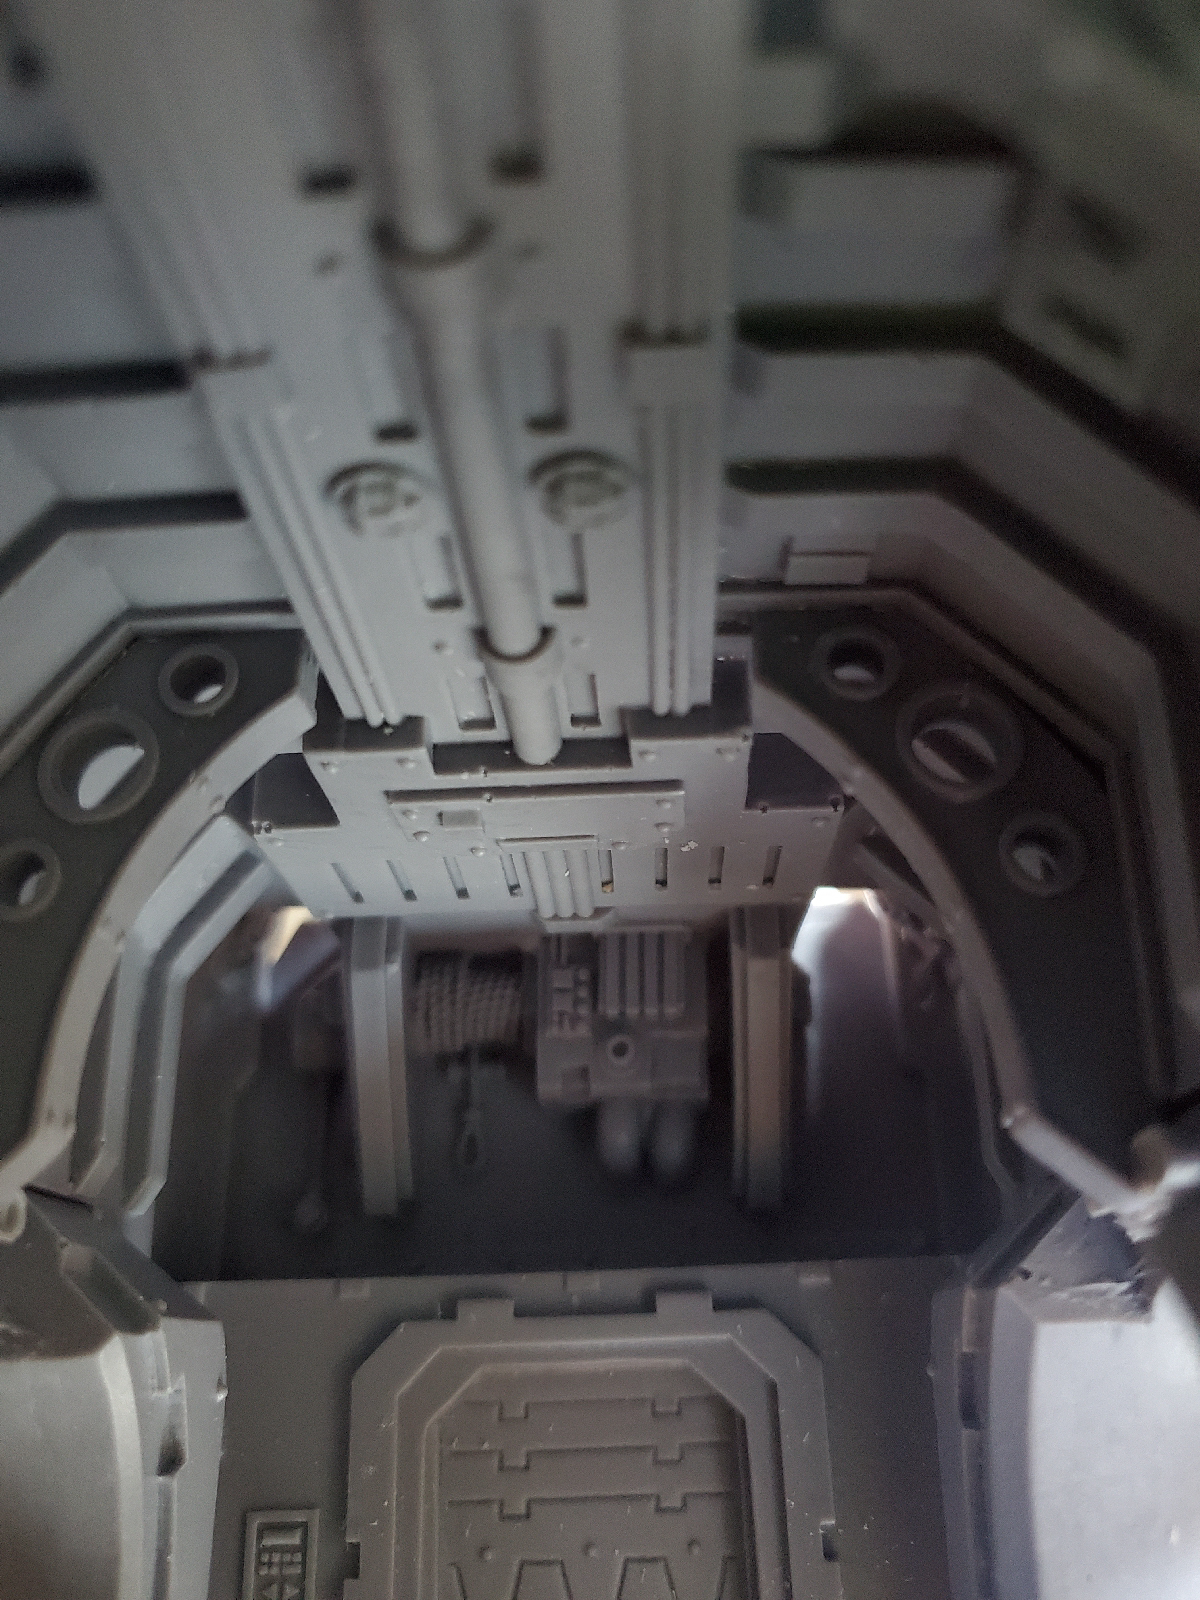
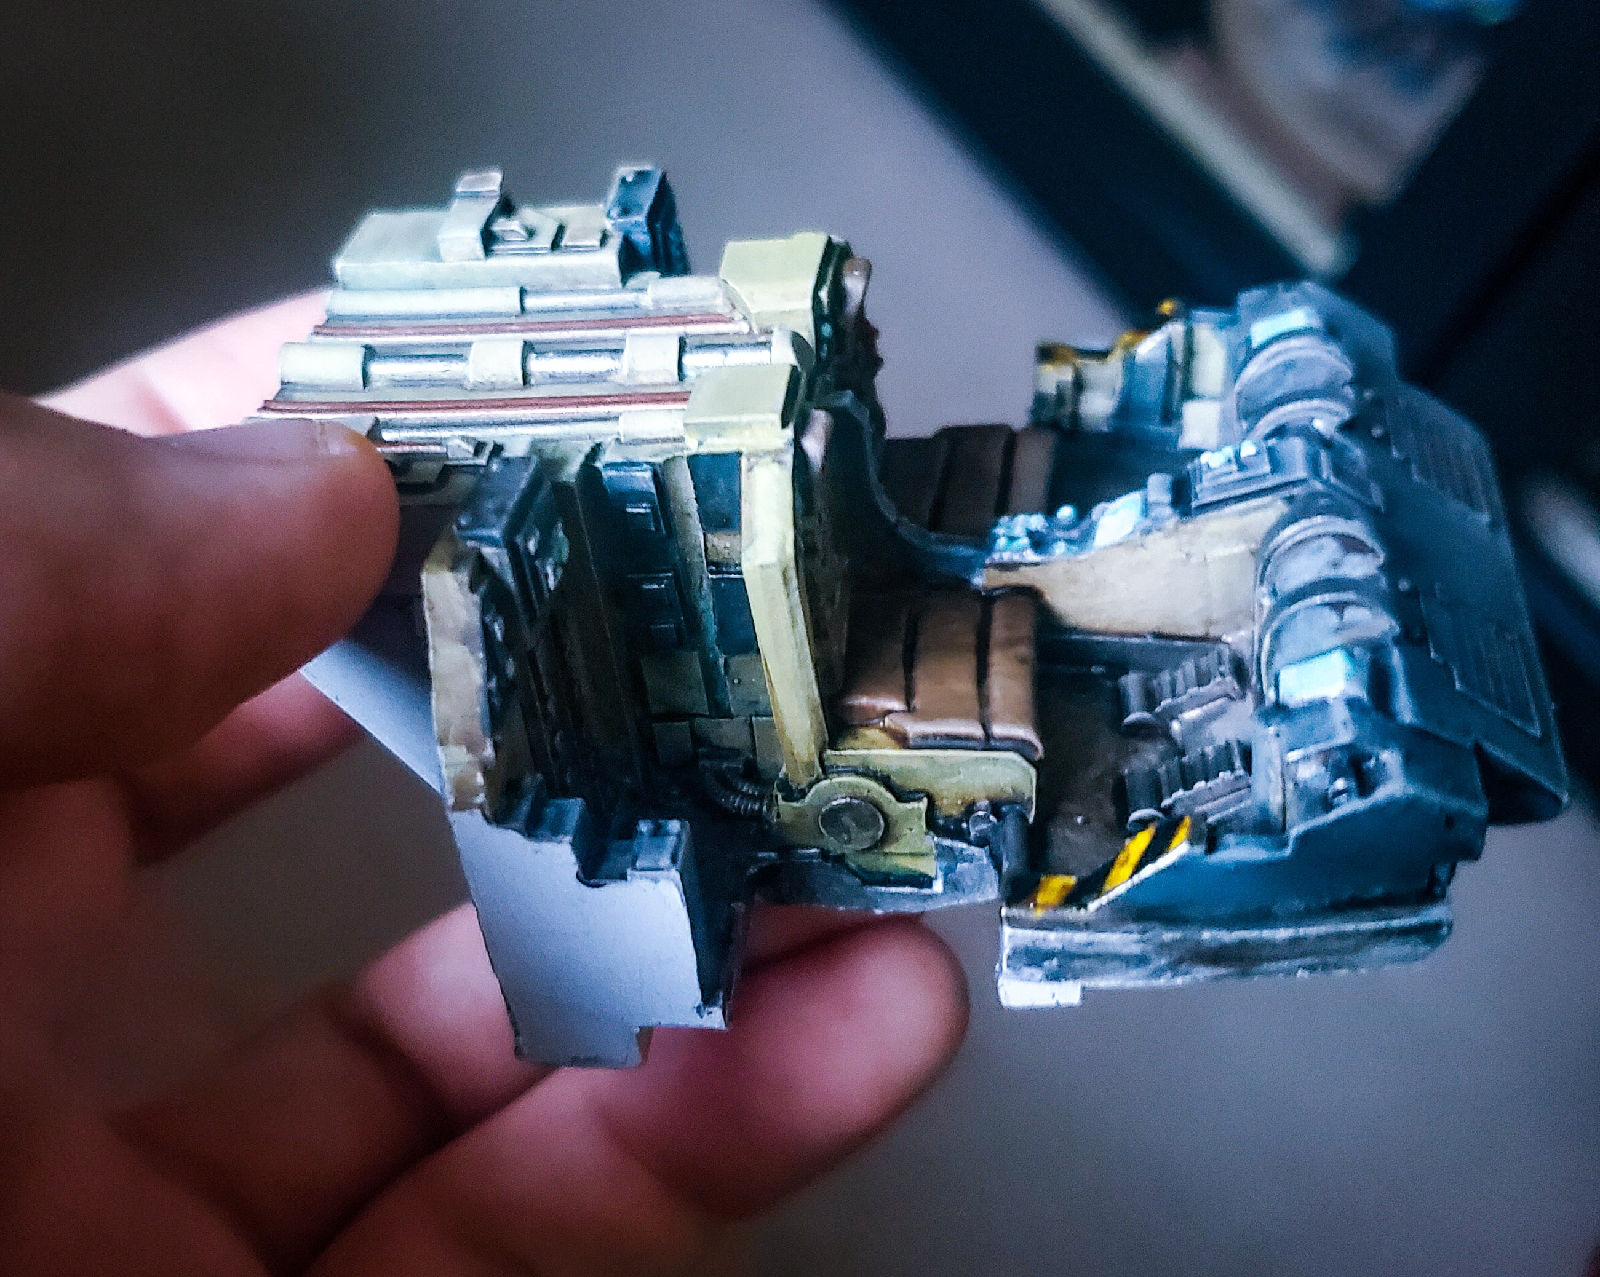
Made a start on the Inner nose / maintenance panel.

So much detail to pick at!!! Yeah I painted that winch you'll never ever see again.

I felt the contrast was a bit much on the inks and washes so went back in with a white drybrush to blend it out a little bit. I want it to be light enough to be able to stand out when it's glued together!


Trying my best on the attention to detail on this thing. It's been a bucket list item for so so long. I want to do my best on it! Maybe it won't be the "best" Stormbird out there, but it will be the best i can do!


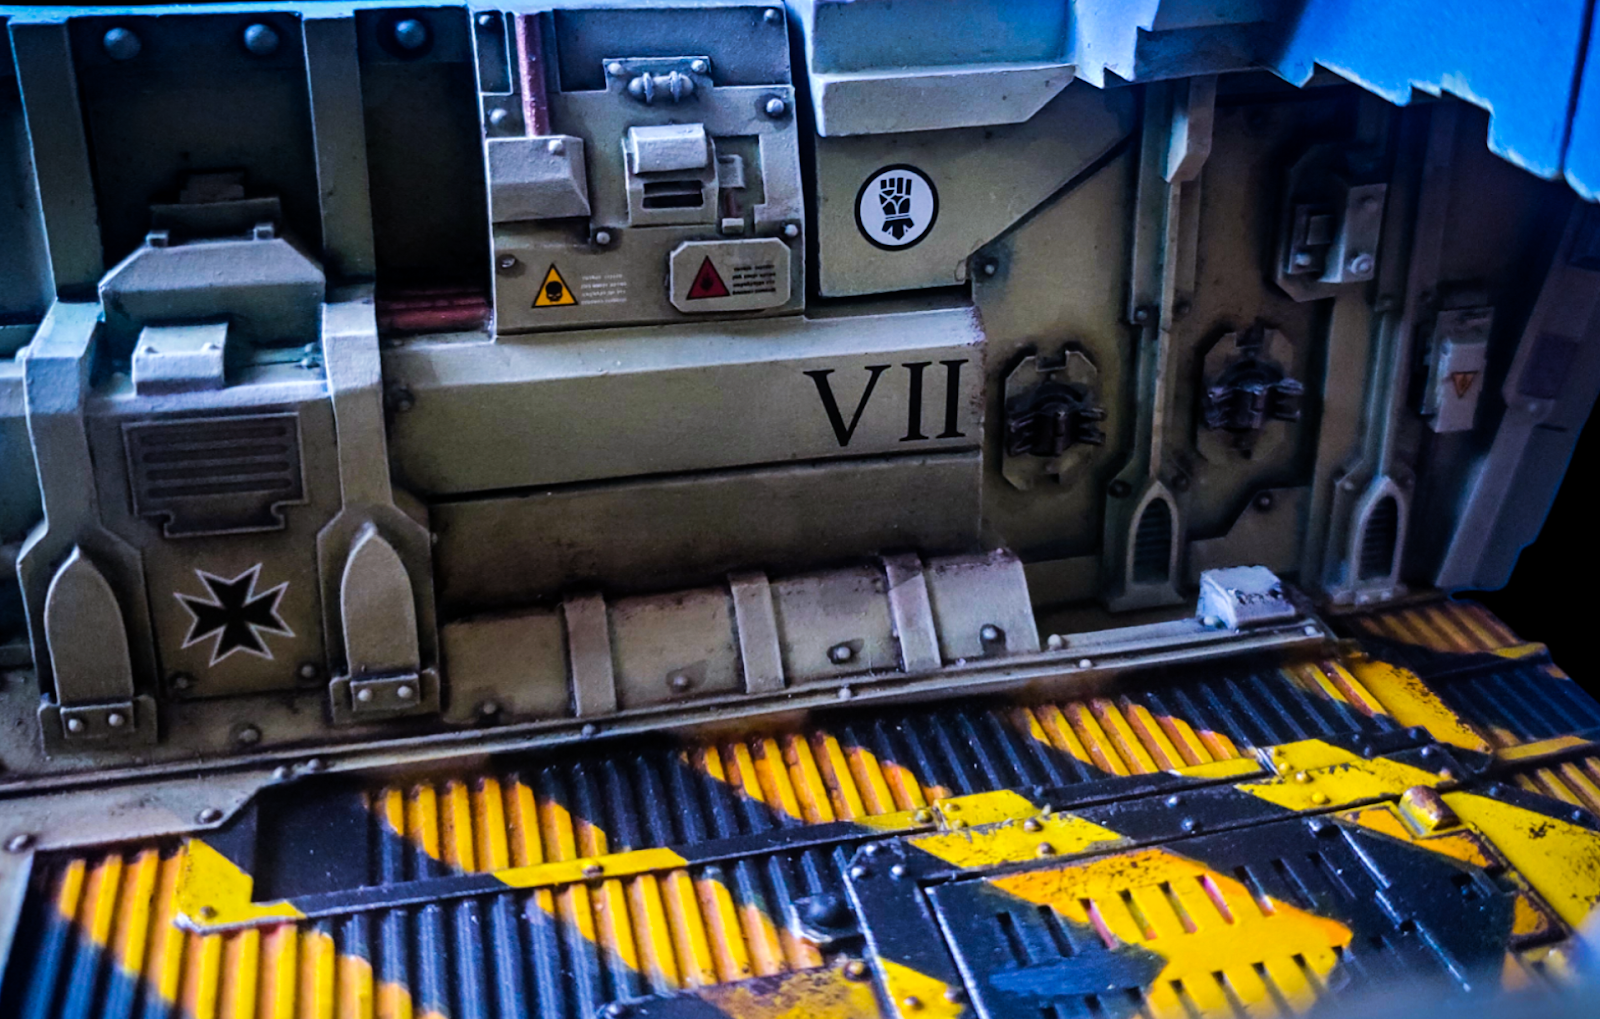
Thinking ahead of that clash from a bright flying block of yellow spaceship mixed with a very realistic if not warhammered up a bit interior, I needed them to meet somewhere more in the middle, the pilots was already looking out of place. I decided to bring in some yellow haz decking, via chevrons (shock horror) keeps it in my style too, it matches what I've been doing on the interior of my Titans!
I've put a lot of hours into this already and I'm aware when it's fully built a lot of it will be totally hidden, or just easter eggs to be hunted out, only visible only from certain angles but that's very me too!
I've put a lot of hours into this already and I'm aware when it's fully built a lot of it will be totally hidden, or just easter eggs to be hunted out, only visible only from certain angles but that's very me too!


After all the stress the door caused me, that you won't ever see this part, ever again. I've included it here just for prosperity! Added the final chipping to the door.

Thats the only glimpse it can ever offer and there will be a ball turret that goes there which will entirely block it from view! You win some, you loose some! I just think it's funny for all the stress it caused, trying to do straight lines over multiple levels and trying to force an idea that simply didn't want to work for me, it can't even be seen after all that, It's just a reminder that we all get rubbish days in this hobby for whatever reason. Things just don't always work out as you intend. No ones perfect... Meh, onto the next bit... I wonder what other overly ambitious things my brain can invent to make my life more difficult during this build, because my imagination far exceeds my skill levels!!
Yes...
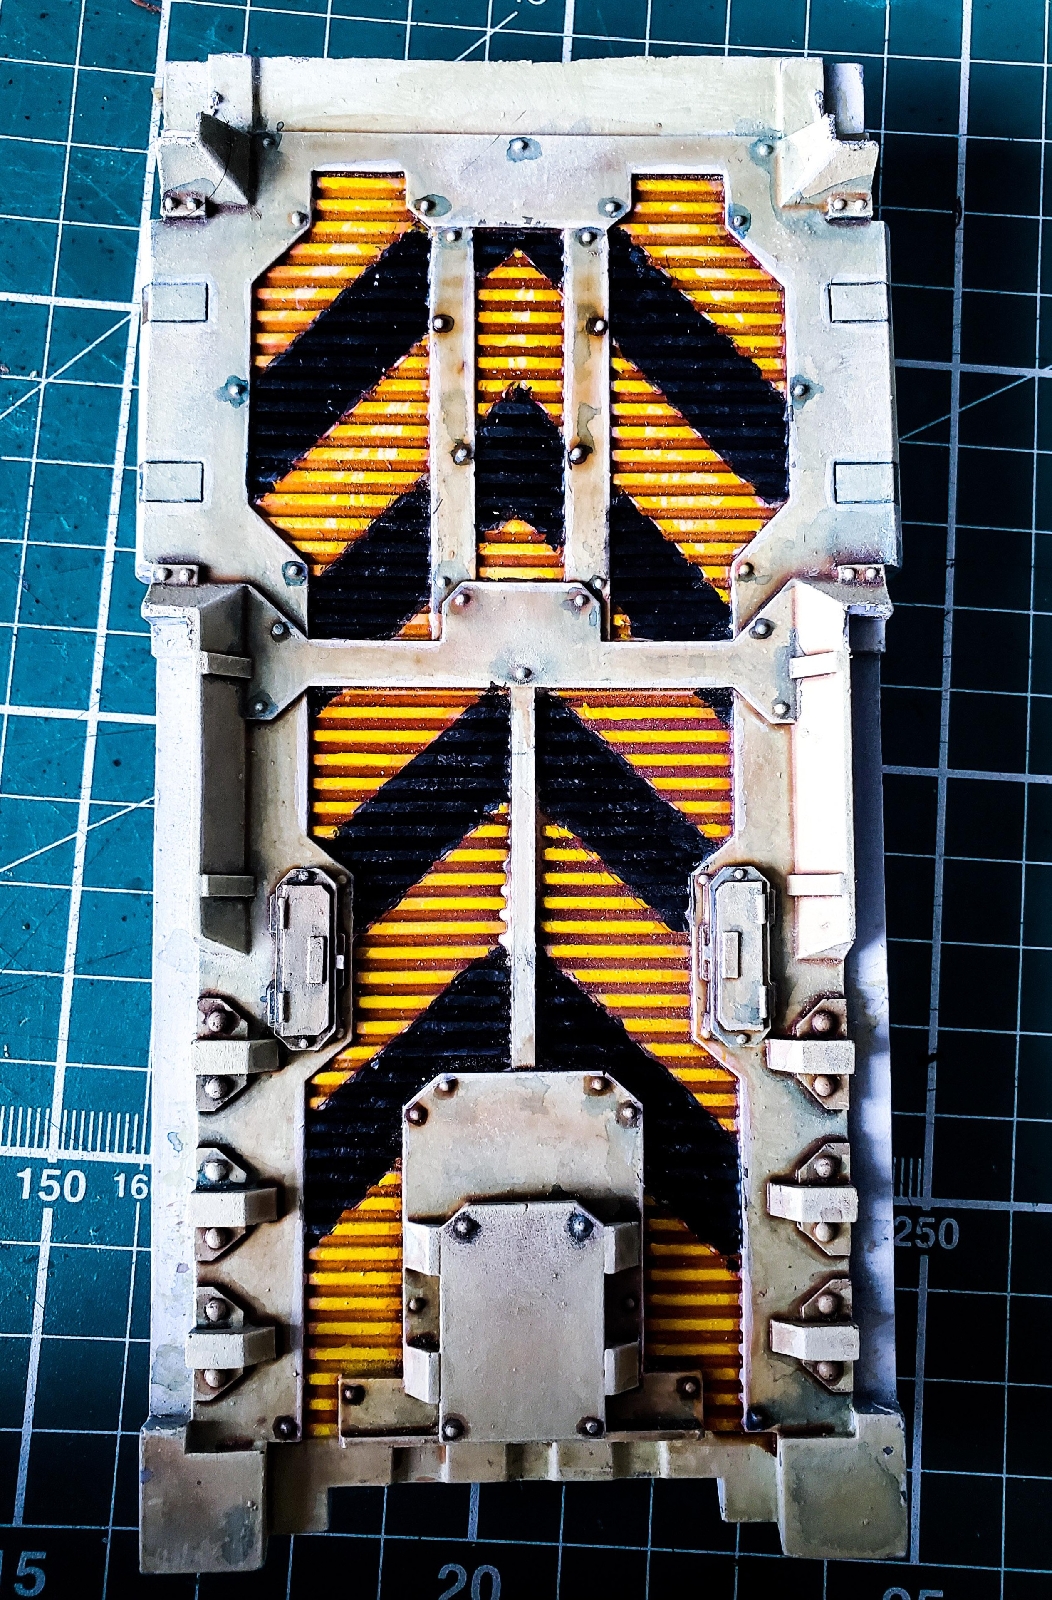
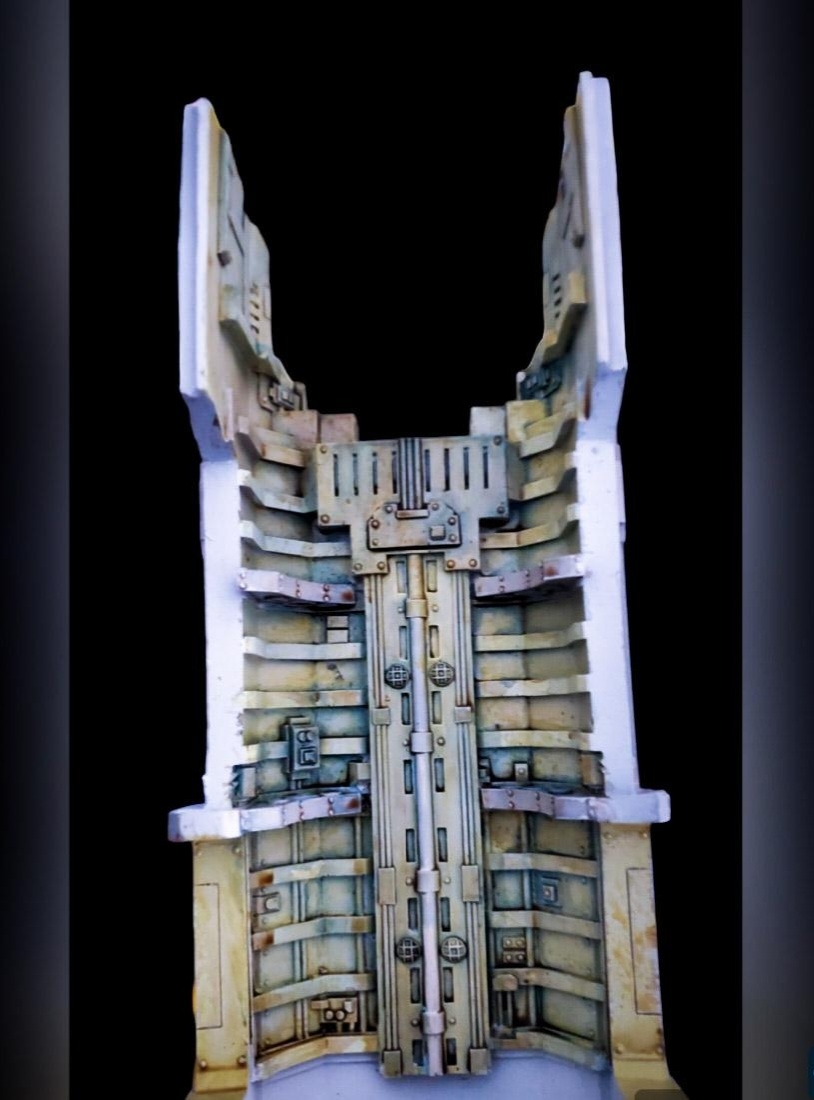
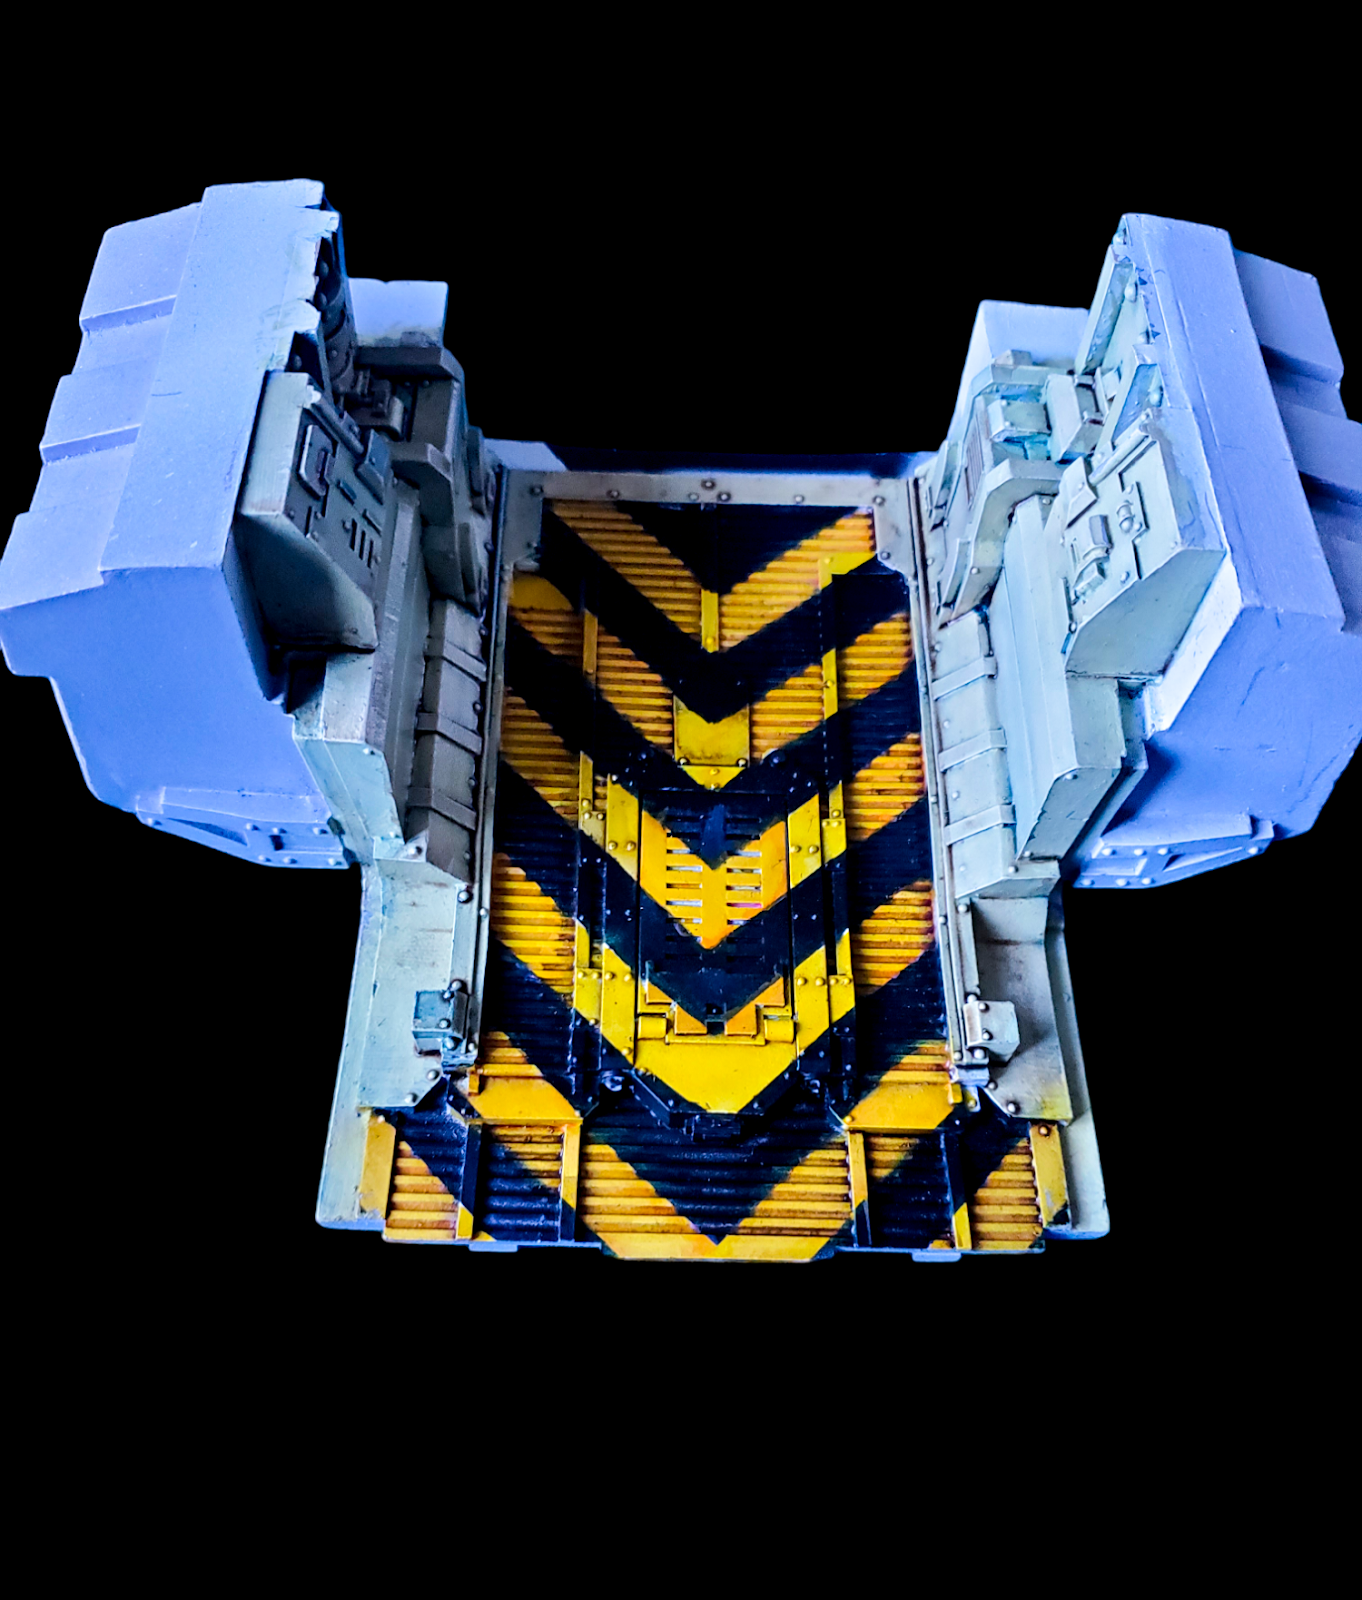
This is the next part of the floor, accessed through the main side doors between the ball turrets, as an assault craft all the hazard stripes are pointing in one direction towards the back of the ship and in the direction of all the main assault exits. A little thought has gone into it. I was torn as to whether to do the entire floor in haz markings (the far easier route) or just put them on the corregated lower sections and then still have the main inner fuselage colours on the raised parts of the floor, obviously the harder, more time consuming and higher risk, more room for error, my brain chose that route, of course!

A little more Wip

Started the rear air lock door of the front
compartment bulkhead

Made more progress in the front section of the fuselage, another haz marked airlock bulk head door which leads on the next Ball Turrets! Also started the side wall sections, the Internals on the front half is making big progress and I'm pretty happy with how its turning out. Christmas Day 2023 tomorrow so I'll be taking a break from painting.... probably.
Quick rest from Christmas 2023 and having a bit of time to work on the Internals.

I'm still amused that after the hundreds of hours it's eaten up so far, the Stormbird looks largely unworked on externally at least!

Bad winter light, but wanted to try capture where the progress has been made.


So pleased with how its going so far!!

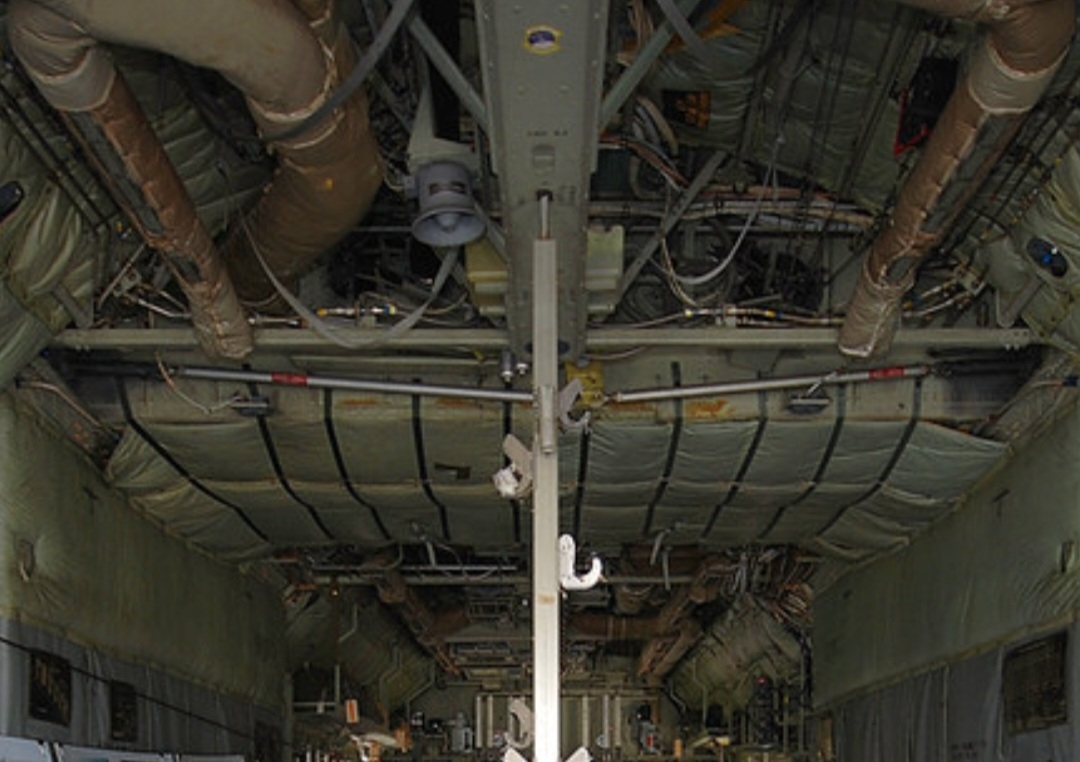
Internals Coming on leaps and bounds. Moving backwards now towards the rear most cargo bay. Big enough to house a Rhino APC. I promised myself I wouldnt really start this build until Jan 2024, and very little is actually built yet so inthink kinda true to word!
Rear Cargo bay, which a Rhino APC will rest on.


Its exactly how I imagined it would look. The rear air lock door also in progress. I don't think an Imperial Fists Rhino will look so out of place now. Have a couple on my shopping list luckily.
JANUARY 2024:

First pic of 2024, nearly a month into working on the interiour of this beast! Coming close to final details and then need to make the final decision on whether this lump of resin will fly or not before proceeding on with this build.
Added some decals to the bulkhead door frame.


I also magnetised the side doors, I was hoping they would stay closed on their own!!! Noooooo.... so glad I had to drill the resin out after it was painted! However a little touching up to do is okay. I've glued as much as I can now. The hinges are on for all the doors are perminantly on now and that was a bit fiddly for me! More of a me problem than a kit problem. Heat sorted out any gaps.

Painted the insides of the Legion doors. Touched up ant damage from fitting magnets yesterday too.
When I started back up painting Warhammer after a break from the hobby (I was just painting movie based models and props exclusively for a few years) it was in connection to our Whitby shop (Models And Movie Props) back in 2004 that brought me back, it was around that time I was introduced to Forge World by a customer actually!! Back then I had a few dream models that I didn't think I'd ever be lucky enough to do. I'd jump on the Forge World website all the time, every day and window shop! A Warhound Titan, later on A Reaver Titan was both immediate ultimate bucket list items! Around that time too the Thunderhawk gunship was obviously on the list, along with the sadly now OOP transporter version if it too. Then the Stormbird and Warlord Titan ultimately made their ways onto the list too as they were released close to each other. 20 years later, I'm starting 2024 with working on the last 2 items on that list! I just can't wait to get them complete, whilst taking my time of course! Once they are done my warhammer bucket list will be 100% completed and that's a very, very strange feeling!!
Update February 2024
After a brief gap from working on the Stormbird, progress resumed!

Mounted a 25mm Clear acrylic rod into a 14" base, and used epoxy to make sure its not going anywhere!


Wings dry fitted! I think I'm going to need about 19 gallons of paint for this thing!
Hoping to have wings on it by the weekend. More glue on order! Like all Titan sized resin models It's been very thirsty with materials!!
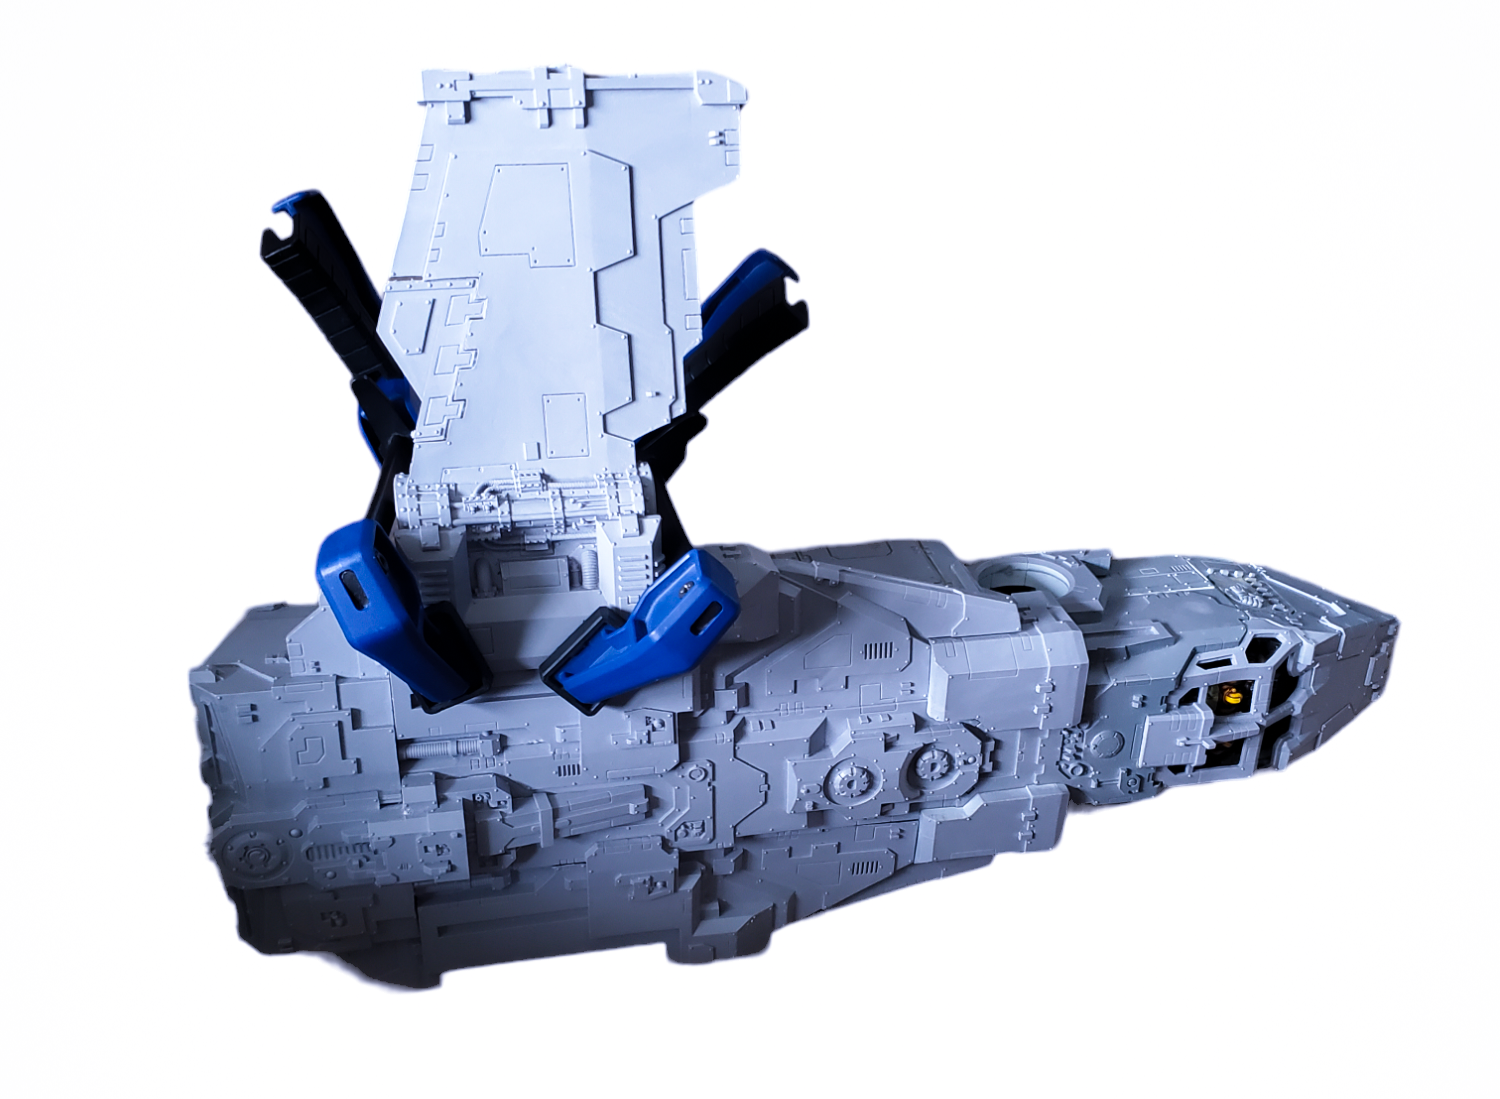
JB weld supplies arrived, the bird gets in wings!


September 2024 Massive thanks to my buddy Lee @Goddenzilla for strengthening the landing gear on this massive bird. I was worried about the weight anyways but with things like summer and the resin heating up it was doubtful the landers would take the strain for long!


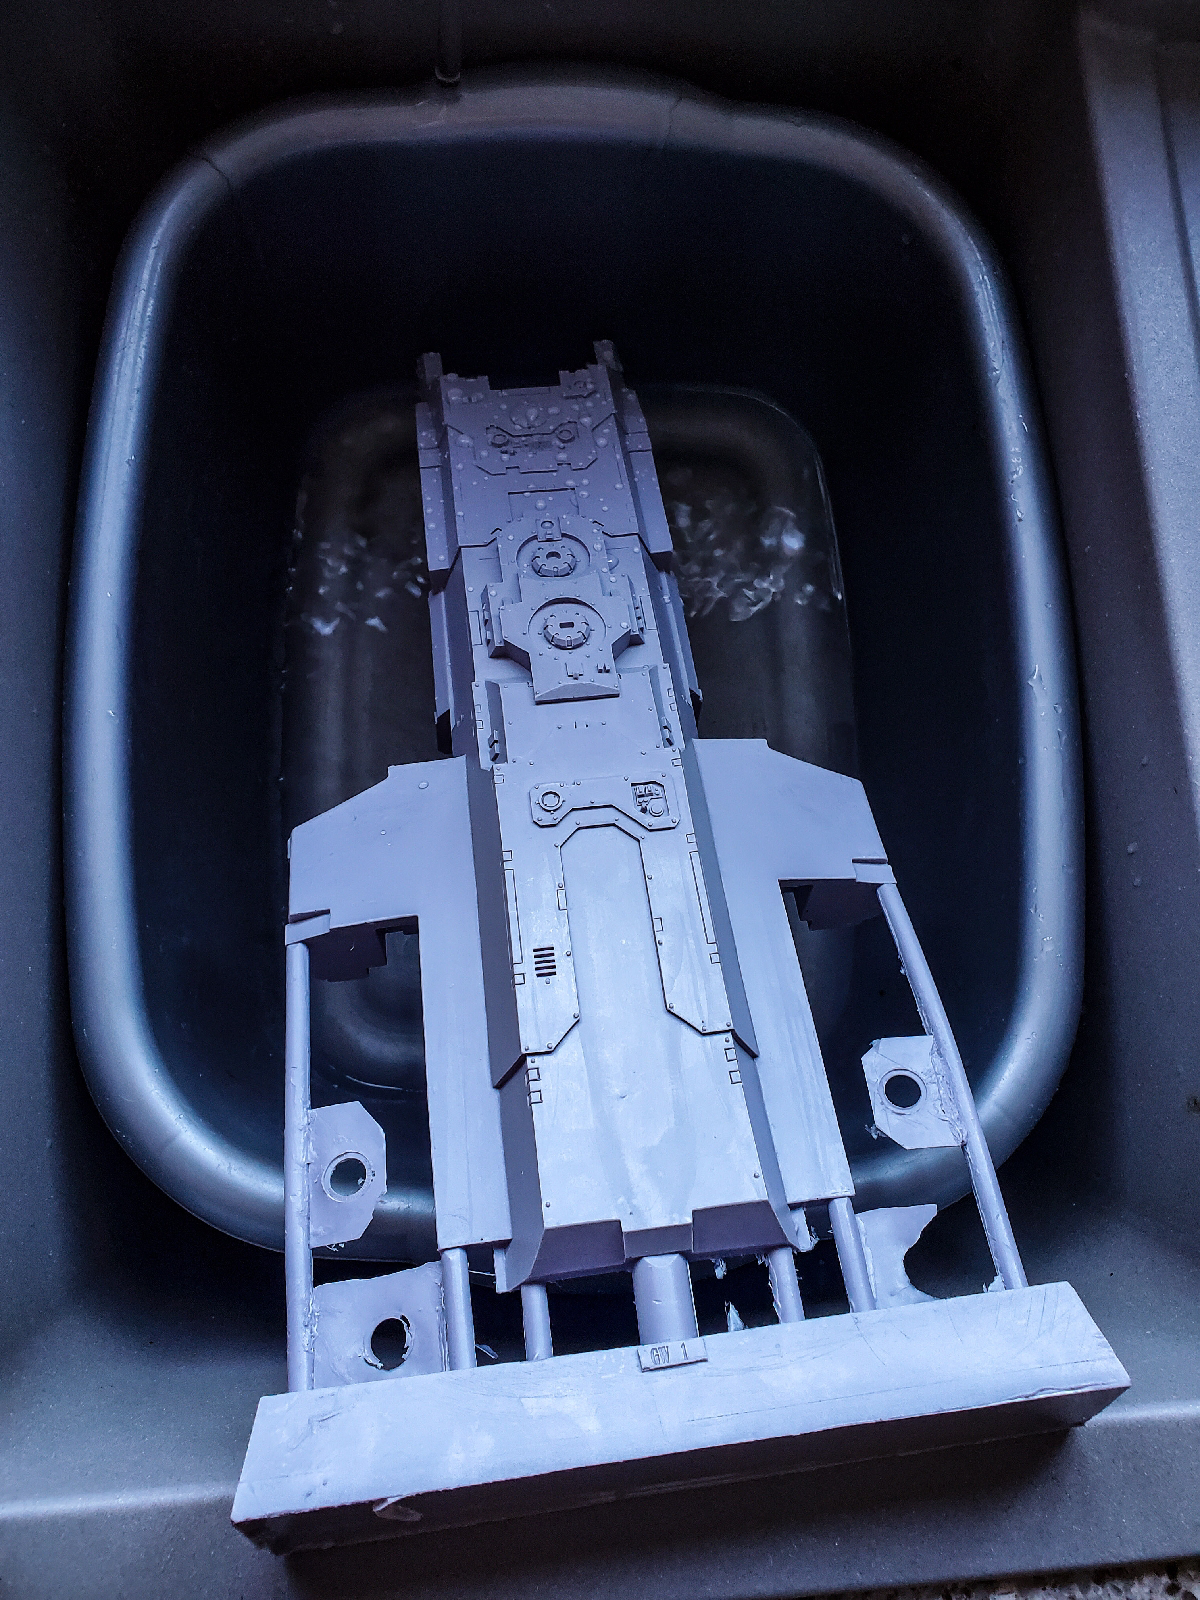
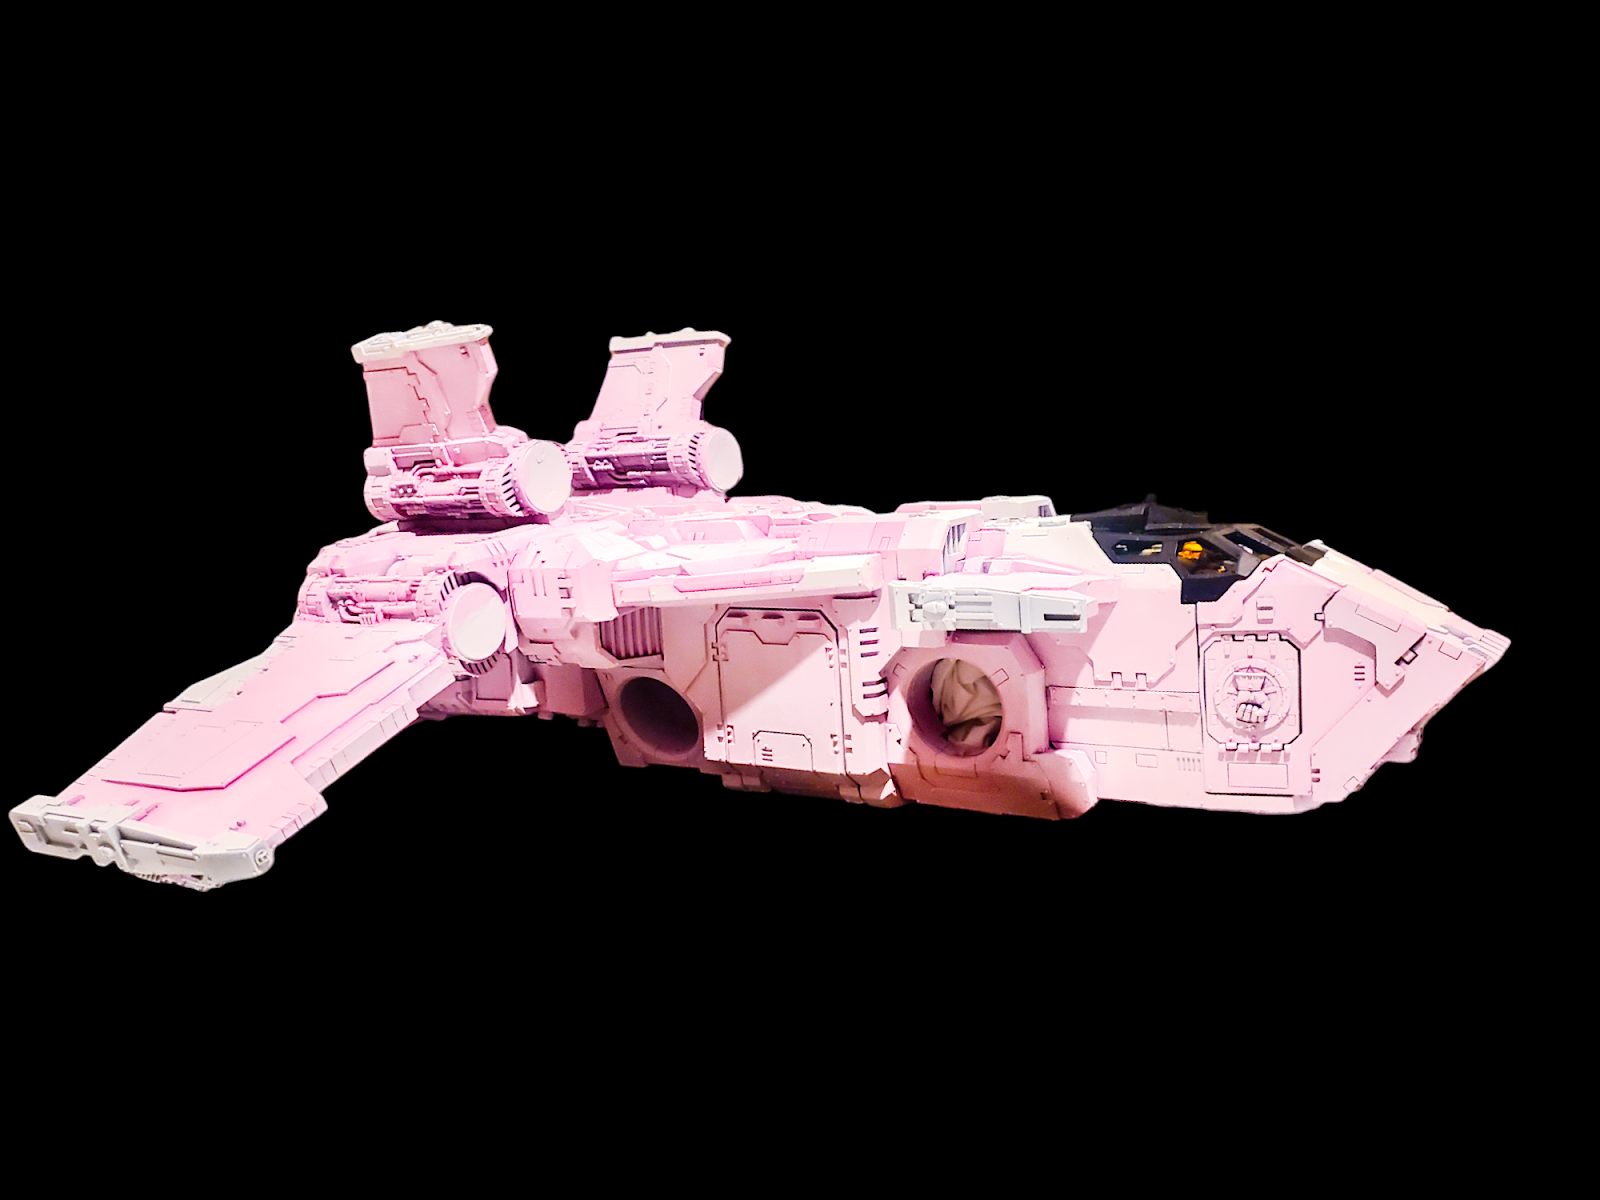
It feels like a long time ago now that I started this protect, got the entire thing white basecoated now, looking forwards to getting all the external paint down. Should start to see big progress coming now.
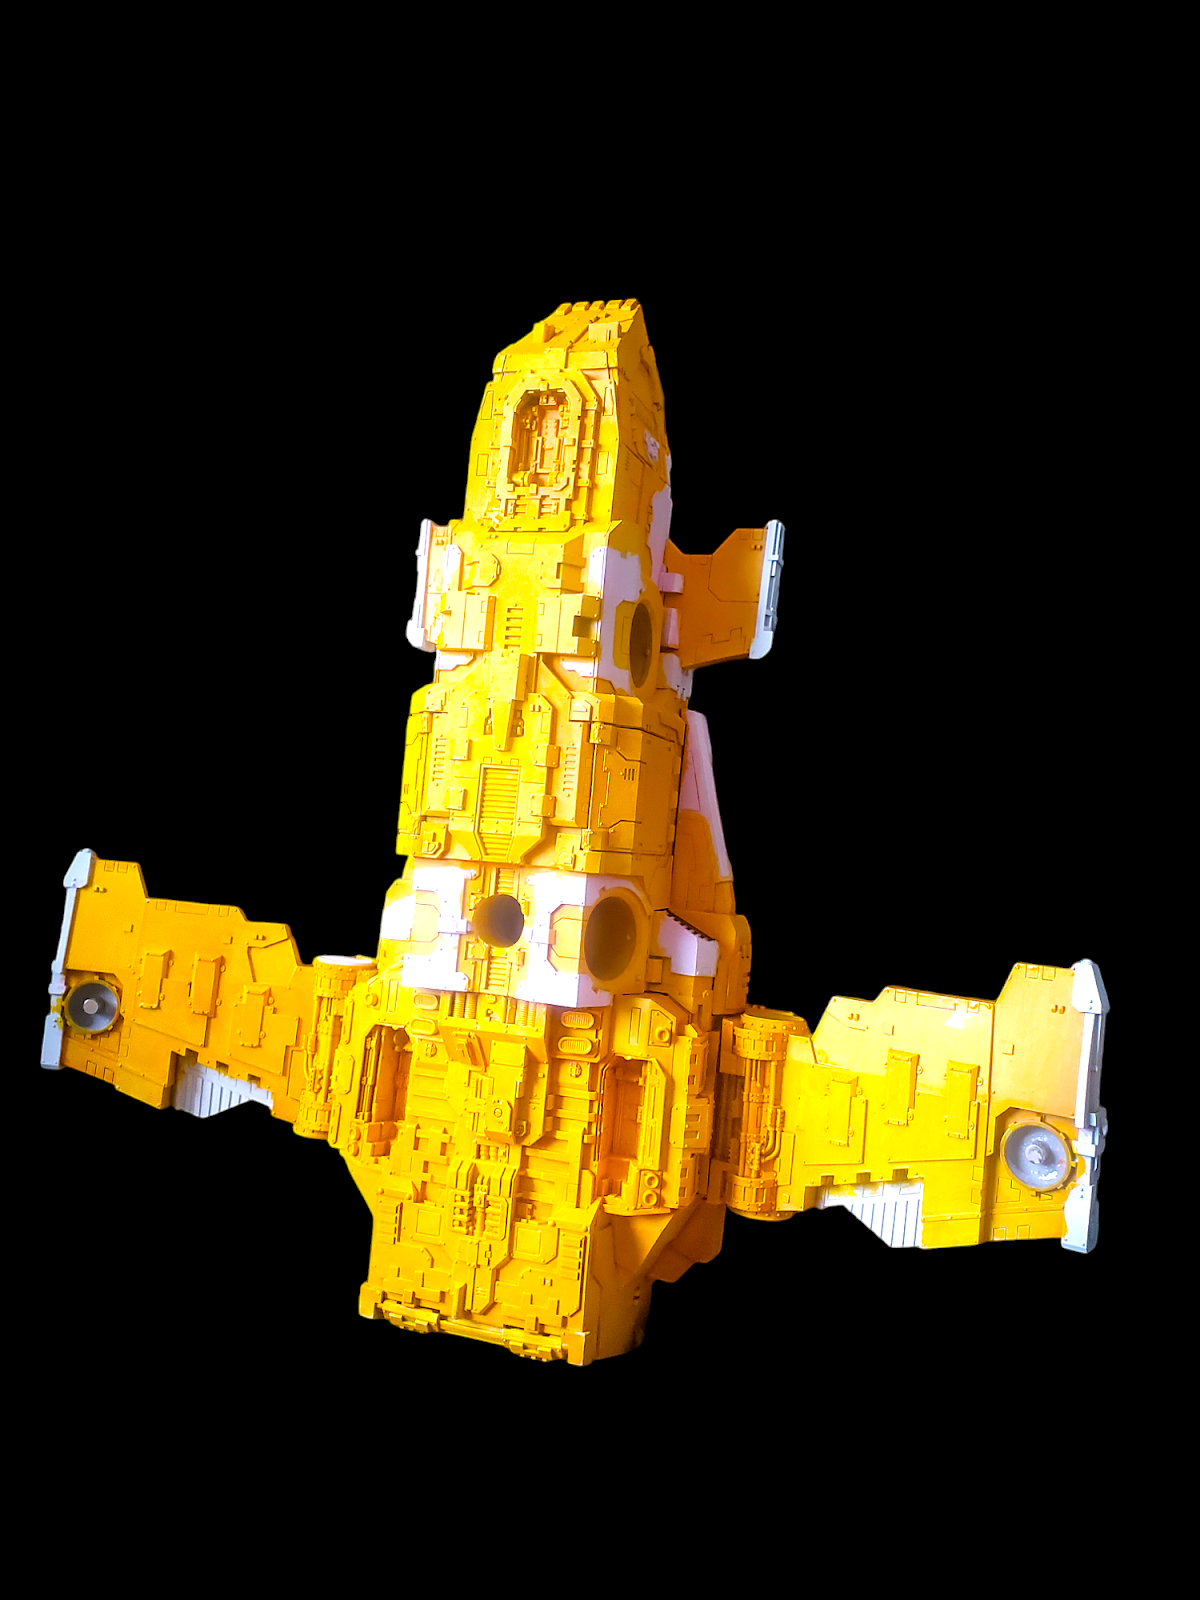
First base coat of yellow.


Started picking out panel lines and blocking out black armour accents.


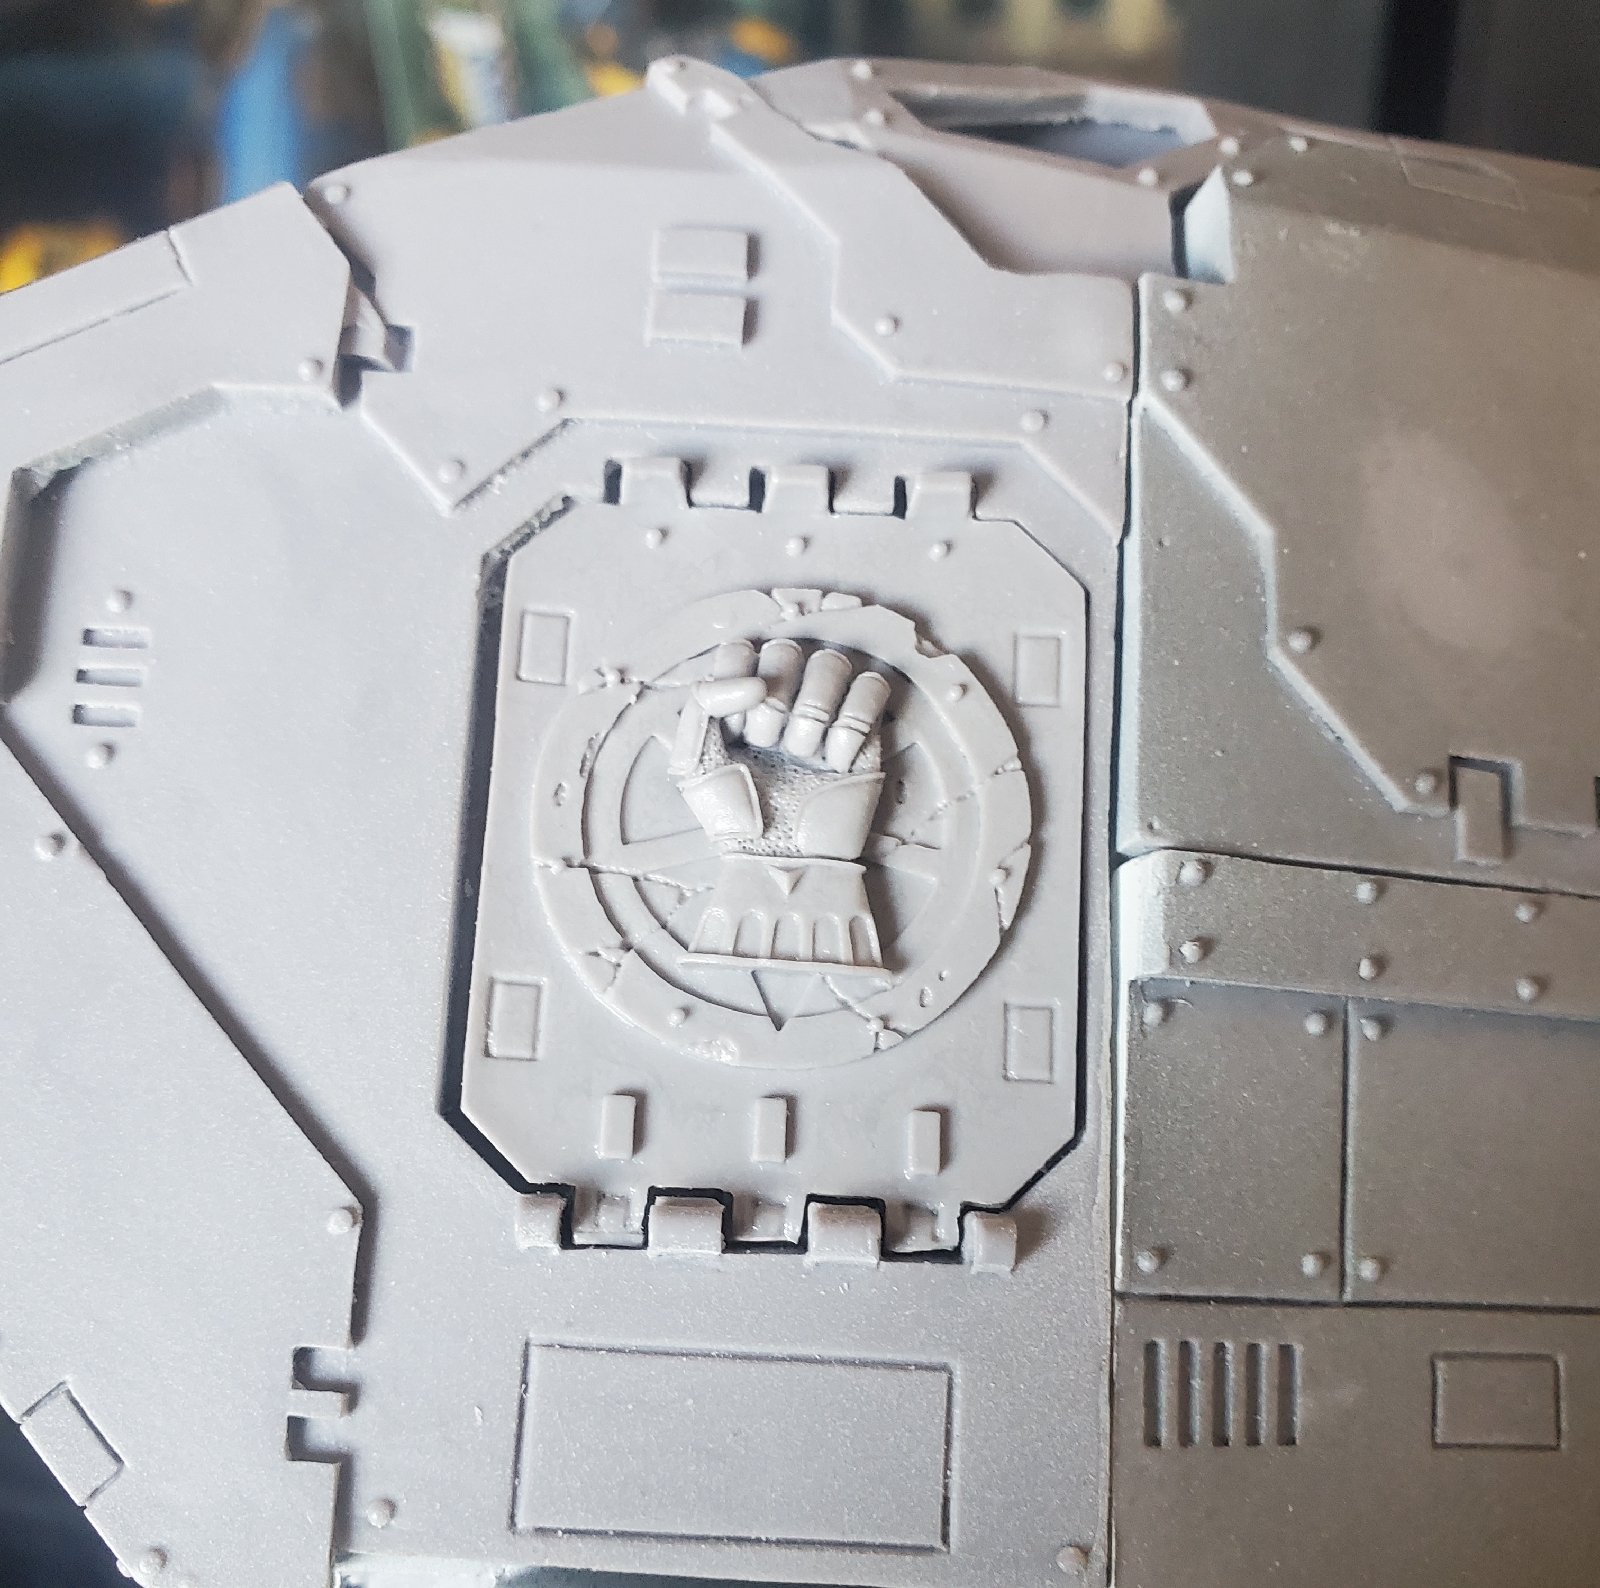
Started adding some decals to the nose cone.


Just wanted to say the biggest of thanks to my buddy @goddenzilla for doing the landing gear on my Stormbird. They needed slightly more work. More pins and the pistons actually had some movement of travel to get the lined up perfectly.

Genuinely the standard parts felt way too snappy for its size and weight. He had already put a rod through the middle and ended up basically replacing the resin pistons with more metal and pinned the life into it. It will actually support its many KGs of mass without any worry of breakage now. The Stormbird finishes the year of 2024 on its own legs and I couldn't be happier. What a journey it's been. Thanks again for the help bro. The airwing is taking shape.


January 2025!!!!

It takes a skilled mate with a 3D printer to step in and make the dream a reality! Can't wait to paint this up! I can't thank you guys enough.
PandaKitty Makes!!!


My buddy Lee came around and had precut the windows for the cockpit!


Installed with UV resin

Massive thanks to Goddenzilla for his hard work, input and help to make this bucketlist project so much better than if I'd gone it alone. Its massively appreciated.


Working progress on the landing pad.


He also filled my head with ideas of a Mk4 Techmarine stood in the front fiddling with the control panel on the lower deck. You'd see him with the door open so I had to do that!


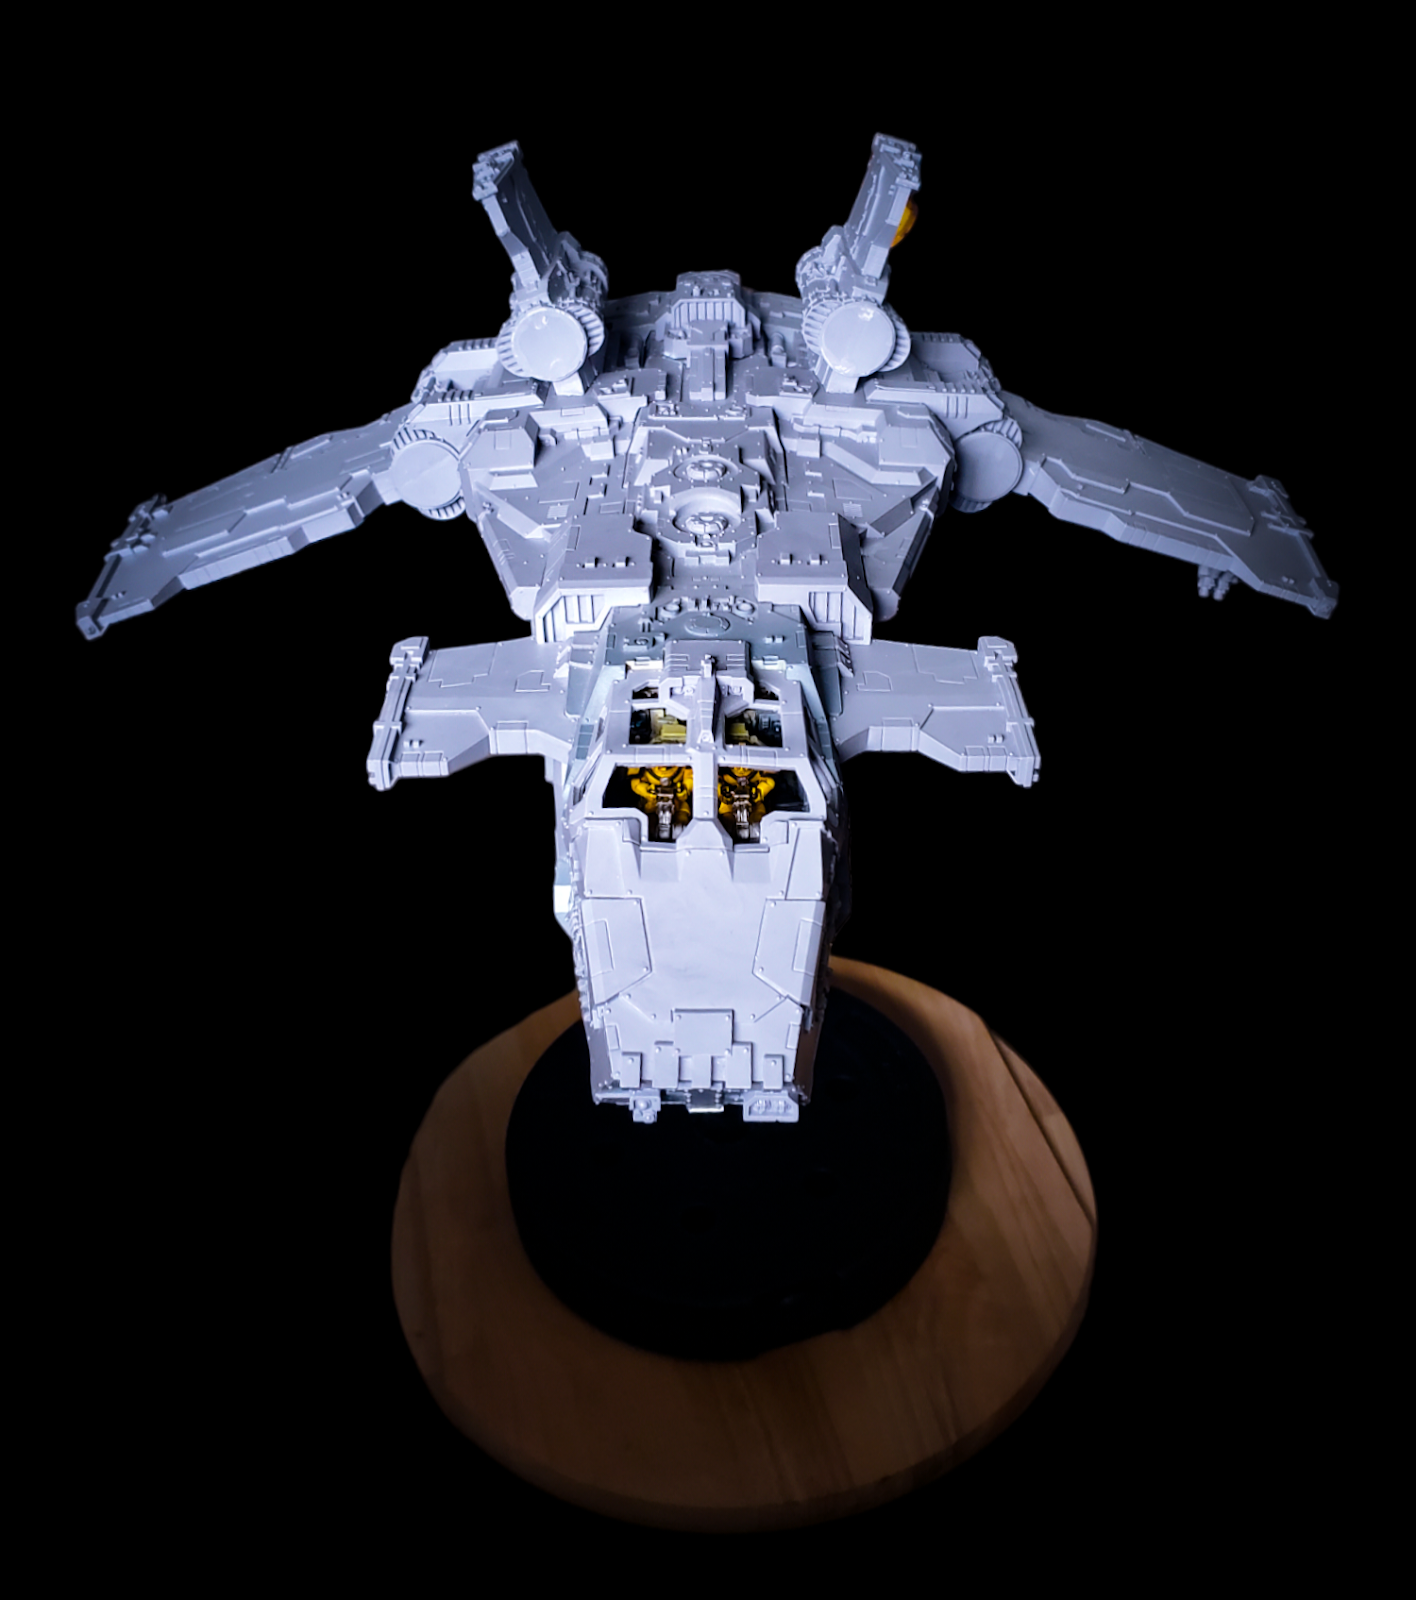
The Stormbird with an updated legion shot


Stormbird 002
"Oath of Retribution"
Served from the Imperial Fists battle barge Blade of Perdition.
The Blade of Perdition was an Imperial Fists warship most notably involved in the Battle Of Phall during the Horus Heresy.
The Battle of Phall was a major fleet engagement during the opening stages of the Horus Heresy, where the Imperial Fists' "Retribution Fleet" was ambushed by the Iron Warriors Legion in the Phall System after being stranded there by severe Warp Storms.
Key actions of the Blade of Perdition during this campaign included:
Boarding Action: Imperial Fists legionaries from the Blade of Perdition teleported onto the Iron Warriors Heavy Cruiser Sire of Sabaktes, planted a melta bomb in its armory, and destroyed the enemy vessel in a chain reaction explosion.
Rearguard Action: As the Imperial Fists fleet eventually retreated towards Terra under the command of Captain Alexis Polux, the Blade of Perdition served in the rearguard, fighting off the advancing Iron Warriors to allow as many allied ships as possible to escape into the Warp.
The Blade of Perdition successfully returned and joined the defense of the Sol System and Terra.
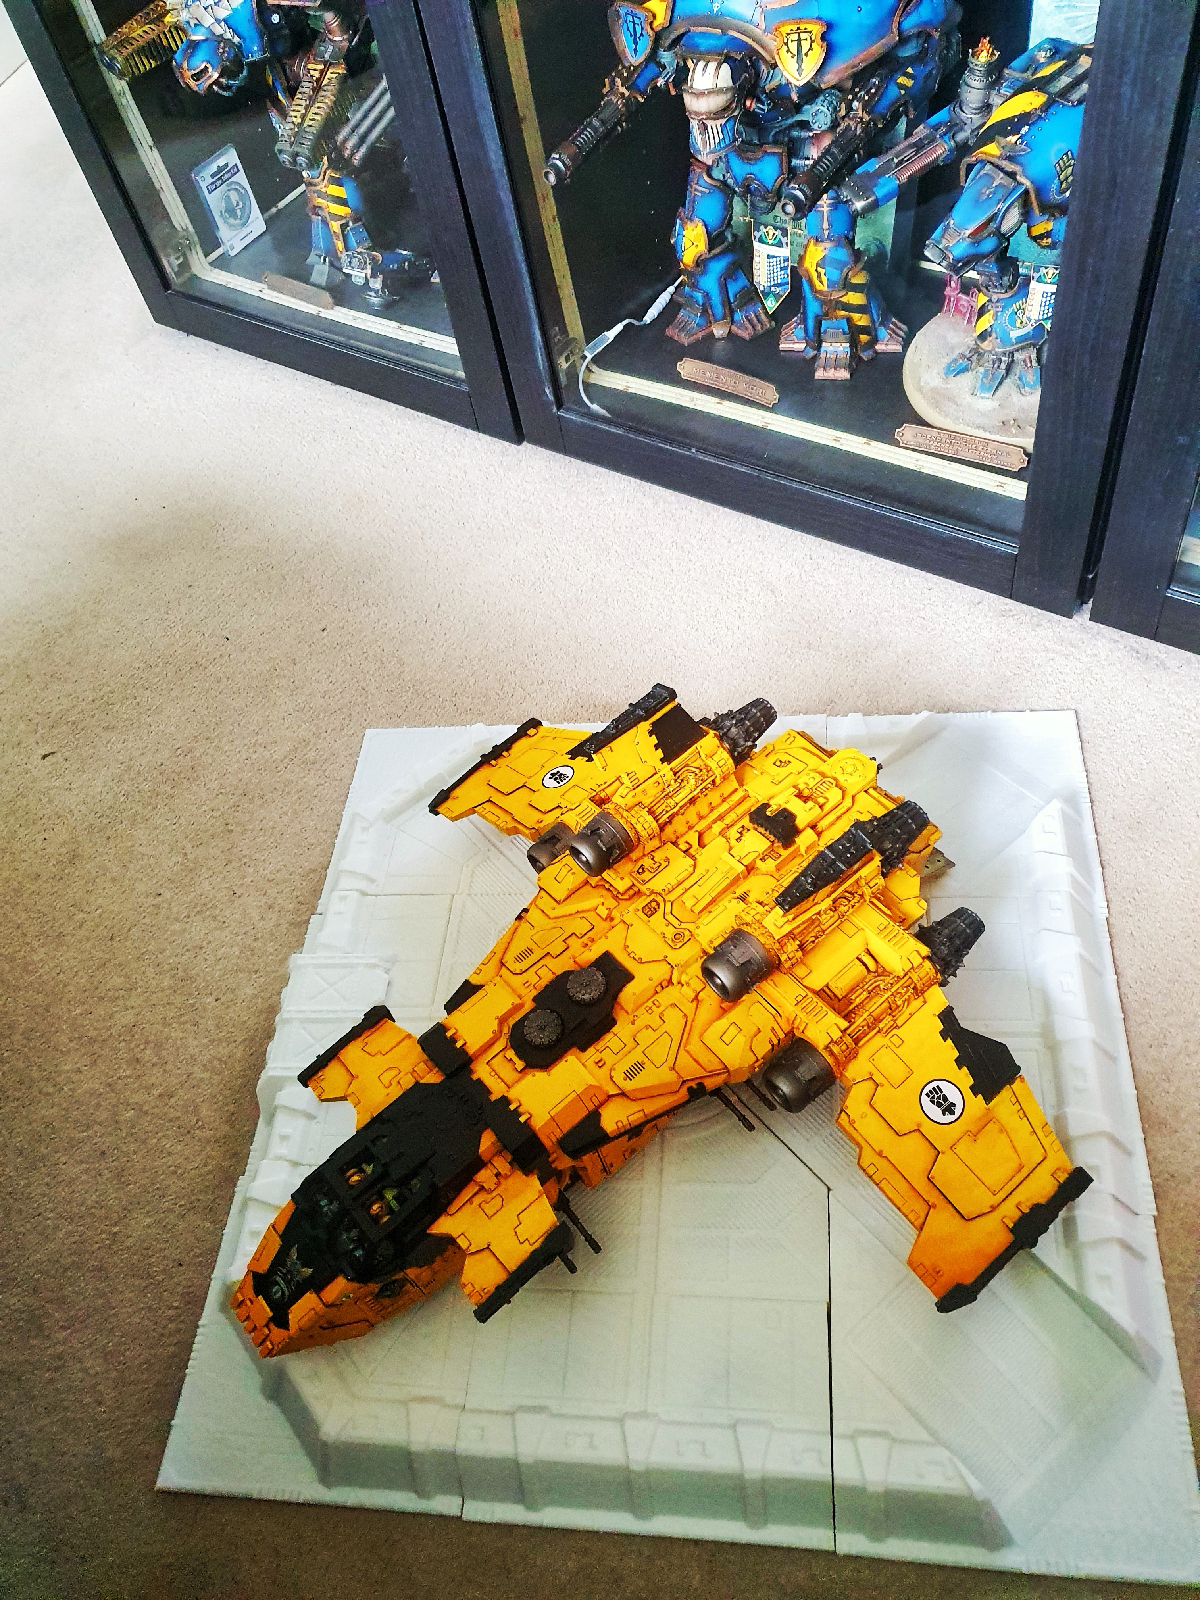
My buddy Paul Philburn finished off the Stormbird flight Base, and its epic! Love the ruins he's chosen, and the attention to detail and realism, and the colour pallet which contrasts perfectly with the big bird!
It's a good feeling to come to the end on the Stormbird project! It's been absolutely mental. The help from friends along the way. Like this, which have made it an awesome collaboration with people who I look up to in the hobby and made it that bit more special.


Pics of the base with better lighting, without the big bird casting its shadow!!


