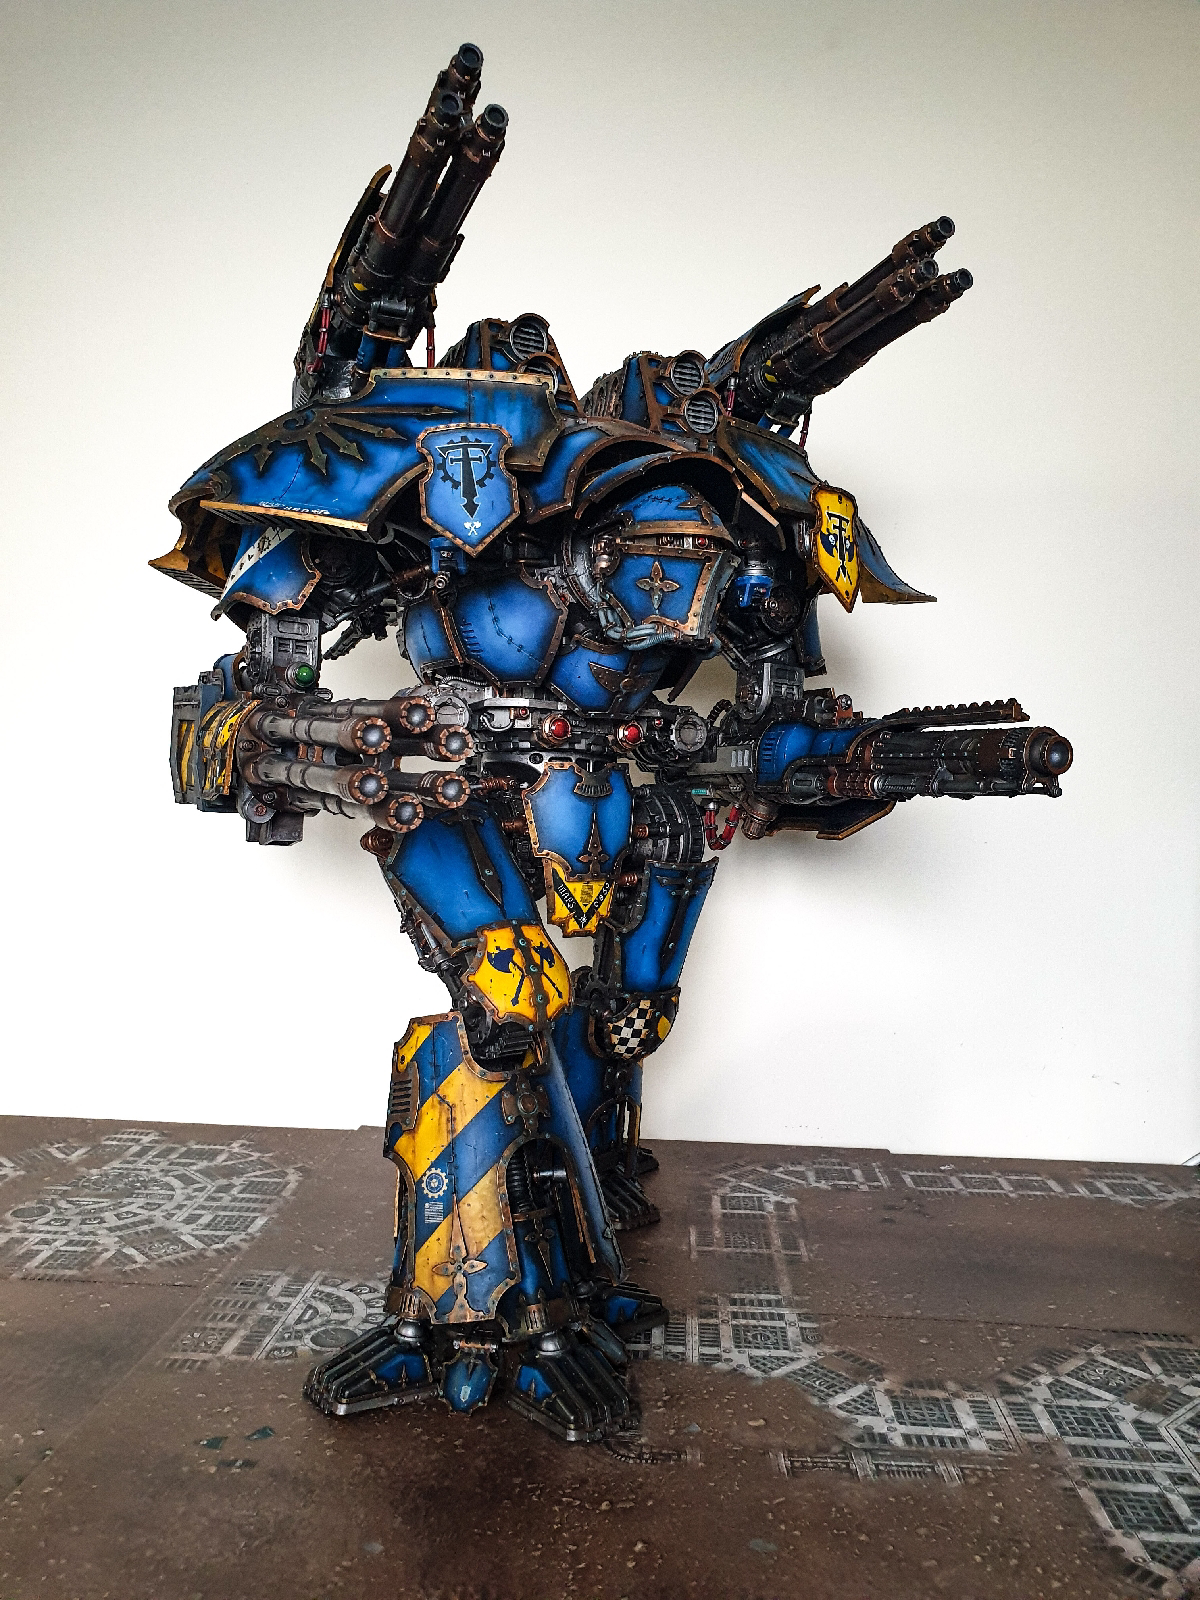
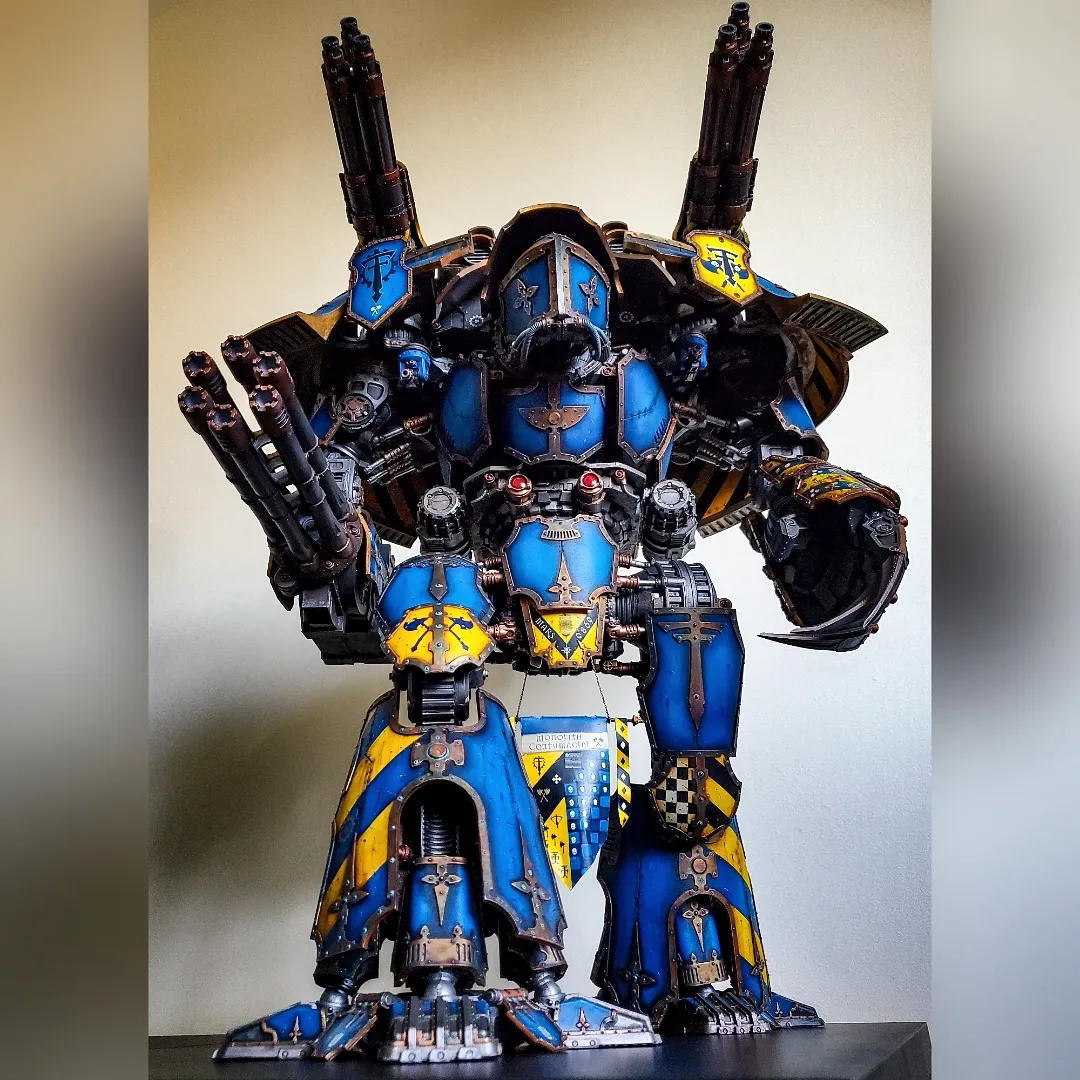
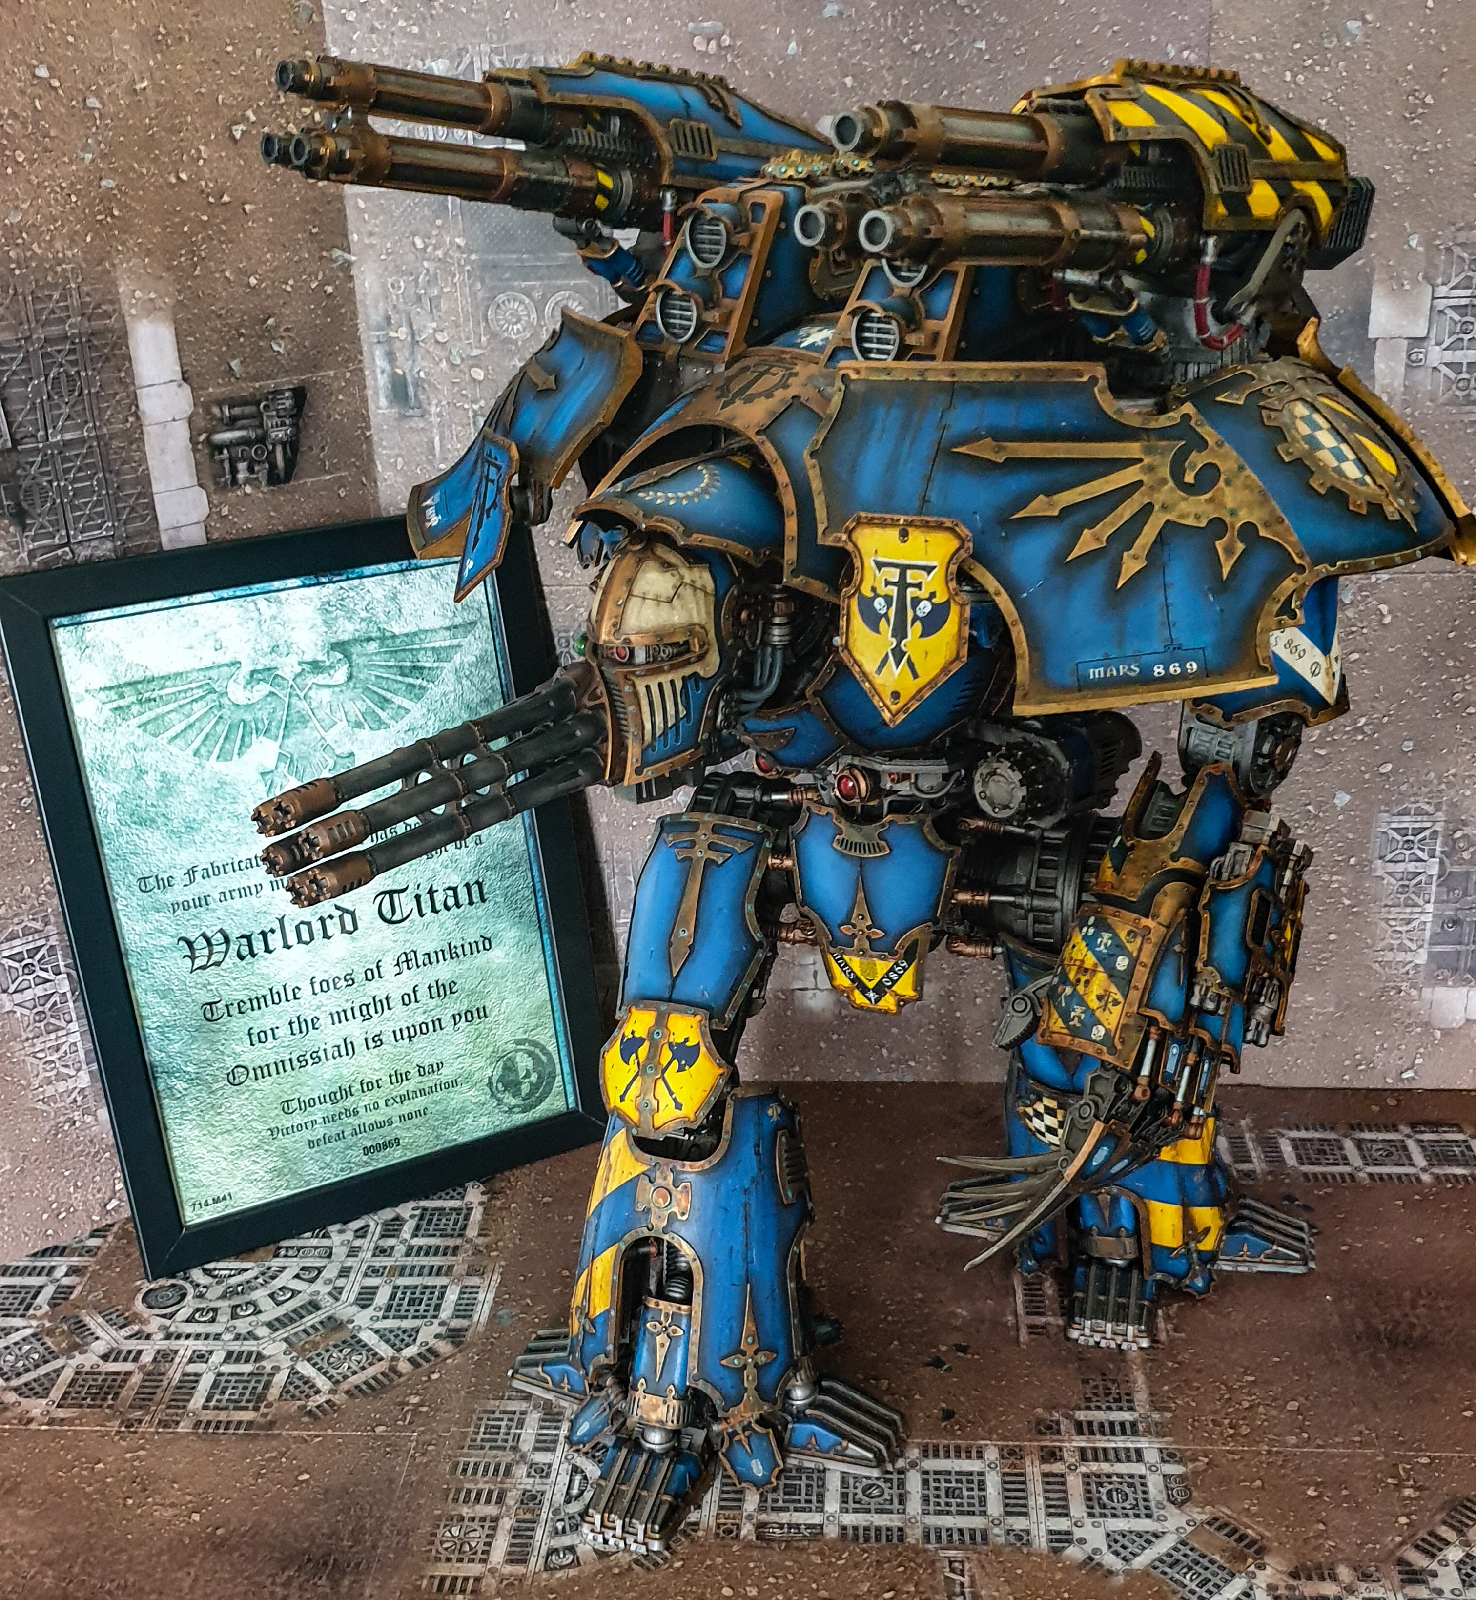
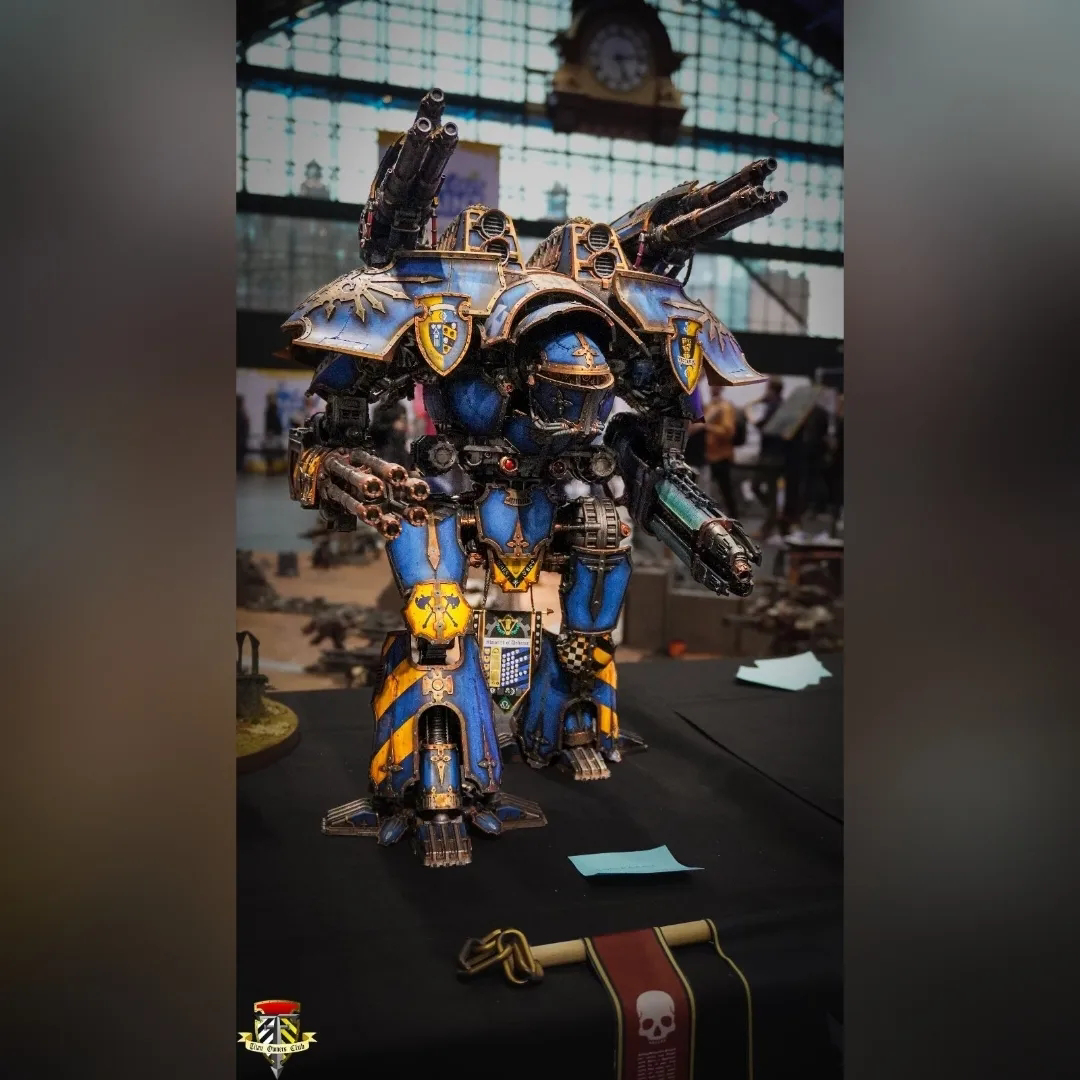
Forge World - Mars Pattern Warlord Titan - Monolith Of Defiance - Legio Victorum


Warlord Titan No.869 - Monolith of Defiance, Legio Victorum

Certificate Number: 000869
Titan Name: Monolith Of Defiance
Pattern: Mars Pattern Warlord Titan
Head Unit: Mars-Alpha
Primary Armament: Belicosa Volcano Cannon, Warlord Gatling Blaster, 2x Warlord Titan carapace Laser Blasters.

Princeps: #UNDESIGNATED#
Titan Legio: Legio Victorum
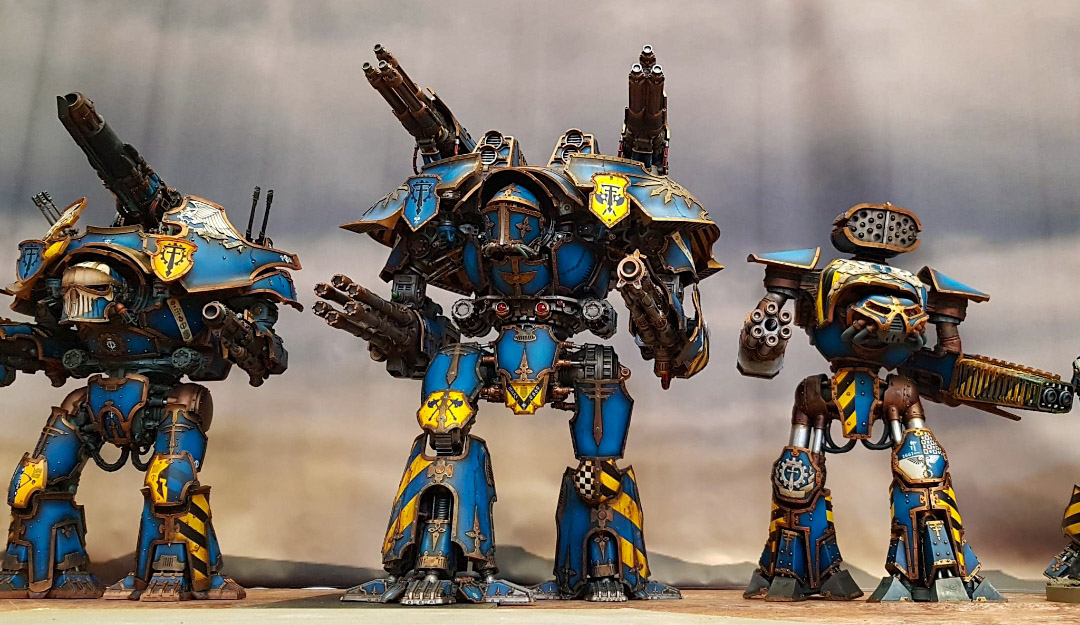
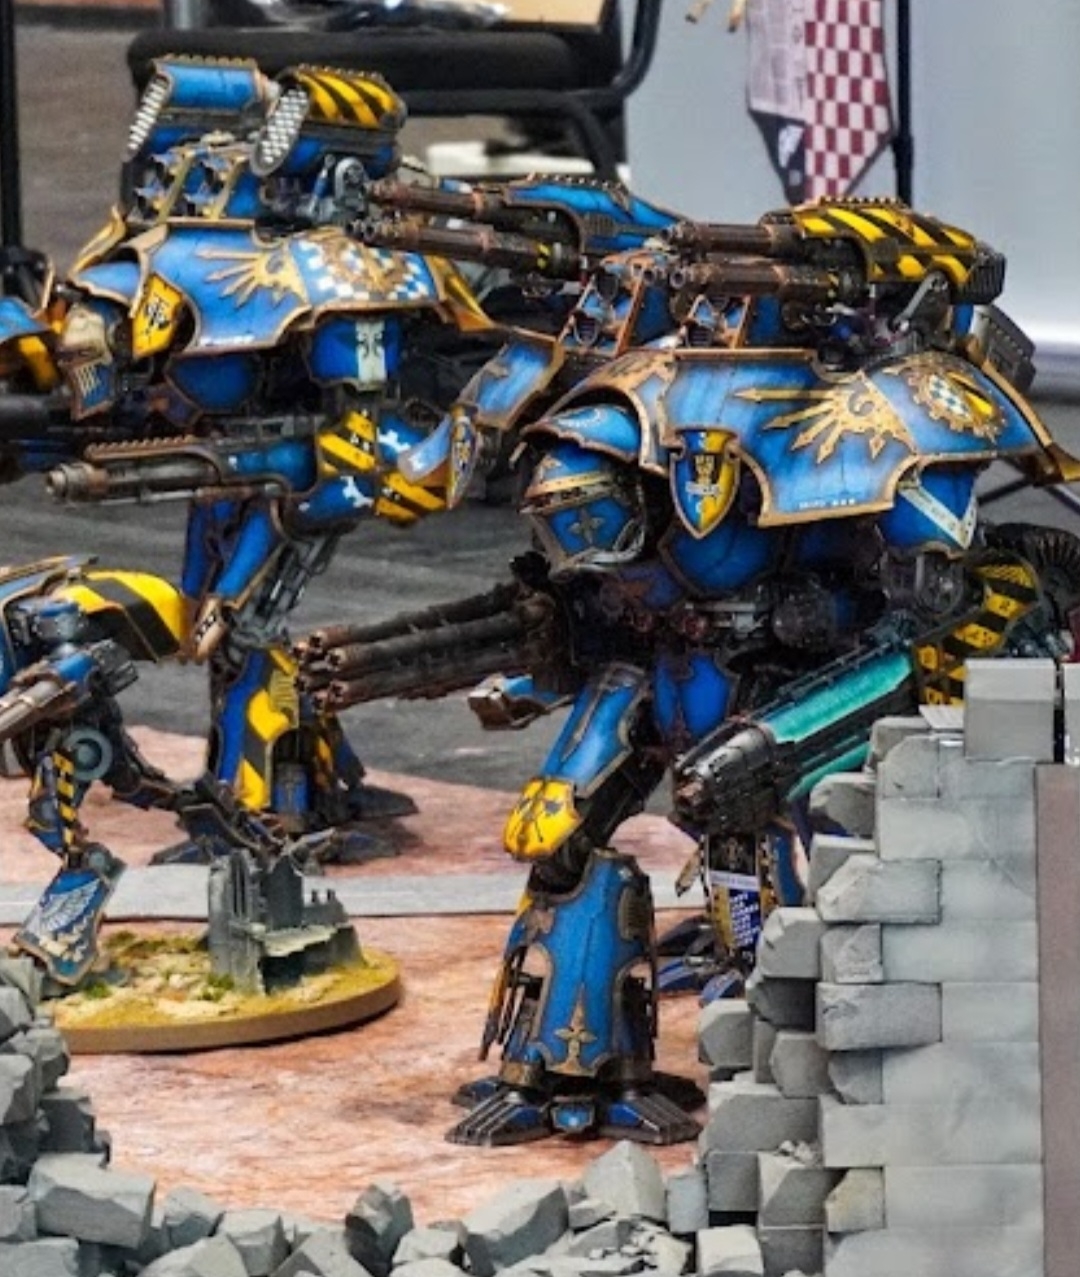
Battle Maniple Composition: Warlord (869); Reaver (2442); Warbringer (252); Mars Warhound (3063-1); Mars Warhound (4045)

Bear with me as I reflect on the build diary on one of the most rewarding model kits I've ever done.

I had the dream combo of a Warhound and a Reaver, it was time to add a Warlord to the maniple.

Started on a cold grey March morning of 2020!


After a long time saving the day was finally here to buy the biggest (currently) Imperial Titan! At around 2ft tall its a daunting prospect!


Obligatory Rhino pic, the brown box has two of the Red Titan boxes in for the body! The white boxes are arm and carapace weapon options and head! (Mars alpha pattern)


It nearly filled the car boot!!!

Just before starting the build the UK goes into its first Lockdown due to the worldwide Covid pandemic. I'm thankful I had something once again to focus on. My Titans always come along at just the right time for me.

The two big red boxes worth of resin, took 3 days to wash it all, there wasn't much mold release agent on it at all, it was a beautiful cast straight out of the box! 

Then the head and weapons. All combined about 10kgs worth of resin!! Its a heavy kit!

I started with the weapons because I didn't want to freak myself out diving straight into the main chassis build! I remember thinking the Reaver Titan Gatling was huge next to an Imperial Knights, the Warlord Gatling is next level massive!!!!

Warlord Gatling next to a Space Marine!

One of the most important and over looked part of the build is having the right tools, these Irwin quick grip clamps was invaluable to me, often leaving the epoxy to cure over night, i was pacing myself, I knew I'd likely only ever build one Warlord and I didn't want to rush a single thing. I was in it for a long journey.
I opted for the lasers because to me they look so intimidating compared to the Apocalypse Missile launchers. 


When it came to the legs I dry fitted the armour with elastic bands to check for clearance issues, you can see the holes in the hips I drilled for 2" screws for extra support. I did the same for the feet and ankles. Its going to be carrying some weight. While I'm on with legs super important advice if you're reading this and are thinking of building one...

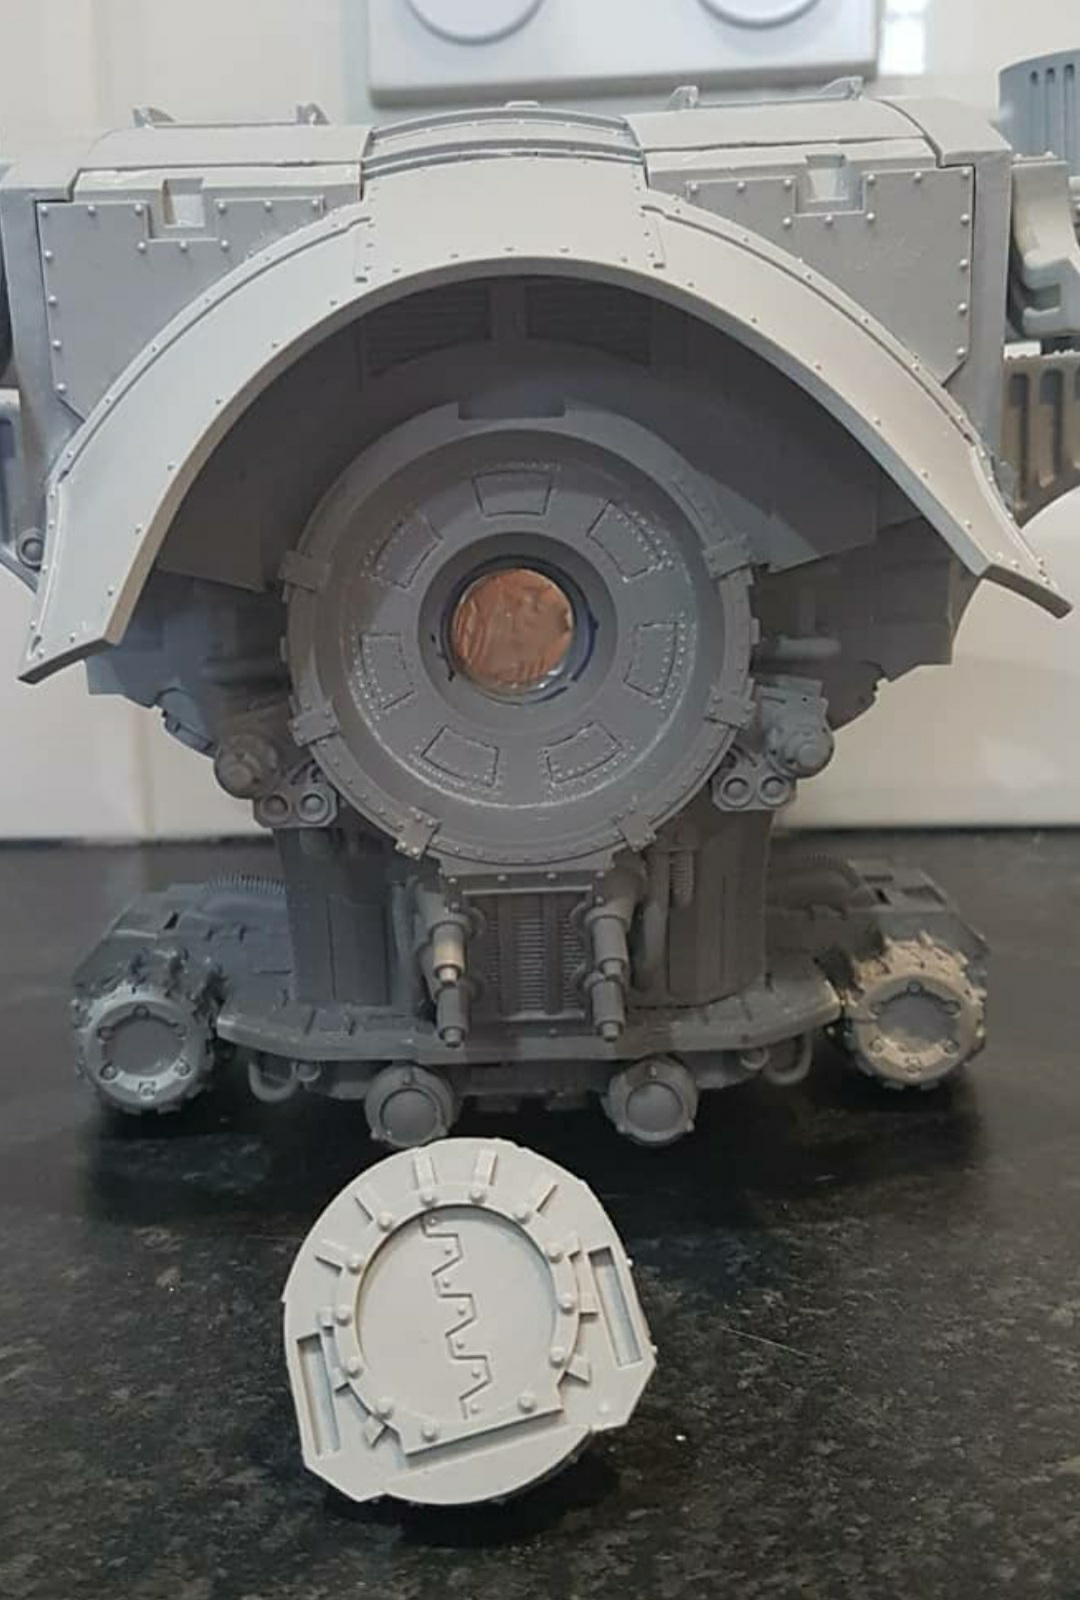
*DON'T FORGET THE HIP RINGS* 

It happened to me, and also my friend Shadow from the Titan Owners Club, he had the exact same episode. I remember test fitting everything, all good, don't forget the hip rings, all good, no clearance worries so let's glue this monster. Mix JB Quick Weld, glue hips, put the 2" screws in, nicely also coated in epoxy weld. Sit back now nicely relaxed to admire the setting pose, then glance down ro see the horror of a hip ring on the counter. Glueing Titan hips can be a juggling act, if you can get an extra pair of hands DO IT..... so commence the mad scramble to get the now setting leg back off against the clock, forget how screwdrivers work, you know that kind of panic!!! Got to it just in time before the epoxy had gone too far. It was a close shave!!! Learn from our mistakes, don't repeat them!


Magnetised the head, incase I wanted to swap it out, there was 3 head options available back in March 2020. Mars Alpha, Mars Beta (Forge World exclusive) and the now discontinued Lucius head.

Magnetised the point defence weapons. They can turn now and most importantly id not accidently snap them off during painting. 

I'll cover magnets now! 🧲 my friend really helped me out with magnet advice, its something I've been asked a lot about so he's kindly allowed me to reproduce the info here. 
8mm dia x 1mm magnets for defence weapons.


20mm x 2mm for the head. My resin was thin on the front plate, i added some DAS modelling clay behind the resin where the magnet is mounted just to add some reinforment. I didn't want the resin to split there! 


8mm dia x 5mm for the arms, i also used them for the shields, as having head swap ideas, each head has its own shield design. Also helps with painting and transporting to remove anything vulnerable to snapping!


I had these 20x3mm magnets left over from my Reaver build so used them to stabilise the carapace weapons.
as well as the waist to torso.i sunk it into the hip section, while glued it with epoxy to the bottom of the torso, the resin was thin there so didn't want to cut any of that resin out! I added clay to the inside once again to add extra support to the thin resin.
because of the way I've done it the torso twists nicely and has support against knocking, the torso won't wobble off the legs and the magnet isn't overly strong so you can still separate them easily. 

#869 stands!!! 

Next was to finish the sub assemblies and prime!!

Now a few weeks into lockdown getting supplies was proving to get difficult. Games Workshop was officially closed, retail, manufacturing, warehouse, distribution. The products left in the independent online shops was fast running out, primers and shade paints like nuln oil was becoming rarer than Toilet Rolls as the panic buying continued! 

I actually want to do a huge shout out to https://www.marionvillemodels.com for the super fast despatch times keeping me going through lockdown. I did 3 or 4 orders for supplies on this one Titan because I kept running out of paints etc. I did one order late in the afternoon and the very next morning it was with me, I didn't loose a single day in wait time. That brings me to my next wise words of advice are as follows, when working with Titans, and you think you have bought just enough products to do the job, you have failed yourself, seriously, order 3 more of everything, glue, primer, paint, washes. You have just massively underestimated the job you are about to do!!! It caught me out time after time on this build. Titans are thirsty with modelling supplies and will consume everything fast!!!!

if I could go back and start again id change the pose and also this step of blasting everything with metallic base coat. I went full on Terminator chrome here with GWs Leadbelcher spray paint and I had a pig of a time getting any paint to do as its told on top of it. Washes slid off, paint slid off. I used a lot of Testers dullcoat (RIP for the UK international distribution has stopped) to try and get the shiney paint back into a workable threshold. 

My next step was the Head, I usually start at the feet with Titans and work up so the boring bits are all done first and nothing gets rushed at the end of the project but in this case I couldn't help myself!!! Not lost on me is the price of this kit and the entire model will be a long journey anyways, every pipe, cable, nut and bolt will get painted whether you can see it or not!!!! 

maybe I went over board with hazard stripes no one will ever see but I had fun doing it!!!
Mars Alpha head complete, its time to move on. The Mars Alpha is my favourite head, however I wanted a Beta head to do some Skull freehanding on. Actually Princeps Rob W from the Titan Owners Club had the same idea and has done it too. I'm hoping it will still happen one day. 

sadly you can't see these hazard stripes as they end up being covered by another panel! We know they are there tho!!! 
Ah well, this titan will have a theme of Easter eggs to find and lots of hidden stripes! 

one month into the build, I have a lot of compliments on the depth of the blue colour, honestly its nothing without the black edging, that's the real secret to it, the black gives it the depth of contrast to the colour and without it it doesn't look 'correct' I've enjoyed adding my bit to Legio Victorum, we didn't have much to go on until Book 9 - Crusade came out nearly at the end of this build, and I hope we see many more Titans registered to the Legio in future. That's my hope. 
Adding gold trim, I do weather the life out of trim so it doesn't end up being so bright,it adds age and character to the Titan. I am a trim addict, I know some people hate painting it but I switch off and enjoy it, I'm usually dissapointed when its all finished! 
really enjoyed working on the panel for Volcano cannon. I'm not very good at choosing weapons for Titans, especially when it comes to what to arm them with for Walks. I always go for what I can paint well with lots of space for cool ideas over the optimum devastating load out! The kill markings represents various Engine kills are taken from the Adeptus Titanicus decal sheet.
more blue armour panels! 

gatling without its armour panels, more details to be hidden away forever!! 


Time to start the legs!

weathering the trim adds so much history and character to the model! I kept adding weathering and streaking to the metal skeleton too, the chassis had to look old! 
id put the hazard stripes on the inner armour of the leg knowing full well when the main plates go on, it will be mostly hidden from view, but you could see it from certain angles which gave me an idea. ....

I decided to paint the inner parts of the panels too, I think some might think a step too far but there's detail there and I've paid handsomely for it haha it needs to be painted and again from some angles you can make that out!!!

I want to leave no stone unturned on this Titan! 

id been working on the thigh plates, knees and groin plates, I went with more yellow to break up the blue, the knee proudly showing the double Crossed Battle axe icon of the Warlord titan! Something im proud to see as a blast from the past. The Warlord Titan box set for Adeptus Titanicus in 1988 featured that crossed axe icon! 
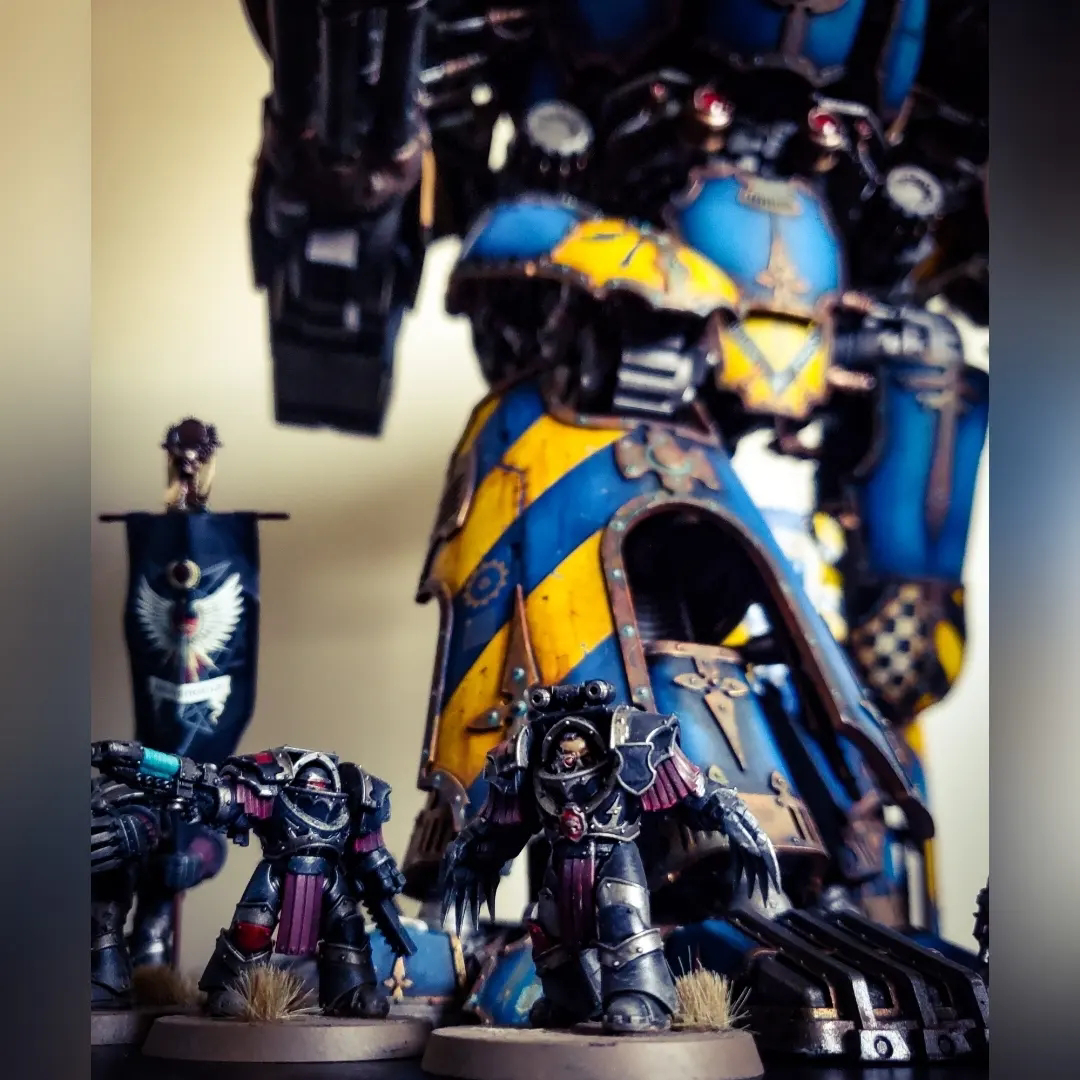
Mars Pattern Warlord Titan #869 the other knee matched my first Reaver Titan, a Maniple marking showing they are part of the same formation and walk together.
I also detailed each of the armoured toe flaps that go between the toes on the feet, mostly hidden by armour in some cases but I thought some kind of inspirational text would help boost morale to friendly troops or help to weaken the morale of enemy troops that happen to get this close to a towering God-Engine. Inspirational quotes/imperial propaganda about the God Emperor of man might be the last thing you see as you're trampled underfoot!!! 
these lovely panels will sadly mostly be hidden from view when the main armour goes over them!


Speaking of main armour! I decided to do Blue and yellow chevrons on this Titan, I don't really know why, I wanted it to be different in some way over every other Titan in the maniple, that bit more special, maybe something to do with rank seniority. Its a Warlord Titan after all. I wanted to weather the legs more and have more grime streaks and a lighter colour would help I thought. The armour would have had puny rounds impact against them and of course marks and scratches through walking on and through buildings and Battle field debris. I wanted it to have history and character, heavily maintained but also has seen some action. 

another proud Titanicus T and double Warlord axes displayed on the leg with more inspirational markings. You can only just make out that toe flap too! I wanted Easter eggs all over this thing, the more you look the more you'll find!

better daylight pics 
Theres a glimpse of those inner panel chevrons if you look hard enough! 

i don't think those hidden chevrons was wasted time! 

so much going on with over lapping armour, I was really surprised at just how much clearance room it has, you could do some great poses with the kit and not have as many limitations as some of the other Titans!
Really starting to look the part now! 

made a start on the main carapace armour which gives in that big beetle bulk. Again the cheques and hazard markings of a specific maniple idea that I've kind of moved away from doing now, it was feeling too familiar across too many models but at the time of painting that was the plan!

I also wanted more hidden hazard stripes, you can still very much see them from certain angles. 


It was also at this time I was also working on a 2nd Warhound Titan! But I'll get to that one in its own story!!

The family grows, I was actually saving hard for a Nemesis Warbringer Titan, but GW / Forgeworld was still closed to the public however manufacturing was starting to get going again however the online store was very depleted. As I write this a year later in 2021 it still hasnt recovered! A Warhound came available which needed some TLC and I used my Warbringer savings to acquire it, I mean a hunting pack of two had to be done right!! I still had time for the WARBRINGER to complete the collection of one of each Titan class at least as soon as WHW reopened! 

In the meantime I had plenty to crack on with!

a snap shot of how it looked at that moment in time, it did change, I used Legio Gryphonicus decals as a template and painted over them but on glance I thought it was still a bit too familiar with their awesome legio. A small part of me thinks if I could have gone back and started again, I might have gone Astorum or Gryphonicus, that said I'm really enjoying Legio Victorum, its a Legio that I've really tried to put my own stamp on, maybe we will see more Titans done this way in future, I really do hope so. I'm not claiming ownership of it in anyway, and I really do hope to see other members of the TOC group joining with Victorum engines. I know of one in progress as I write this and how incredibly flattering that is to have inspired someone to join Legio  Victorum because they liked what I did with a scheme! 

I was also having a Titan Owners Club owners interview with our US friend Shadow so I took a few updated pics for him, so I'll include that as its part of its history. 

Displayed with some of my 2018 Knights, I did them as Terryn but perminantly attached to Legio Victorum now. I'm hoping to add yellow fists to them in time! At the time of actual filming id just acquired that missing part of the puzzle, the Warbringer Titan, with many thanks to a friend popping into WHW as soon as it reopened and bagging one off the shelf. I probably still wouldn't have one now if it wasn't for that because its almost constantly out of stock online. The Warby will get its own post too!


Again, cheques and hazard stripes are the iconography of this maniple so I think it works. I was only ever intending to do one knight, which I did my own thing with, it was never going to be an army, or attached to a Titan Legio so I've had to come up with a back story!!!! 

also during lockdown ikea was closed so it took a long time to acquire a cabinet to keep my investment safe, I was a bit gutted to find that the glass door wouldn't close because the volcano cannon is way too big!!!! The saga goes on, i ordered an Arioch Power Claw from Forge World just so my Titan would look complete on display!! 

knuckles, its almost the size of a human hand! 

I went with the full claw option because of how menacing it looks, I wish I hadn't been so eager to jump right in and build it so fast without taking my time to pin everything to have it articulated.

Probably way too many kill markings but i was enjoying myself!! I heard Lee from @theforgeofmars tell a tale of a Warlord using the power claw to punch and tear into enemy titans, pulling away valuable armour and unleashing the vulcan mega bolter mounted on the back of its hand straight into the freshly exposed heart of its opponent, imagine the damage of those twin gatlings, and I imagined they would just be used to strip down void shields or target infantry! With that info in my mind its punched down so many titans in melee combat!!!!
Again, a snaphot in time because there was a few things I didn't like, about the straight down angle of the arm, I don't imagine a titan would swing its arm like a human walking  but it didn't look right so I broke it apart and changed the angle so it looks a little better now!
I also redressed the heraldic shields, I got a couple of Beta shields my Titan buddy Marc had going spare and it gave me the chance to fix the things I didn't like and put the Warlord more in keeping with my Warbringer!! I also removed the white T decals from the carapace, it didn't look right to me and stole the attention too much. Now its slightly more subtle, if there is such a thing on a WARLORD Titan!!!
 
Awesome Shout out from the Titan Owners club! 
A quick run down finally, it was an amazing journey to finally get to build the Warlord model, it was a dream for many years and one which seemed i'd unlikely ever manage to do. It's not lost on me the price of these models and the personal sacrifices it took to make it happen, affectively putting all life on hold until the goal is reached. It really was a long journey not a sprint, the best part of 5 months work, working 7+ hours a day, 7 days a week on it. It if wasn't for lock down I think I'd still be on it now!! 

I often get asked if its an easy build being a more modern cad designed model kit, with modern colour instructions and my answer is both yes and no. I still think the Reaver is by far the easiest build, despite having a few things here and there which are slightly irritating to some but are part of its charm (looking at you toe pistons) the WARLORD kit for me went together very well, it wasn't a fight or chore to build it, no huge gaps to sort, no bad resin, no misshapen parts which can happen with any resin kit. So it really did feel like a modern kit BUT its 2ft tall and around the 10kg mark, its big and very heavy and that presented me with the odd headache, and at times felt like a juggling act. Just the size alone made the legs quite tricky and an extra pair of hands is recommended by me anyways. It would have made life a lot easier. Something to think about. 

I love the social aspect of the club. When I joined the Titan Owners Club it was 100% about the Titan models for me. Now over two years in its become so much more than that and what makes the club so special is the people!! No ego, no dick swinging, its about people that all have a love of these models that go out of their way to help and support one another. I didn't expect to join and make genuine friendships the way I have. If you're apprehensive about titan building we have the main blog and Instagram and Facebook pages with a wealth of knowledge and expertise. I'm still learning from these guys and girls! The club is insanely friendly. 

I was feeling very blue when I came to end of the paint and the journey was over. I'm very unlikely to ever get to build a second, (this ended up now not being entirely true as of 2023) but I do still have long term plans for this Titan, expanding the arsenal to choose from when it comes to the load outs, it won't be totally "finished" for years to come. I may even repaint it one day, there's nothing stopping that. 

If I had the funds and space to keep a second WARLORD Titan then I'd absolutely get another, that says a lot about the model I think. I also feel the same about the Warbringer. Money aside these big models take up a lot of space!!! 

Updated pics 2023 and photos from Walks.
Titan Walk 2021 my Warlord scored her first Engine kilKill!
Walking with Legio Solaria and Legio Metalica against the Traitors 

Monolith Of Defiance walks. Proud day.


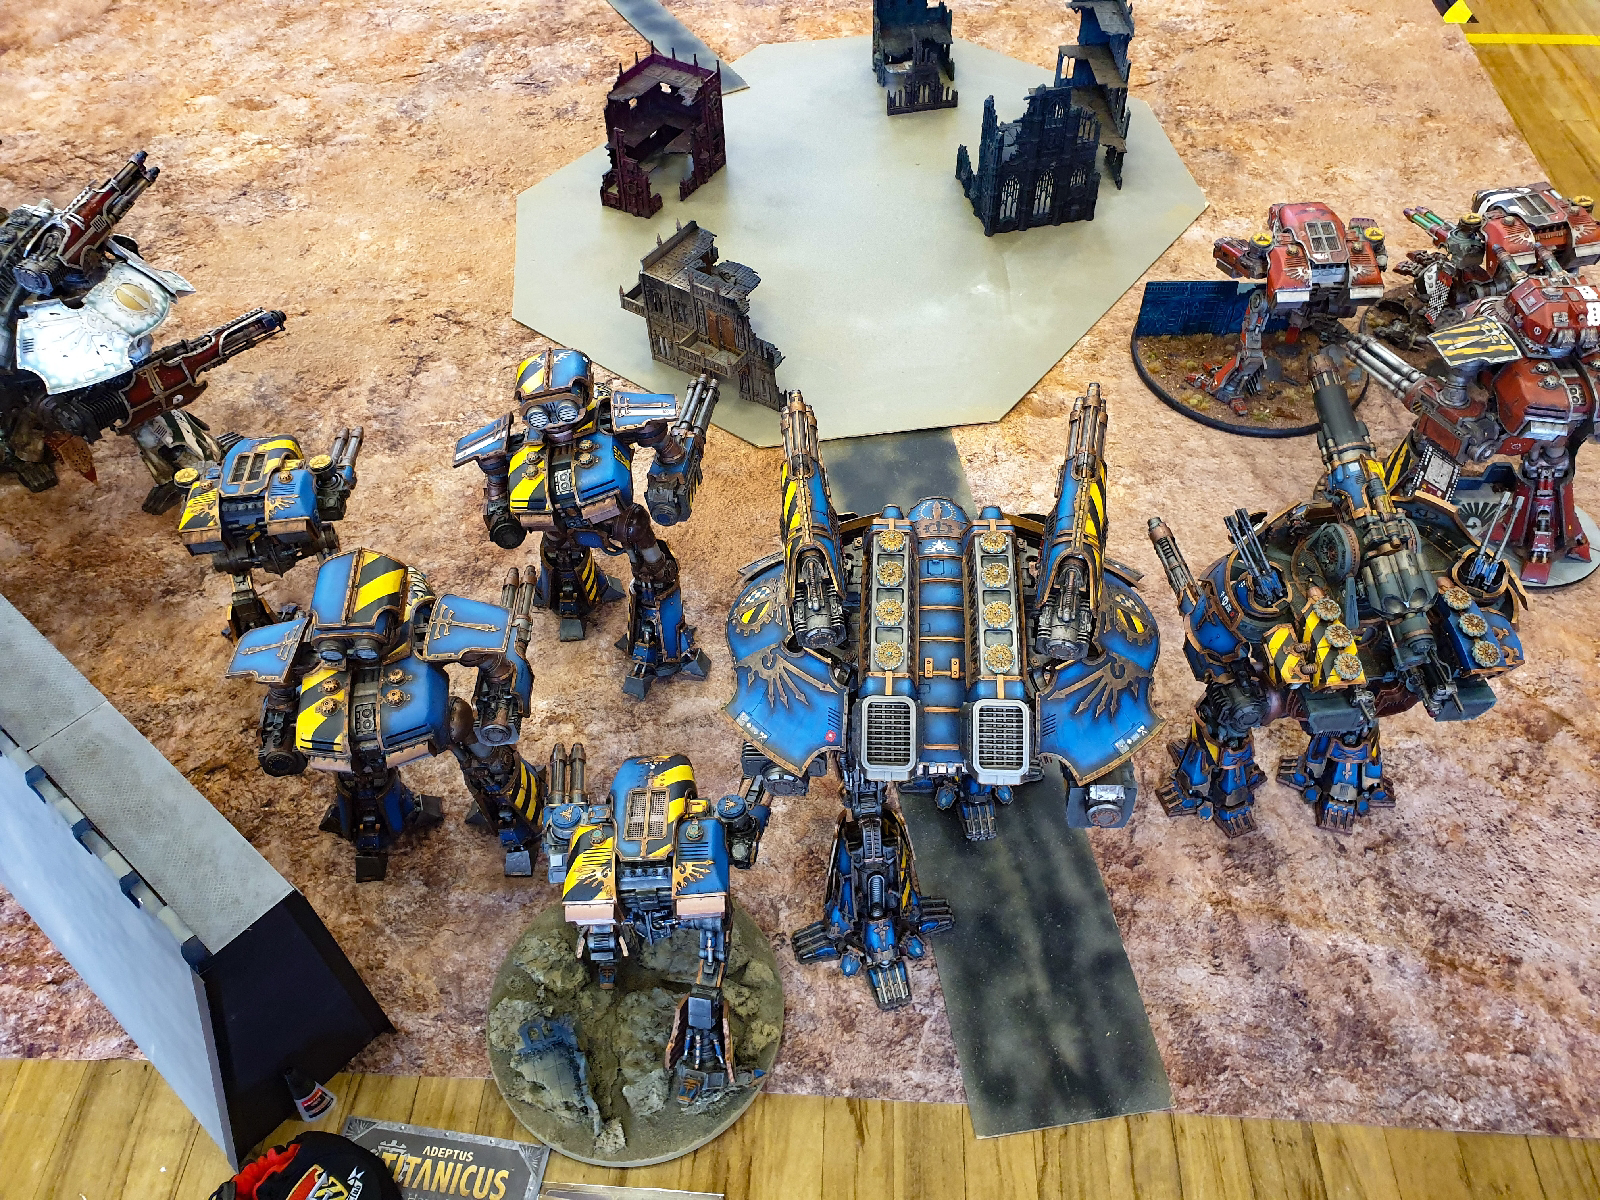
Monolith Of Defiance on display at Warhammer Fest Manchester 2023
Monolith walks!

Legio Victorum, very proud to see my engines involved with the Titan Owners Club and with Warhammer Fest! 
Monolith Of Defiance 
Monolith with my Reaver Vow Of Zealous Fury at Warhammer Fest.
Loved the venue for this walk!
Both my Warlords at Warhammer Fest!

Comments

  1. The blog is looking great Adieh. I too screwed up the hip rings, only with Warlord 2. Nearly messed up 4 too. Glad to see I’m in good company. Might I suggest you add a follower widget. I’d definitely follow and will link from my blog.

    ReplyDelete

Post a Comment

Popular posts from this blog

Sokar Pattern Stormbird - Imperial Fists

Thunderhawk Gunship - Imperial Fists

Titan Prototypes and old rarities